Welcome to the MarkLogic Data Hub tutorial for version 5.2! (If you are looking for for version 5.4 or later, go here.) In this tutorial, you will learn to use the MarkLogic Data Hub platform to integrate data in a fast and agile way to quickly deliver a data service that brings value to the customer.
To understand exactly what is happening in this tutorial and why, let’s first take a look at the recommended approach for tackling this type of data integration project.
Data Services First
The “Data Services First” approach is what we recommend to begin designing and building your MarkLogic Data Hub project. With Data Services First, you start with the business problem that you are trying to solve, and then you work your way backwards.
Let’s start with the MarkLogic Data Hub Platform as an example, represented by this graphic below:
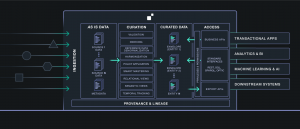
Often when people interpret a graphic like this, they begin processing it by working from left to right. But with Data Services First, you would start from the right and:
- Identify the business problem you’re going to solve. What will bring immediate value?
- From there, figure out the business entities that are related to the problem.
- From those entities, connect that to the sources of data that you’ll need.
This approach is designed to limit the amount of upfront work that you need to do in order to demonstrate business value, which is the key objective of Agile software development.
But in order to actually achieve the promise of Agile, your data layer needs to empower you. This is where the unique technology of the MarkLogic Data Hub platform shines, and what we’re going to demonstrate that using in a simple example.
Let’s start by thinking about our customer and the business problem we need to solve.
The Customer
To be effective in our Data Services First approach, we need to get a better understanding of our customer and the business problems they face. Of course, we select a business problem that, when solved, will be of high value to our customer. Let’s frame that into a user story to describe what we need to build.
Our customer is fictitious company called Sunrise Insurance. Our business users at Sunrise have struggled to get a complete view of a customer because their customer data is trapped in data silos spread across their enterprise.
Let’s consider a really simple example where a Sunrise customer has both a homeowners policy and an automobile policy. That policy data is stored in different systems, with different schemas.
When a Sunrise customer calls in for support, the call center operator has to navigate between systems just to piece together an understanding of that customer and their relationship with Sunrise. Furthermore, the operator needs to manually consider that the data in different systems may vary. For example, in one system the customer name might be “Joe Smith,” but in another system, that customer may be known as “Joseph Smith.”
In one system, the customer data may have been updated recently; while in another system, the customer data is outdated. All this effort costs the call center operator valuable time, introduces room for manual error, and leaves the customer frustrated. This problem only gets more difficult when you consider the many different types of insurance policies Sunrise offers.
To combat these complexities, Sunrise needs to integrate these data silos in order to get a complete view of their customers and power their call center operations.
The User Stories
Let’s imagine that we’ve met with Sunrise Insurance to discuss these challenges, and we’ve determined that it would be of significant business value to deliver them an application that call center operators can use to provide customer support. Based on these conversations, let’s begin by writing up some user stories.

For the purposes of this tutorial, we can describe the following user stories:
- As a call center operator, I need to be able to search by name, email, and postal code, and return a complete view of a customer so that I can provide the customer with support.
- As a call center operator, I need to be able to view only the last 2 digits of the customer pin number, so that I can validate customer identity over the phone and in doing so adhere to data privacy and compliance regulations.
The End Goal
Our objective is to deliver a data service that powers an application that allows for the call center operators to search and locate customer data across all policy types. In this example, we’ll focus on the database tier. We will perform the needed data integration and study an example data service that can deliver this experience, but we won’t focus on any middle-tier or browser-tier development.
Conceptually, the data service we deliver should be able to power a user experience similar to the one shown in the wireframe below: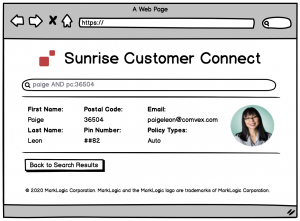
Let’s Get Started!
This tutorial is designed so you can follow along and get hands-on with the MarkLogic Data Hub. To do so you will need to setup a few (free) things on your machine:
- Basic stuff the MarkLogic Data Hub platform will need:
- Java 9 JDK (or later).
- The MarkLogic Data Hub uses Java to run.
- Gradle 4.6 (or later).
- The MarkLogic Data Hub deployment tasks are automated with Gradle.
- Chrome or Firefox.
- The MarkLogic Data Hub has a tool called QuickStart, which is a browser based tool that we’ll use to build our project.
- Java 9 JDK (or later).
- MarkLogic awesomeness:
- MarkLogic Server 9.0-10.3 (or later).
- The MarkLogic Data Hub platform runs on the MarkLogic database.
- You’ll need to get it installed and initialized. Check out these resources to learn how:
- MarkLogic Data Hub 5.2 QuickStart *.war file
- We’ll use Java to run this *.war file in order to access the QuickStart interface that we’ll use to build our hub.
- MarkLogic Server 9.0-10.3 (or later).
- Tutorial specific goodies:
- Download the sample data and code that we’ll use in this tutorial.
- Unzip this folder somewhere on your local machine.
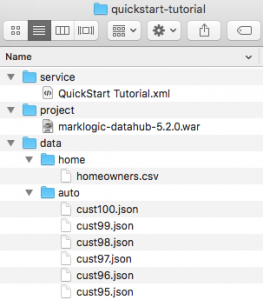
- Once you’ve unzipped it, drop the *.war file into the /quickstart-tutorial/project/ directory.
- Once you are set up, the local folder should be structured as shown:
Now that you’ve got your local environment setup, let’s begin the tutorial.
Create a Project
We’ll begin by running the QuickStart and creating a new project.
- Open the Terminal (Linux / Mac) or Command prompt (Windows).
- Navigate into your
/quickstart-tutorial/project/directory based on where initially you set things up. For example, on my local machine that looks like: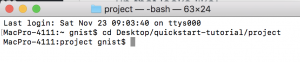
- From your
/project/ directory, launch the QuickStart by keying in the following command:java -jar marklogic-datahub*.war

- Once launched, you should see the following:

- Open your browser (Firefox or Chrome) and go to
http://localhost:8080 - You should see the following:
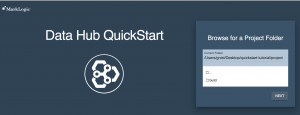
- Click the NEXT button.
- Click the INITIALIZE button.
- Initialization creates the baseline hub configuration for your project on the file system. It is this configuration that gets built out as you configure your hub using the QuickStart tool, and it is this configuration that you can deploy to different environments and to the cloud using the MarkLogic Data Hub Service. In essence, the QuickStart tool is meant to help accelerate your ability to build out your data hub configuration; the QuickStart is not your actual data hub. In fact, once you get comfortable with what you are doing, you might even decide to simply open the project configuration and manage it directly in your IDE. But in this example, we are assuming that you are just getting started so we will use the QuickStart. When the project initialization is complete you should see the following message:
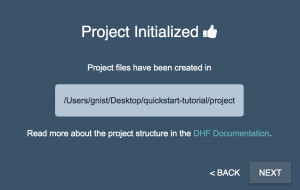
- Click the NEXT button.
- You’ll now be asked to choose your project environment. In this tutorial we are in development mode and will only have one environment, your local computer. Keep the default setting of LOCAL and then click NEXT.
- In order to develop your MarkLogic Data Hub, you must authenticate as a user with appropriate permissions. When installing and initializing MarkLogic, you are required to create a MarkLogic admin user. You do not need to be a MarkLogic admin user in order to develop a MarkLogic Data Hub. If this is your first time using MarkLogic, it is likely that the admin user you created at install time is the only user that is available. So right now, we’ll just keep it simple and act as that admin user. As you continue down the MarkLogic Developer Learning Track, you will learn how to implement a realistic security model. For our purposes, please login with the MarkLogic admin user credentials that you created when you installed MarkLogic on your local machine.
- Once you’ve entered your credentials, click the LOGIN button.
- Click the INSTALL button.
- The installation will create all the necessary resources for your MarkLogic Data Hub. Under the covers, this installation is using ml-gradle to automate the deployment. When completed, you will see the following:
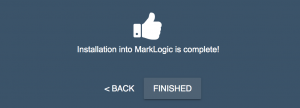
- Click the FINISHED button. You will see the baseline of your MarkLogic Data Hub as shown in the QuickStart Dashboard:
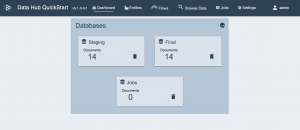
Let’s pause for a moment to think about what we’ve done so far, and think about where we are heading next.
We’ve created our MarkLogic Data Hub. It is defined in the project configuration on our local filesystem and the resources associated with it have been set up and configured on the MarkLogic server instance running on our local machine.
But all we have so far is the baseline configuration. What we now need to do is ingest the data sources that are going to be needed in order to deliver the data service that our customer wants, as described in our user stories.
Ingest
The MarkLogic Data Hub is built to be flexible. You don’t need to do a bunch of upfront data modeling work. Simply load data as-is into your hub and begin discovering and using that data.
That’s not to say that modeling isn’t important…it definitely is!
But with MarkLogic, the model gets added in short bursts as you go through development sprints. The flexibility that MarkLogic provides to load data as-is and curate it over time reduces the time that it takes to deliver something of value to your customer.
So let’s start by loading the home and auto insurance data that we’ll use in this example. To do so, we’ll configure and run a flow. A flow is a pipeline that will process our data. A flow is made up of steps. Each step in a flow is a batch of transactions that does something meaningful with our data, based on our configuration of that step.
So to get started, we’ll create a flow with an ingestion step for each data source, and then we’ll run that flow to bring the data into our hub.
- From the Data Hub QuickStart, choose Flows:

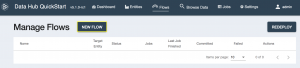
- From the Manage Flows screen, select NEW FLOW:
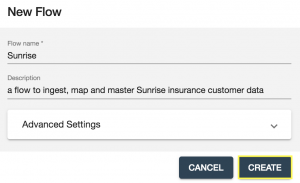
- Configure the flow as shown and the click the CREATE button:
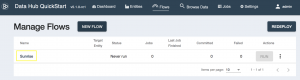
- Click your newly created Sunrise flow:
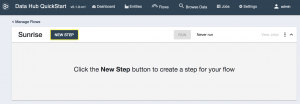
- Click New Step:
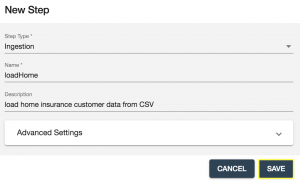
- Select Ingestion as the step type, configure it as shown (leave the advanced settings with the defaults) and then click the SAVE button:
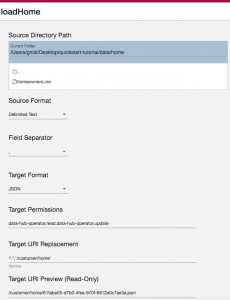
- Next we’ll configure the loadHome ingestion step.
- Set the Source Directory Path to point to the
/quickstart-tutorial/data/home/directory on your local machine. - Set the Source Format to Delimited Text.
- Set the Field Separator to the comma (,) character.
- Leave the Target Format as the default (JSON).
- Leave the Target Permissions as the default.
- Set the Target URI Replacement setting to
^.*,'/customer/home'. A URI is a unique identifier for a document in the database. If we just left the settings as the defaults, the path information of the original data would be included in the URI, which would likely be long and messy. This regular expression match and replace will clean it up. You can use the “URI Preview” section to see the effect of this input/parameter. You may have to leave focus from the input field for the change to take effect. - Your step configuration should appear as shown:
- Next we’ll run the flow.
- From the Sunrise flow configuration screen click the RUN button:

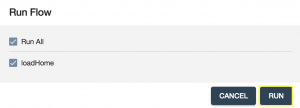
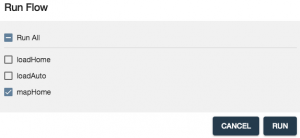
- On the Run Flow interface choose the loadHome step and then click RUN:
- When the step completes, select BROWSE DATA from the QuickStart menu:

- View the Staging database and note that you now have 100 documents in a collection named loadHome. This is because documents are organized into a collection named after the step.
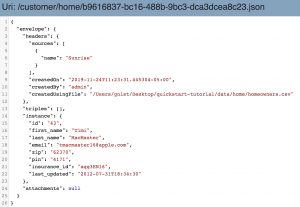
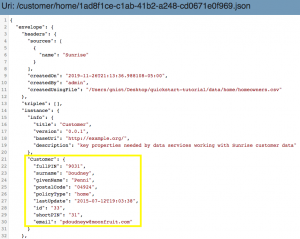
- Each row in the original CSV file is now a JSON document in the database. Select one of the documents to see the contents. Note that the provenance (origin) of the data is automatically tracked and that the data has been wrapped in an envelope:
- Now that we have loaded the home insurance data, we are going to add a second ingestion step to the Sunrise flow and configure it to load the auto insurance data.
- From the QuickStart menu choose Flows:
- Click the Sunrise flow.
- Click the NEW STEP button.
- Add a new ingestion step to the Sunrise flow, configured as shown, and then click SAVE:
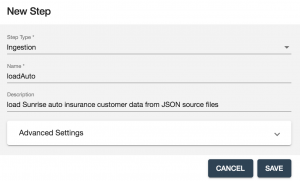
- Next we’ll configure the loadAuto ingestion step.
- Set the Source Directory Path to point to the
/quickstart-tutorial/data/auto/directory on your local machine. - Leave the Source Format as JSON.
- Leave the Target Format as JSON.
- Leave the Target Permissions as the default.
- Set the Target URI Replacement setting to
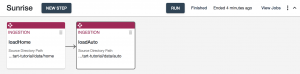
^.*/auto,'/customer/auto' - Your step configuration should appear as shown:

- From the Sunrise flow configuration screen click the RUN button:
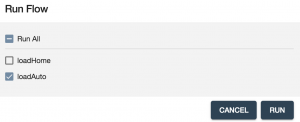
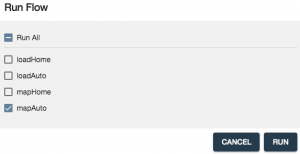
- On the Run Flow interface choose only the loadAuto step (we’ve already loaded the home data) and then click RUN:
- When the step completes, select BROWSE DATA from the QuickStart menu:
- View the Staging database. Note that you now have 100 documents in a collection named loadAuto.
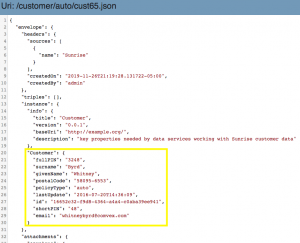
- Select one of the documents in the loadAuto collection to see the contents:
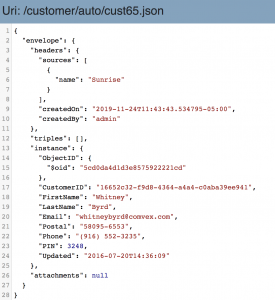
Now we’ve loaded our data from the original sources into our staging database. For simplicity, and to enable you to easily follow along on your own machine, we loaded data from our file system. Keep in mind that in a real world project, data can come directly from many different systems into the MarkLogic Data Hub using data orchestration tools like Apache NiFi and Mulesoft. As you go deeper in your MarkLogic Developer learning track, you will get a chance to do those types of things.
But for now, take a minute to compare the home and auto customer data that we loaded from the file system into our data hub. Note that both data sets are about the same general business object — a customer. They also have some similar properties, such as the customer’s name. However, the schema of each source is different. For example, the auto data contains the customer first name in a property called FirstName, while the home data contains the customer first name in a property called first_name.
In our next step, we will work to curate the raw data into a model that will let us deliver the data service that our customer needs across all shapes of customer data.
Curate: What is it?
The process of data curation is done in order to model the data in order to get it into a shape that can power the data services you are going to deliver. Curation makes your data better– better suited to deliver the data service your customer needs.
Curation starts with creating entities and defining the key data properties that your data services will need to consume. From there, you may take the many different shapes of data that you have loaded from various systems and map key properties to that entity configuration. You might also have requirements that require you to enrich the data by iteratively processing, identifying, and tagging references within the data, as well as transforming properties, modeling relationships between entities using triples, or mastering your data to match and merge duplicates.
Now let’s think about how we’re going to curate our data for the example project in this tutorial.
Our user stories and wireframe tell us that our data services will need to be able to work with data like the customer name, email, postal code, policy type, and the last two digits of their PIN. We also need to generate a single view of the customer, so if a customer occurs across multiple systems or policy types, we will want to match and merge those customer documents together in order to deliver on the business objective of a unified, complete view of the customer.
At a high-level, here is what we need to do:
- Create an entity with a model for these key properties of data.
- Configure mapping steps to map our sources of data to the entity model, and transform data if needed to help us meet the requirements.
- Configure Smart Mastering in order to match and merge duplicate customers into a single source.
Let’s get started!
Curate: Create an Entity
For this tutorial, our project is purposefully designed to be simple with a single entity: a customer. Let’s create and configure that entity.
- From the QuickStart menu choose Entities:

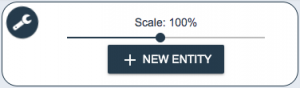
- Click the wrench icon and then select NEW ENTITY:
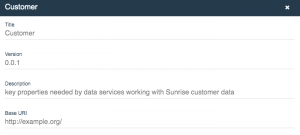
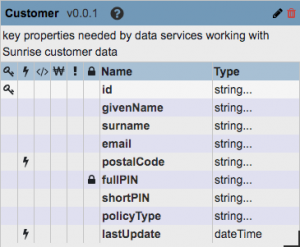
- Set the Title of the entity to Customer and give it a description:
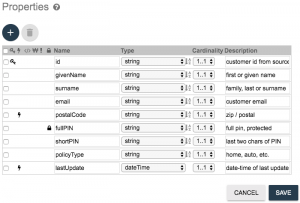
- Add properties and configure them exactly as shown in the screenshot below. Note that you will need to select the primary key icon (it looks like a key) for the customerID property. Having a property defined as a primary key will be helpful later on when we use the Data Hub Explorer tool. Also note that we are selecting the element range index icon (it looks like a lightning bolt) on the postalCode property and the lastUpdate property. This will allow us to configure a dedicated search grammar for our business users to query against postal code data as described in the user story, and we’ll use the date and time of the last update as part of our logic to govern how we merge duplicate customer data when we configure mastering later in this tutorial. And lastly, note that you will select the personally identifiable information icon (it looks like a lock) for the fullPIN property. This will require users to have a specific role called pii-reader in order to be able to read the full pin data. When finished configuring the properties, click the SAVE button:
- When prompted to update indexes choose YES:
- You should now see your entity configuration, which you can move around, resize, or edit as needed:
Curate: Mapping
Now that we’ve created and configured our Customer entity, the next step is to map each of our data sources to our entity definition. To do so, we will add mapping steps to our Sunrise flow.
- From the QuickStart menu, choose Flows:
- On the Manage Flows screen, select your Sunrise flow.
- Click the NEW STEP button.
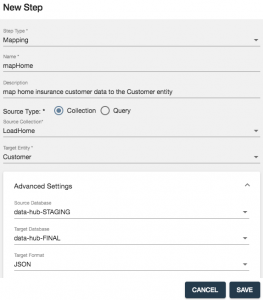
- Configure the step as shown in the screenshot below and then click the SAVE button. Take note of the collection scope and default settings when you expand the Advanced settings in the UI. We are telling this step to process all the documents in the staging database (i.e., source database) that are in the collection called loadHome (which is all the documents that were loaded earlier when we ran the loadHome step). These documents will be processed, mapped based on the configuration that we will define next, and then written to the final database (i.e., the target database).
- Select the mapHome step in order to configure it. Note that if needed, you can click and drag the step to a different position in the flow. This might be useful if you intend to run an entire flow from start to finish, and you want the steps to process in a specific order. For our project, it doesn’t really matter as we will be running each step in our flow independently.
- When configuring a mapping step, a sample document in the source collection being processed will automatically be selected. You could change this sample by entering a different document URI in the source data configuration option. For our example, the default source sample document will work well.
- What we need to do is define the XPath expression setting for each property in our entity configuration. You can use the property picker icon to select from the properties in the source and map them to the property defined in the entity:

- You can use the function picker icon to use pre-built functions that enable you to transform data properties from the source as they are mapped to the entity:

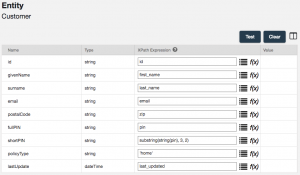
- Work to configure the mapping step as shown in the screenshot below. Note that the policyType is being hard-coded as ‘home‘, and the last two digits of the pin are derived by applying the substring function: substring(string(pin), 3, 2). All other mappings are simply property-to-property mappings:
- Click the TEST button to validate your mapping results based on the sample.
- Scroll up to the top of the QuickStart screen, or navigate back the the Manage Flows screen, for your Sunrise flow, and then click the RUN button.
- Select only the mapHome step, and click RUN:
- Now we need to validate the results. From the QuickStart menu choose Browse Data:
- Change staging to final:

- Note that in the final database, there is a collection called Customer (which is named after our entity). Select a document in the Customer collection to view the results of your mapping step. You will see the instance section of the envelope has a property called Customer containing all the mapped data. It’s this curated data that our data services will be programmed to use:
- We’ve now mapped the data for home insurance customers into a form that would let us meet our data services requirements. Next we need to map the auto insurance customer data to that same entity definition.
- From the QuickStart menu, choose Flows:
- On the Manage Flows screen, select your Sunrise flow.
- Click the NEW STEP button.
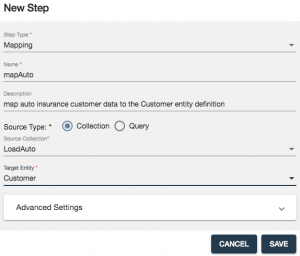
- Configure the step as shown in the screenshot below and then click the SAVE button.
- Select the mapAuto step in order to configure it.
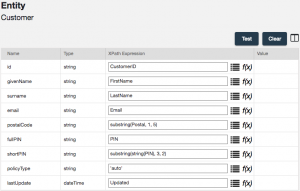
- Configure the mapping as shown in the screenshot below:
- Click the TEST button to validate your mapping results based on the sample.
- Scroll up to the top of the QuickStart screen, or navigate back the the Manage Flows screen for your Sunrise flow, and then click the RUN button.
- Select only the mapAuto step and then click RUN:
- Now we need to validate the results. From the QuickStart menu, choose Browse Data:
- Change your selection from staging to final:
- Select one of the auto documents in the Customer collection to view the results of the mapping step:
Now that we’ve mapped our different sources (with their different schemas) of customer data to the entity model that we defined, we are much closer to being able to deliver the data services that will power the application our customer needs.
Next, we’ll need to take steps to ensure our business user, the call center operator, is delivered a singular, complete 360-degree view of the customer.
Curate: Mastering
Think about the situations where we may have duplicate customer data. It is possible for the same customer to have both a home and auto policy with Sunrise. Where that is the case, the customer would currently be in our data hub twice (and potentially more if we were to integrate more sources of customer data).
But we can address this and deliver the integrated customer view that our business user needs because the MarkLogic Data Hub platform provides Smart Mastering capabilities. Smart Mastering makes it easy for us to analyze data and automatically match and merge based on logic and the rules that we configure.
To implement Smart Mastering, we’ll add matching and merging steps to our flow and set up some rules to find the customers with both home and auto policies, and merge those into a single document. We’ll configure the merging of data to take into account when the data was last updated, giving priority to the more recent data. This last bit of data curation will enable us to deliver the data services that meet the requirements defined in our user stories.
- From the QuickStart menu, choose Flows:
- On the Manage Flows screen, select your Sunrise flow.
- Click the NEW STEP button.
- Configure the step as shown in the screenshot below and then click the SAVE button. Note that we are going to run this step against the final database and process all the documents in the Customer collection. The customer collection contains both our mapped home and auto customer data.
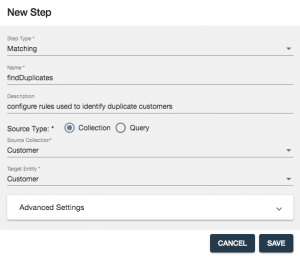
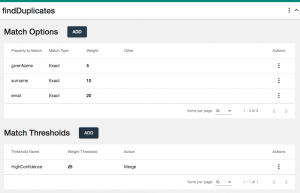
- Next we’ll configure the findDuplicates step with Match Options and Match Thresholds. Match Options define the things we want to look for in the data that, when matched, might indicate a duplicate. For example, if the email property is exactly the same between two documents, that might indicate that the documents represent the same customer. We can also configure matching that is intelligent but more flexible than a simple exact match. For example, analyze the givenName property between two documents to determine if it is a match based on synonyms defined in a thesaurus. This could enable a document containing a givenName of “Joe” and a document containing a givenName of “Joseph” to be seen as a match. There are a lot of powerful ways, including custom programmed logic, that you can define what to look for in a match. Each match option will also be assigned a weight. Weights allow you to differentiate between match criteria, because some options likely will be more solid indicators of a match than others. Once your match options are defined, then you will define Match Thresholds. Match Thresholds analyze all the “hits” that we’ve found based on the defined match options and the total score of those options. Depending on the strength of the overall match score, we may take different actions. For example, in our project, if the score is above a certain value, our action will be to automatically merge the documents because we are confident they represent the same customer. Another example of an action is to notify. This is useful if there are some indicators of a match but you’re just not sure. The notify action will put the data into a collection which could then be manually processed by a user through a queue that could be built into an application.
- Add Match Options and Match Thresholds to create the following configuration:
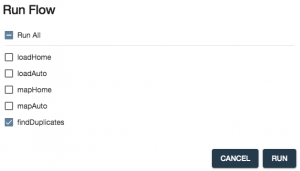
- Scroll up to the top of the QuickStart screen, or navigate back the the Manage Flows screen for your Sunrise flow, and then click the RUN button.
- Select only the findDuplicates step and click RUN:
- Now let’s study the results. From the QuickStart menu, choose Browse Data:
- Change your selection from staging to final:
- Note that several new collections related to the matching step that now exists in our final database:
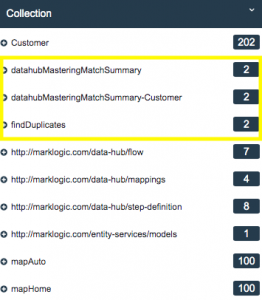
- Click on the findDuplicates collection facet to see the documents that resulted from this step:
- Study each of the match summary JSON documents, noting that these documents are now part of the Customer collection.
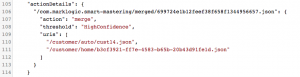
- Study the actionDetails property of these documents specifically:
- For reference, and to validate results later on, the customers who were matched are Barbara Gates and Brit McClaren.
- The matching step has done the analysis and tracked what needs to be done, but the action has not yet been taken.
- Now, we need to add a merging step to our flow in order for the action to be completed.
- From the QuickStart menu choose Flows:
- On the Manage Flows screen select your Sunrise flow.
- Click the NEW STEP button.
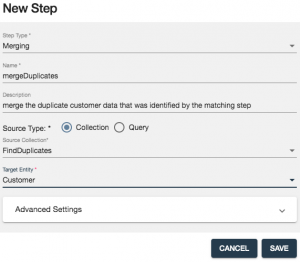
- Configure the step as shown in the screenshot below and then click the SAVE button. Note that we want to process the findDuplicates collection of documents, which contains the match summary documents that resulted from the prior matching step.
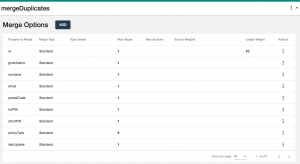
- A merging step has configuration that enables you to control how the data will be merged. For our project, we are going to create merge options that will result in the retention of a single value for each of the properties in our entity definition, except for the policyType property. Retaining a single value is a requirement for a property that is defined in the entity as a primary key, such as our id property. But for the other properties, if desired, you could merge and retain all the representations of the data property and it would be modeled as an array. But we have the lastUpdate property in our data, and we are going to use that in our configuration to logically say that we want to retain the more recent data about that customer. But for policyType we want to retain all values (let’s say up to 5), so our business user knows all of the policies the customer has with Sunrise.
- Select the mergeDuplicates step to configure it.
- Add merge options to create the exact configuration shown below:
- No configuration is needed for Merge Strategies.
- Configure the Timestamp Path to be /envelope/instance/Customer/lastUpdate as shown and click SAVE:

- Scroll up to the top of the QuickStart screen, or navigate back the the Manage Flows screen for your Sunrise flow, and then click the RUN button.
- Select only the mergeDuplicates step and click RUN:

- Now let’s study the results. From the QuickStart menu choose Browse Data:
- Change your selection from staging to final:
- Notice the collections that resulted from the merging step:
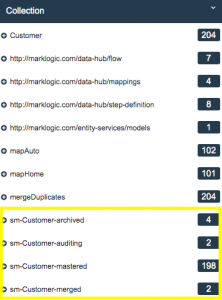
- It’s important to note that the merging step is not destructive: no data was lost. Remember we started with 200 customers. Barbara Gates and Brit McClaren met our defined matching criteria and were then merged. The 2 documents about Barbara merged into 1 and the 2 documents about Brit merged into 1. That is why the sm-Customer-mastered collection now has 198 documents. It’s important to note that the original data didn’t go away. Those 4 documents are retained in the sm-Customer-archived collection. The sm-Customer-merged collection is there if we want to only look at the documents that were merged. And the sm-Customer-auditing collection tracks lineage for data governance.
- Explore the data in the sm-Customer-merged collection to see the results of the merge. For example, this is the curated customer data we now have for Brit McClaren:
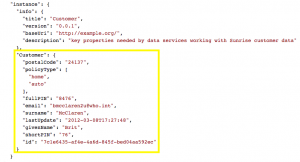
- Explore the data in the sm-Customer-mastered collection, and note that this collection contains all the curated customer data, so this is the collection of data that our data services will be programmed to consume.
Now that we have mastered our data, the curation process for our current sprint and data services requirements is complete. The next step is to build the data service that would access data from the hub in order to power the application that our business user needs.
Access
MarkLogic provides many interfaces for developers to access and use the data in the data hub, including Java, Node.js, REST, JavaScript and XQuery.

A common (but not the required or only) technology stack that businesses use for MarkLogic projects is a data tier consisting of the MarkLogic Data Hub and Data Services written in JavaScript. This approach enables an IT organization to have a few MarkLogic developers on the team who get trained and become MarkLogic experts. These developers build the hub, create the flows, and program the data services that access data from the hub. This approach then enables an IT organization to leverage the MarkLogic Data Hub through the many middle tier application developers they likely have in house, who program in whatever middle tier language they (or the IT organization) prefers.
As you progress down the MarkLogic Developer learning track, you will learn more about how to use the JavaScript APIs to program, deploy and test data services using the MarkLogic Data Hub platform. For now, let’s focus on a simple example that proves we can deliver the needed data from our hub to meet the requirements described in our user stories and to power the application described in the wireframe previously.
To do this simple proof, we’ll use Query Console— a tool MarkLogic provides for writing and running ad hoc queries against a database.
- Open Query Console by opening a new browse tab and navigating to http://localhost::8000.
- To keep it simple for now, login with your MarkLogic admin user. Again, note that that you don’t need to be an admin user, and as you complete more training you will learn how to set up a proper security model for a project.
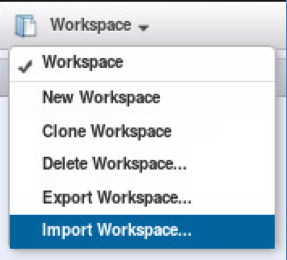
- Import a workspace by selecting the down arrow on the upper-right and selecting Import Workspace.
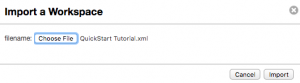
- Browse out to your
/quickstart-tutorial/service/directory and select theQuickStart Tutorial.xmlfile. - Click the Import button to bring the workspace into Query Console:
- Look at the tab in the workspace titled Customer Search and make sure the Database is set to the final database for your hub:
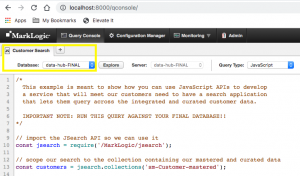
- Study the comments and code, and then click the run button to see the results:

- Study the JSON response and note that all the data needed to deliver the desired user experience is present:
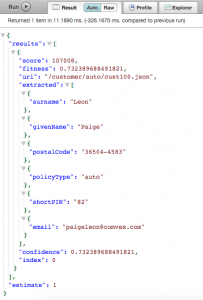
This proves that we can use the curated data in our Data Hub and JavaScript APIs to develop the data service that our customer needs. The next logical step would be to think about deploying our data hub and data service so that it can be used to power applications.
Deploy
Now that you’ve built your MarkLogic Data Hub, you have flexible options regarding where to deploy it— whether that’s on premise in a local data center, or more likely (as so many organizations do today) in the cloud (any cloud).
And the MarkLogic Data Hub Service makes it easier than ever to deploy in the cloud. No infrastructure to purchase or manage means you can scale up or down as needed and focus your efforts on what you do best: developing and delivering innovative services and applications.
This tutorial isn’t going to walk you through deploying your data hub to the cloud with MarkLogic Data Hub Service, but we do have some helpful resources if you would like to learn how:
Documentation | Tutorial | Training Course
Review
Congratulations on completing this tutorial! Let’s take a moment to reflect on what we have learned.
We started with discussing the overall approach to building a MarkLogic Data Hub by focusing on Data Services First. With this approach, we figured out what would deliver real business value and framed that into user stories. From there, we worked backwards to determine the entities and then the data sources that we’d need to deliver the data service from our requirements and user stories
We then built our hub and began creating a flow. We started by adding ingestion steps to bring in only the data that we needed to deliver the data service. We saw that data ingestion was fast and easy– we didn’t need to define a schema up front.
Then we began to curate our data. We defined an entity, and mapped the different sources of data to the entity, and generated a consistent view of the data that our data service would need.
Next, we mastered our data. This enabled us to match and merge duplicates according to business rules that we defined. The end result of the mastering was that we now had curated data that provided an integrated and complete view of our customer to power the data service that our business user needs.
To refresh our memory, the final flow looks like this:

Once the data was curated to our liking, we explored the ability to access data from the hub using JavaScript APIs, proving that the data integration and curation we performed would in fact be able to successfully meet the requirements described in our user stories.
And finally, we discussed at a very high level some of the different options available for you once you are ready to deploy your MarkLogic Data Hub and Data Services to production.
But this is only the start of your journey with the MarkLogic Data Hub platform!
What’s Next?
There is still a lot to learn.
And the good news is we’ve got more (FREE!) resources to help you go deeper with the MarkLogic Data Hub platform. You’ll get a chance to build more complex projects and explore MarkLogic at a deeper technical level to help prepare you for the work that you will do with MarkLogic.
Start by checking out our role-based learning tracks. Or, explore the product, browse blogs, look at tools, watch or read tutorials and more by getting involved with our MarkLogic Community. And of course don’t forget to keep the general product documentation and Data Hub documentation close by as you continue to work with MarkLogic.
Thanks for your time and happy hubbing!