MarkLogic is an enterprise-class NoSQL database that includes a REST enabled full-text search feature.. You can use it to store, search, and query massive amounts of data, represented as documents having various formats. MarkLogic exposes its core functionality through a Java API, allowing you to write applications in pure Java.
The Java API makes use of a powerful underlying REST API for communicating with MarkLogic Server. This tutorial will walk you through a series of HOWTOs for working with MarkLogic exclusively through its Java API, using a series of sample apps that illustrate the use cases.
Setup
Install MarkLogic
Download and install the latest version of MarkLogic. Once you’ve installed and started up MarkLogic, go to the browser-based administrative interface (at http://localhost:8001/), where you’ll be walked through the process of getting a Developer License, as well as setting up an admin user. (This tutorial assumes you’ll be running MarkLogic on your local machine; if that’s not the case, just substitute your server name whenever you see “localhost” in this tutorial.)
If you need more detailed instructions on installing and running MarkLogic, see Installing MarkLogic Server.
Set up the tutorial project
Next, download the tutorial project: java-api-tutorial-start.zip. Unzip the file into a directory of your choice on your machine.
The tutorial files have been packaged as an ml-gradle project and can be opened in any integrated development environment (IDE). More information about the gradle tasks and project layout is available in the ml-gradle github wiki.
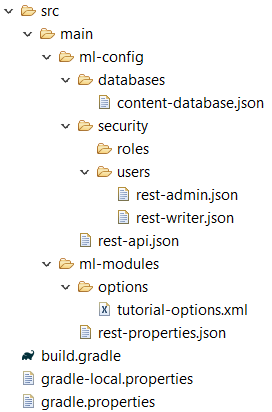
Let’s take a quick glance at the current project structure:
Configure a REST app server
A gradle project can easily configure an app server that supports the MarkLogic REST API by simply configuring a JSON file located at the folder `src/main/ml-config`. This configuration file can be named anything as long as the content contains the following:
{
  "rest-api": {
    "name": "%%mlAppName%%",
    "database": "%%mlAppName%%-content",
    "modules-database": "%%mlAppName%%-modules",
    "port": "%%mlRestPort%%",
    "xdbc-enabled": true,
    "forests-per-host": "%%mlContentForestsPerHost%%",
    "error-format": "compatible"
  }
}
This configuration will create an app server with the MarkLogic REST API rewriter being used, while creating a separate content and modules database to be used by that app server. The values in between `%%` are replaced with the corresponding values for those keys in gradle.properties and/or gradle-local.properties. More information about this is available in the ml-gradle github wiki.
Configure users
MarkLogic has a powerful and flexible security system. Before you can run the Java examples, you’ll first need to create a user with the appropriate execute privileges. While you can use the “admin” user (which has no security restrictions), you should create two users to follow best practice:
- one with the “rest-writer” role, and
- one with the “rest-admin” role.
(While there is also a “rest-reader” role available, which provides read-only access to the REST API, we won’t be using that.)
Use the `src/main/ml-config/security/users` folder to configure the users. However, avoid including these configurations in your source repository, as this includes the password in plain text. Sample configuration below:
{
  "user-name" : "rest-writer",
  "password" : "x",
  "role" : [ "rest-writer" ]
}
Deploy configuration
Now that the project has been configured, Let’s proceed with the deployment of these configurations to our MarkLogic instance. Run the following command at the project root directory: gradle mlDeploy
You should see something like the following:
c:\path\to\java-api-tutorial >gradle mlDeploy
> Task :mlDeleteModuleTimestampsFile
Module timestamps file C:\path\to\java-api-tutorial-gradle\build\ml-javaclient-util\module-timestamps.properties does not exist, so not deleting
BUILD SUCCESSFUL in 38s
3 actionable tasks: 3 executed
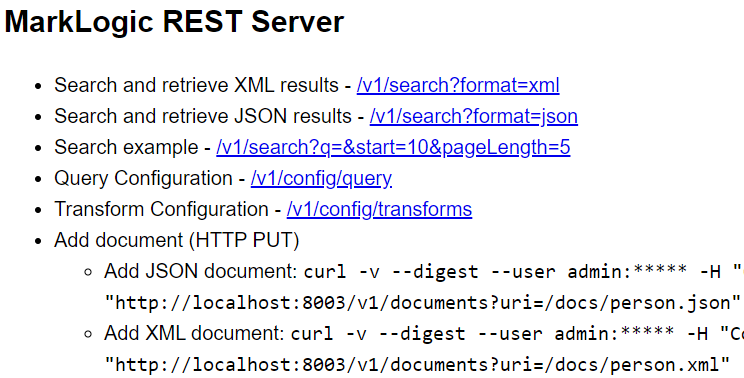
Confirm your app server by loading http://localhost:8011/; you will see:
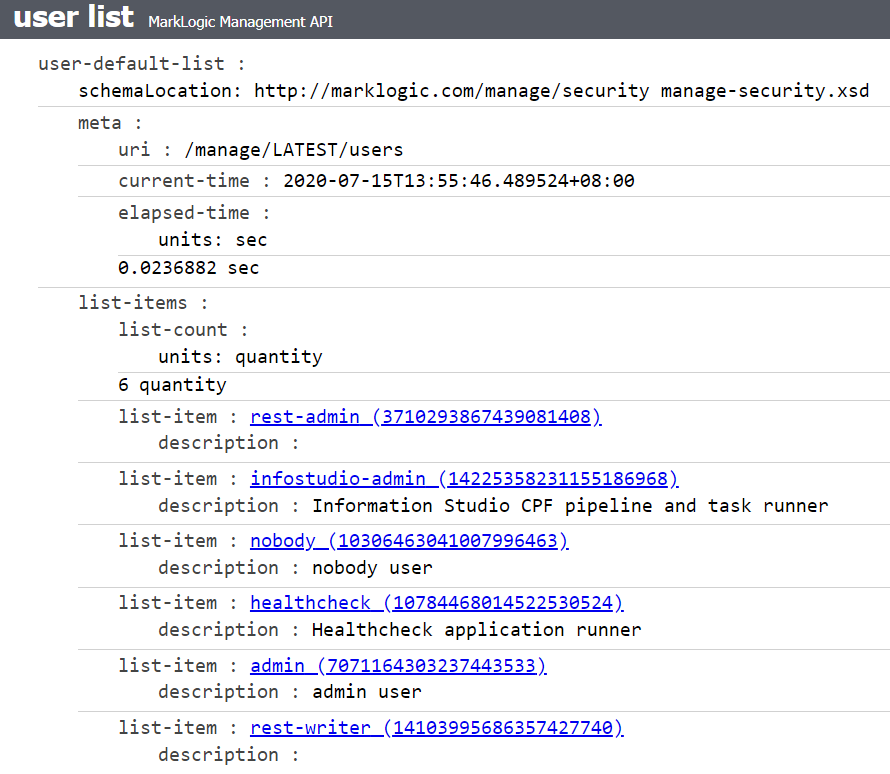
Confirm your users by loading http://localhost:8002/manage/LATEST/users:
MarkLogic Basics
The basic unit of organization in MarkLogic is the document. Documents can occur in one of four formats:
- XML
- JSON
- text
- binary
Each document is identified by a URI, such as “/example/foo.json” or “bar.xml” or “baz”, which is unique within the database. The suffix does not affect, nor reflect, the content of the document, but is often used for readability.
Organizing Documents
Documents can be grouped into directories via URI. For example, the document with the URI “/docs/plays/hamlet.xml” resides in the “/docs/plays/” directory. As with files on a filesystem, a document can only belong to one directory. It is important to note that this “directory” is not present in the actual filesystem.
Documents can also be grouped (independently of their URI) into collections. A collection is essentially a tag (string) associated with the document. A document can have any number of collection tags associated with it.
MarkLogic does not require any specific document structures. It is not necessary to provide a document schema of any sort, but you could enforced one, if desired. Comparing MarkLogic to an RDBMS, the one general guideline to keep in mind is that documents are like rows. In other words, since documents are the basic unit of retrieval, it’s better to have a large number of small documents than it is to have a small number of large documents that act as an aggregate of different documents.
The Java API provides CRUD capabilities (Create, Read, Update, Delete) on documents and also lets you perform tasks relating to search, query, and analytics. Search and query are about finding documents. Analytics is about retrieving values from across many documents and optionally performing aggregate calculations on those values. Where MarkLogic really shines is in the combination of search and analytics, providing such things as faceted navigation across your data.
We’ll look at examples of each of these as we go along. We would be using a mix of Java classes, gradle tasks and cURL commands for this tutorial. Windows users may opt to use Cygwin to make sure the cURL commands run as-is. Note that the Java Client API will require Java 1.9 or higher to compile and run. While you can use any IDE to run the main classes, we will use a pre-defined gradle task:
Windows: gradlew.bat runDemo -Ptarget=<className>
Linux/Mac: ./gradlew runDemo -Ptarget=<className>
You may have to apply chmod +x to the gradlew file or do sh gradlew instead. For this tutorial, we will use the shorthand gradle; if necessary, please replace with gradlew.bat or ./gradlew, accordingly.
The first step to interacting with a MarkLogic database is to create an instance of the DatabaseClient class. Created a MarkLogicUtility class to create this for us.
public class MarkLogicUtility {

    public static DatabaseClient getDatabaseClient(String username, String password) {
        DatabaseClientFactory.SecurityContext auth = Config.
authType
.equalsIgnoreCase("basic")
            ? new DatabaseClientFactory.BasicAuthContext(username, password)
            : new DatabaseClientFactory.DigestAuthContext(username, password);

        DatabaseClient client = DatabaseClientFactory.
newClient
(Config.
host
, Config.
port
, auth);
        return client;
    }
    ...
}
Notice the arguments passed to the factory method. As seen in the online javadoc for the newClient() method, these correspond to:
host— the host with the REST serverport— the port for the REST serversecurity context— built using the credentials and along with the http authentication method to be used
For all of the sample apps in the project you downloaded, these parameters are configured using the Config.properties file:
# properties to configure the examples
example.writer_user=rest-writer
example.writer_password=x
example.admin_user=rest-admin
example.admin_password=x
example.host=localhost
example.port=8011
example.authentication_type=digest
Once you’re done interacting with MarkLogic, you should always release the DatabaseClient:
// release the client
client.release();
CRUD
To manage documents, use an instance `DocumentManager` created via instance of DatabaseClient, i.e. ` client.newDocumentManager()`.
| Task | Method |
| Create and update document and metadata | write |
| Read document | read |
| Delete document and metadata | delete |
| Partial update | patch |
| Read metadata | readMetadata |
| Update metadata | writeMetadata |
Create a JSON document
Let’s get started by loading a JSON document into the database. CreateOrUpdateJSONDocument.java provides an example of how you could load a simple JSON document into the database at the URI /example/recipe.json:
// create a manager for documents
DocumentManager manager = client.newDocumentManager();

// create a JSON example
/*
{
  "recipe": "Apple pie",
  "fromScratch": true,
  "ingredients": "The Universe"
}
 */
JsonObject recipe = new JsonObject();
recipe.addProperty("name", "Apple pie");
recipe.addProperty("fromScratch", true);
recipe.addProperty("ingredients", "The Universe");

JsonObject document = new JsonObject();
document.add("recipe", recipe);

// create the handle for our sample Document
GSONHandle handle = new GSONHandle(document);

// write our document with a specific URI
manager.write("/example/recipe.json", handle);
Re-running this application will trigger an update of the document of the same URI.
Read a JSON document
To prove that the document has been loaded, open and run ReadJSONDocument.java.
Create an XML document
CreateOrUpdateXMLDocument.java behaves in a similar fashion to the JSON version, but uses a handle specific for XML. The write function uses `PUT /v1/documents`. Since PUT commands are idempotent, the result of running the command more than once is the same as if you had only run it once.
Read an XML document
ReadXMLDocument.java is an example of how to read your XML document from MarkLogic.
Read different documents
ReadMixedDocument.java shows how you can detect the type of document you received and how to supply your handle appropriately.
// create a manager for documents
DocumentManager manager = client.newDocumentManager();

//retrieve the documents
DocumentPage page = manager.read("/example/person.xml", "/example/recipe.json");

//iterate through the results
while (page.hasNext()) {
    DocumentRecord doc = page.next();
    //check the document format
    if (doc.getFormat().equals(Format.XML)) {
        //handle XML
        DOM4JHandle handle = doc.getContent(new DOM4JHandle());
        Document xml = handle.get();

        System.out.print("Processing XML Document: ");
        System.out.println(xml.asXML());
    } else if (doc.getFormat().equals(Format.JSON)) {
        //handle JSON
        GSONHandle handle = doc.getContent(new GSONHandle());
        JsonElement json = handle.get();

        System.out.print("Processing JSON Document: ");
        System.out.println(json);
    }
    //TODO: handle other types accordingly.
}
Create a text document (with metadata)
Inserting a text document is similar, except you use a StringHandle or supply the format as shown below:
InputStreamHandle isHandle = new InputStreamHandle();
isHandle.setFormat(Format.TEXT);
Regardless of the content type, you can also associate a new document with a collection tag, using the DocumentMetadataHandle. CreateOrUpdateTextDocument.java shows you how:
// create a Text example
String document = "This is a text file.";

// create the handle for our sample Document
StringHandle handle = new StringHandle(document);

// create the handle for our meta data
DocumentMetadataHandle meta = new DocumentMetadataHandle();

// add/set our collections
meta.getCollections().addAll("examples", "mine");

// write our document and metadata with a specific URI
manager.write("/example/foo.txt", meta, handle);
The above request creates the text document and associates it with both the “examples” and “mine” collection tags. Recall that collections are just tags so they don’t need to already exist for you to start using them.
Read a document’s metadata
You could supply a DocumentMetadataHandle instance to retrieve the metadata along with the content, or supply the DocumentMetadataHandle alone to only retrieve metadata without the content. Open and run ReadMetadata.java to see the results.
Create a binary document (with metadata extracted)
Collections represent just one of the four kinds of metadata that can be associated with a document:
- collections,
- permissions,
- quality, and
- properties.
Permissions associate roles (such as “rest-writer”) with privileges (such as “update”) for the document. Quality is a signed integer value that can be used to boost or reduce a document’s ranking in search results. Properties are arbitrary name/value pairs that you can associate with a document, outside of and in addition to its actual content.
CreateOrUpdateBinaryDocument.java shows how you need to use a specific implementation of DocumentManager, specifically BinaryDocumentManager, to enable you to configure the extraction flag:
// create a manager for binaries
BinaryDocumentManager manager = client.newBinaryDocumentManager();

// tell the manager to extract document information and store them as properties.
manager.setMetadataExtraction(BinaryDocumentManager.MetadataExtraction.PROPERTIES);
To see the resulting properties, modify ReadMetadata.java such that:
//retrieve meta data only
manager.readMetadata("/example/mlfavicon.png", meta);
The Java API provides flexible ways of working with documents and metadata. For full details, see Single Document Operations in the in the Java application developer’s guide.
Delete a document
DeleteDocument.java shows how to delete multiple documents in a single transaction.
Bulk-load documents
Uploading documents one at a time can be costly, especially when using a digest authentication scheme. The Java API takes advantage of HTTP’s multi-part content type. CreateMultipleDocuments.java shows how you can upload multiple XML and JSON files in one commit using an instance of DocumentWriteSet.
DocumentManager manager = client.newDocumentManager();
DocumentWriteSet set = manager.newWriteSet();
...
set.add(uri, meta, content);
...
manager.write(set);
This approach, however, takes out the ability of the JAVA API to perform type-specific actions like XML document repair and Binary metadata extraction. You would have to use the type-specific DocumentManager and write the same type of documents in bulk as shown in CreateMultipleBinaries.java.
The JSON documents describe talks given at a recent MarkLogic World conference; the XML consists of a set of Shakespeare plays (associated with the “shakespeare” collection on load); and the images are photos with embedded metadata. Run both classes to load the data that we will use for the rest of our examples.
Alternatively, we can load the data by running a pre-defined custom gradle task:
gradle loadDemoData
You should be able to see 180 documents loaded into your Tutorials-Content database.
Now that we’ve populated our database, let’s start taking advantage of MarkLogic’s real power: search/query. The first step to creating and executing queries is to get your hands on a QueryManager instance, which our DatabaseClient instance is happy to provide:
// create a manager for searching
QueryManager queryMgr = client.newQueryManager();
All sample programs related to search begin with the exact line of code above.
What’s the difference between search and query? For MarkLogic, there is no difference except in how we use the terms. A query is a search specification, and a search is the execution of a query.
This usage is reflected in how you perform a search:
// run the search
queryMgr.search(query, resultsHandle);
The search() method executes the query that you give it, sending the results to the resultsHandle you provide.
So how do we create a query? First we have to decide which of the three kinds of queries we want:
| Kind of query | What it does |
| string | finds documents using a search string |
| query by example (QBE) | finds ‘documents that look like this’ using criteria that resembles the structure of documents in your database |
| structured query | finds documents according to an explicit hierarchy of conditions |
Each of these is modeled by the QueryDefinition interface and its sub-interfaces:
- StringQueryDefinition
- RawQueryByExampleDefinition
- StructuredQueryDefinition
To get one of these, you start by asking your query manager for a query instance. Let’s start with a query-by-example search.
Find XML documents using a query by example
Open up QueryByExampleXML.java. We will look for documents with a person in them who is described as a “brother”. We can draw up a simple XML example of what this would look like, noting that inside the PERSONA element, we look for the word “brother”.
// create a manager for searching
QueryManager queryMgr = client.newQueryManager();

// create an XML example
/*
<PLAY>
    <PERSONAE>
        <PERSONA>
            <q:word xmlns:q="http://marklogic.com/appservices/querybyexample">brother</q:word>
        </PERSONA>
    </PERSONAE>
</PLAY>
 */
Document document = DocumentHelper.createDocument();
Element play = document.addElement("PLAY");
Element persona = play.addElement("PERSONAE").addElement("PERSONA");
Element word = persona.addElement("word", "http://marklogic.com/appservices/querybyexample");
word.addText("brother");

// create the handle for our sample Document
DOM4JHandle handle = new DOM4JHandle(document);

// create the actual query instance
RawQueryByExampleDefinition query = queryMgr.newRawQueryByExampleDefinition(handle);
You should see the following results:
Listing 8 of 8 documents:
/xml/titus.xml
/xml/tempest.xml
/xml/othello.xml
/xml/john.xml
/xml/t_night.xml
/xml/rich_iii.xml
/xml/troilus.xml
/xml/as_you.xml
Query by example is a powerful and easy syntax to learn for expressing a wide variety of searches. This example is in XML, but there is JSON syntax as well as that you will see next.
Find JSON documents using a query by example
Open up QueryByExampleJSON.java. Here, we are looking for business track related talks.
// create a JSON example
/*
      {
        "track": "Business"
      }
 */
JsonObject json = new JsonObject();
json.addProperty("track", "Business");

// create the handle for our sample Document
GSONHandle handle = new GSONHandle(json);

// create the actual query instance
RawQueryByExampleDefinition query = queryMgr.newRawQueryByExampleDefinition(handle);
You should see the following results:
Listing 10 of 29 documents:
/json/63332553253483328.json
/json/48780530628366848.json
/json/35870404743018368.json
/json/22624330205081124.json
/json/89598109735776880.json
/json/1449874718673528.json
/json/78162690064928960.json
/json/86439584543624544.json
/json/6154533964581788.json
/json/22208833624608816.json
Find documents using a search string
Open up StringQuery.java. This time we’re using a StringQueryDefinition:
// create a search definition
StringQueryDefinition query = queryMgr.newStringDefinition();
query.setCriteria("index OR Cassel NEAR Hare");
After grabbing an initial string query instance from our query manager, we specify the search text using its setCriteria() method. In a real-world search application, you’d often insert user-supplied text here (what the user types in the search box). In this case, our string query is “index OR Cassel NEAR Hare“. This will find documents (regardless of format) that either contain the word “index” or have the word “Cassel” appearing near the word “Hare”. What this illustrates is that even a “simple search” can be quite powerful using MarkLogic’s default search configuration (which are called search options). Later on, we’ll see a couple examples of how to customize search options.
You should see the following result:
Listing 6 of 6 documents:

Matched 3 locations in /json/43065348814009848.json:
Paxton [Hare] and Dave [Cassel] will present the RObust XquerY (roxy) testing & application framework, now available on...
Dave [Cassel]
Paxton [Hare]

Matched 1 locations in /json/24303724944754636.json:
...you. It explains, in human terms, the core concepts and features of the universal [index] and the range [index], and how it differs from traditional search and database products. You'll leave the...

Matched 1 locations in /json/42126076784916220.json:
...analyzes it from a financial market perspective in order to determine investment strategy. Its Mood [Index] successfully called the bear market of 2008û09 as well as the bull market that...

Matched 1 locations in /json/24218342103995384.json:
...capabilities of MarkLogic Server in dealing with geospatial data. We will look at the geospatial [index] and search capabilities, and then spend the majority of the hour customizing a specific...

Matched 2 locations in /xml/rich_iii.xml:
As [index] to the story we late talk'd of,
The flattering [index] of a direful pageant;

Matched 1 locations in /xml/othello.xml:
Lechery, by this hand; an [index] and obscure prologue
Get another page of search results
Open Pagination.java. This program is identical to QueryByExampleJSON.java, except in this case we want to return a different subset of the results. All of the previous examples returned the first 10 most relevant results. Here, we’re asking for the third five most relevant results. In other words, we’re using a smaller page size (five results per page) and asking for the third page of results.
// Set page size to 5 results
int pageSize = 5;
queryMgr.setPageLength(pageSize);

// get the 3rd page of search results
int pageNum = 3;

// it is important to note that MarkLogic starts at 1
int start = pageSize * (pageNum - 1) + 1;

// create a handle for the search results
SearchHandle resultsHandle = new SearchHandle();

// run the search
queryMgr.search(query, resultsHandle, start);
You should see the following result:
Listing 5 of 29 documents:
/json/31848530209127544.json
/json/20662665111012756.json
/json/61218661558814344.json
/json/32212879751865132.json
/json/31029205677261020.json
Find documents based on their properties
Open PropertiesSearch.java. Here, we see our first example of a StructuredQueryDefinition. Most structured queries are only useful in conjunction with modified search options (see “Custom search” below). But using one is also necessary for a basic search against document properties:
// get a structured query builder
StructuredQueryBuilder qb = queryMgr.newStructuredQueryBuilder();

// Find all documents that have a property value containing the word "fish"
StructuredQueryDefinition query = qb.properties(qb.term("fish"));
Run the program to get a list of all the matching documents (photos of fish):
Listing 5 of 5 documents:
/2012/02/26/20120226-151617-50.jpg
/2012/02/27/20120227-154053.jpg
/2012/02/28/20120228-180626-90.jpg
/2012/02/27/20120227-154046.jpg
/2012/02/27/20120227-141439-10.jpg
Search within a directory
Regardless of what kind of query it is, every query implements the following three methods specified by QueryDefinition, as well as their get* counterparts:
- setDirectory()
- setCollections()
- setOptionsName()
The first two -— setDirectory() and setCollections() —- allow you to restrict a query to a particular directory or set of collections. The last one, setOptionsName(), lets you associate a query with a named set of custom search options stored on the server. (See “Custom search” below.)
DirectorySearch.java shows an example of the first method:
// Restrict the search to a specific directory
query.setDirectory("/2012/02/14/");

// empty search defaults to returning all results
query.setCriteria("");
When you run the program, it will search only those documents in the “/2012/02/14/” directory:
Listing 3 of 3 documents:
/2012/02/14/20120214-075659-00.jpg
/2012/02/14/20120214-075906-80.jpg
/2012/02/14/20120214-074932-10.jpg
Search within a collection
Similarly, the query in CollectionSearch.java restricts a search to a collection, thanks to the setCollections() method:
// Restrict the search to a specific collection
query.setCollections("shakespeare");

// Search for the term "flower"
query.setCriteria("flower");
When you run the program, the query will return only the matches that it finds in the “shakespeare” collection:
Listing 10 of 12 documents:
/xml/r_and_j.xml
/xml/dream.xml
/xml/t_night.xml
/xml/rich_ii.xml
/xml/lll.xml
/xml/troilus.xml
/xml/pericles.xml
/xml/two_gent.xml
/xml/win_tale.xml
/xml/all_well.xml
Processing Search Results
In all of the search examples so far, we haven’t looked too closely at how the search results are extracted (and printed to the console). In each case, we’ve been using the tailor-made SearchHandle, which encapsulates search results as a POJO. Before we look more closely at that object structure, let’s take a peek at the raw data it encapsulates. We already saw how use of DocumentMetadataHandle is optional; this is also the case with SearchHandle.
Get search results as raw XML
Open SearchResultsAsXML.java. This example performs the same search as the previous example, except that instead of using a SearchHandle, we’re using a StringHandle to receive the raw XML search results (from the server) as a string:
// create a handle for the search results
StringHandle resultsHandle = new StringHandle();

// run the search
queryMgr.search(query, resultsHandle);

// dump the XML results to the console
System.out.println(resultsHandle);
Run the program and examine the console to see how MarkLogic represents its search results in XML. This should give you an idea of the complexity of information we’re dealing with here. Also, depending on your search options, the structure of these results can vary widely.
Get search results as raw JSON
Open SearchResultsAsJSON.java. This example is identical to the previous one, except now we configure our StringHandle to receive JSON (instead of XML, the default):
// create a handle for the search results
StringHandle resultsHandle = new StringHandle().withFormat(Format.JSON);
Run the program to see the raw JSON search results that were fetched from the server.
Get search results as a POJO
While you are certainly free to process search results as raw JSON or XML, the preferred way in Java is to use a SearchHandle instance, which models the results using a containment hierarchy that mirrors that of the raw data we saw:
SearchHandle:
- MatchDocumentSummary[]
- MatchLocation[]
- MatchSnippet[]
Open TutorialUtil.java in the tutorial project. This module contains a few different approaches to printing search results that have been used by the previous search examples. Let’s focus on the last one -— displayResults(). The first step to extracting search results from a SearchHandle is to call its getMatchResults() method:
// Get the list of matching documents in this page of results
MatchDocumentSummary[] results = resultsHandle.getMatchResults();
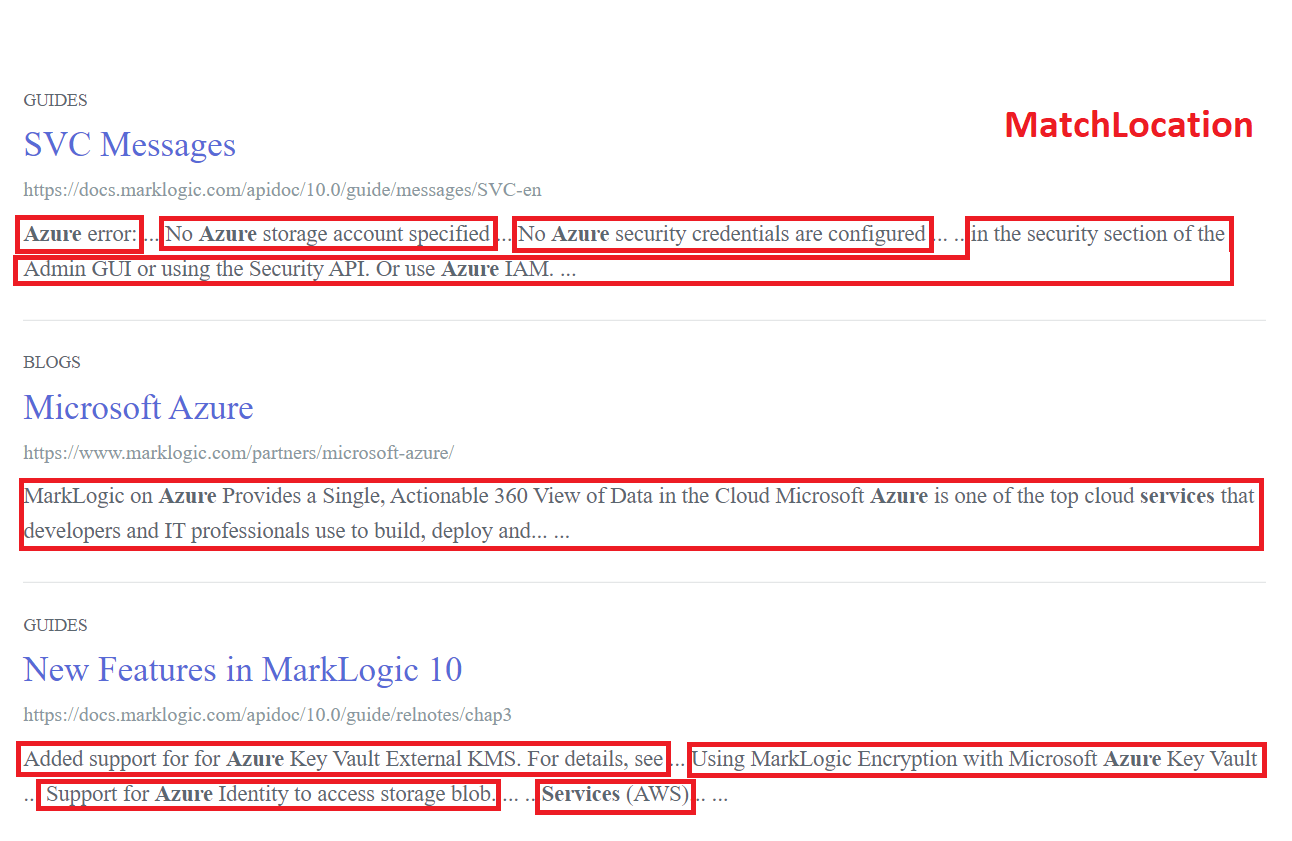
This yields an array of MatchDocumentSummary objects. We can illustrate what this object represents by looking at a typical search results page, such as the one on this website:
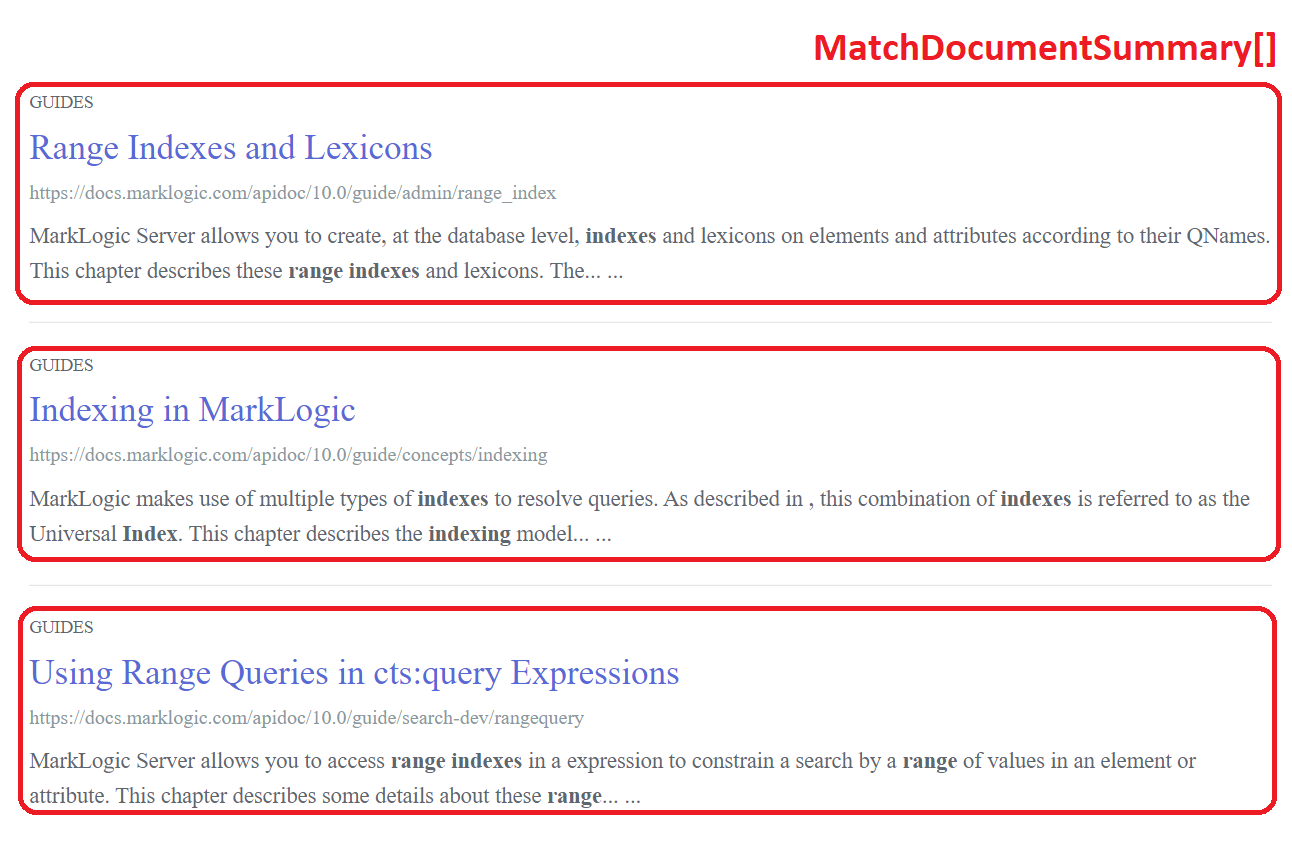
Each matching document in the list would be represented by a MatchDocumentSummary instance. This suggests that SearchHandle could then be used, for example, as the model (or to drive the model) in an MVC-based web application. Our utility code is only concerned with printing text to the console, but the basic task is the same: iterate through each level of this hierarchy and do something useful at each level.
Next, we drill down into each search result and call getMatchLocations():
// Iterate over the result documents
for (MatchDocumentSummary result: results) {

        // get the list of match locations for this result
        StringHandle content = new StringHandle();
A MatchLocation object represents a range of text in the document that includes a search “hit”:
In addition to getMatchResults(), the SearchHandle class provides other useful methods for building a search application, such as getFacets(), getMetrics(), and getTotalResults().
Custom Search
All of the search examples so far in this tutorial have used MarkLogic’s default query options (interchangeably called “search options”). This may suffice for some basic applications, but most of the time you will end up wanting to provide custom options. Custom options let you do things like:
- define named constraints, which can be used in string queries, such as “tag” in “flower tag:shakespeare”
- enable analytics and faceting by identifying lexicons and range indexes from which to retrieve values
- extend or alter the default search grammar
- customize the structure of the search results, including snippeting and default pagination
- control search options such as case sensitivity and ordering
Options are grouped into named option sets on your REST API server. You can customize these either by updating the default option set, or by creating a new named option set.
Get a list of the server’s option sets
Before we start manipulating option sets, let’s query the list of current option sets. Open ListOptionSets.java. We can read the list as a POJO by using a QueryOptionsListHandle:
// handle for list of named option sets
QueryOptionsListHandle listHandle = new QueryOptionsListHandle();
We then call our query manager’s optionsList() method to retrieve the list, storing it in our handle:
// get the list of named option sets
queryMgr.optionsList(listHandle);
And then iterate over the Map returned by the now-populated handle’s getValuesMap() method:
// iterate over the option sets; print each's name & URI
for (Map.Entry<String, String> optionsSet : listHandle.getValuesMap().entrySet()) {
    System.out.println(optionsSet.getKey() + ": " + optionsSet.getValue());
}
What this does is give you, the developer, a list of the available option set names you can pass to the search() method. If you don’t pass a name explicitly (as in our examples so far), then the option set named default is used.
Since we haven’t added any custom options yet, when you run this program, you would just see an empty result. However, there is a “default” option set and its URI is/v1/config/query/default, which is actually the way to view the raw options in your browser if you want:
- http://localhost:8011/v1/config/query/default (XML)
- http://localhost:8011/v1/config/query/default?format=json (JSON)
Now let’s create a new set of options.
Upload custom search options
Let’s start by building a constraint option. Constraint means something very specific in MarkLogic. Whenever a user types a phrase of the form name:text in their search string, they’re using a constraint (assuming one has been defined for them). For example, they might type “author:melville” to constrain their search to documents with an author element or property with the value “melville”, as opposed to a search for the term anywhere.. But for this to have the intended behavior, a constraint named “author” must first be defined in the server’s query options. For this tutorial, you’re going to define a constraint that enables users to type things like “tag:shakespeare” and “tag:mlw12”.
To create or replace an entire option set, we store our configuration at src/main/ml-modules/options (A starting file has been created under the options_ folder. You may opt to rename this folder instead.). Your option set can be expressed either as a JSON or XML document. For our exercise, we use the JSON representation:
> src/main/ml-modules/options/tutorial.json
{
  "options": {
    "constraint": [
      {
        "collection": {
          "prefix": ""
        },
        "name": "tag"
      }
    ]
  }
}
The file name is being used to name our query option. You can create a default.json as well to override the default query option.
There are a number of different kinds of constraints. In this case, you’re using a “collection constraint”. The “prefix” field is an optional collection tag prefix, which would be handy if you wanted to power multiple constraints via collection tags such as “author/shakespeare” and “state/california” using the prefixes “author/” and “state/”, respectively. In this case, you’re not doing that; you just want to constrain by the whole collection tag, so you pass an empty prefix (“”).
You can see what the stored options look like by retrieving the newly-created option set: http://localhost:8011/v1/config/query/tutorial. Add the “format=json” parameter to see the options in that format.
For syntax details, see Appendix: Query Options Reference in the Search Developer’s Guide.
To deploy our configuration we run the following command:
gradle mlLoadModules
Then go back and re-run the previous example (ListOptionSets.java). You should now see the option set we created is now available.
Search using a collection constraint
Let’s make use of our new configuration and run a search using our “tag” constraint. Open TagConstraint.java. To make the new option available, we need to associate our string query with the tutorial options on the server:
// create a search definition
StringQueryDefinition query = queryMgr.newStringDefinition();
query.setOptionsName("tutorial");
query.setCriteria("flower tag:shakespeare");
Run the program. It should yield the same results as CollectionSearch.java. The only difference is that now the “shakespeare” collection criterion is user-supplied as part of their search string in the form of the “tag” constraint.
Search using a JSON key value constraint
The rest of the examples in this section include two steps:
- Update the server configuration
- Run a query making use of the updated configuration
You’re going to modify the existing src/main/ml-modules/options/tutorial.json file. And for each change that we make, you would need to run `gradle mlLoadModules`. Alternatively, you could open a new command prompt and run `gradle mlWatch` to have your changes pushed to MarkLogic as soon as you save your changes.
Add the following entry to your constraints property:
{
  "name": "company",
  "value": {
    "json-property": "affiliation"
  }
}
Such that the resulting JSON file contains the following:
{
  "options": {
    "search-option": [
      "unfiltered"
    ],
    "quality-weight": 0,
    "constraint": [
      {
        "collection": {
          "prefix": ""
        },
        "name": "tag"
      },
      {
        "name": "company",
        "value": {
          "json-property": "affiliation"
        }
      }
    ]
  }
}
Running CompanyConstraint.java yields the following result:
Matched 14 documents

Listing 10 of 14 documents:

Matched 1 locations in /json/86275434005074200.json:
...5 is packed with new indexing options. In this talk you will hear a Lead [Engineer] from MarkLogic describe the MarkLogic 5 indexing options, and heÆll give you a... ..., Lead [Engineer], MarkLogic...

Matched 4 locations in /json/81647273790756000.json:
[MarkLogic]
Sr. Performance [Engineer]
[MarkLogic]
Lead [Engineer]
...
You can also see the updated query options at http://localhost:8011/v1/config/query/tutorial.
Search using an element value constraint
You’re going to modify the existing src/main/ml-modules/options/tutorial.json file. Add the following entry to your constraints property:
{
  "name": "person",
  "value": {
    "element": {
      "name": "PERSONA",
      "ns": ""
    }
  }
}
You would need to run `gradle mlLoadModules` if you are not using `gradle mlWatch`.
Now we can search for the “King of France” directly in our query text:
// find plays featuring the King of France
query.setCriteria("person:\"king of france\"");
Run PersonConstraint.java to see the results.
Search using a JSON key word constraint
You’re going to modify the existing src/main/ml-modules/options/tutorial.json file. Add the following entry to your constraints property:
{
  "name": "bio",
  "word": {
    "json-property": "bio"
  }
}
Here, instead of a value constraint, we’re using a word constraint scoped within all JSON “bio” keys:
You would need to run `gradle mlLoadModules` if you are not using `gradle mlWatch`.
Unlike a value constraint (which tests for the value of the key or element), a word constraint uses normal search-engine semantics. The search will succeed if the word is found anywhere in the given context.
Also, it uses stemming, when enabled, which means that matching words will include equivalent forms: “strategies” and “strategy”, “run” and “ran”, etc. To enable stemming, we need to create/modify src/main/ml-config/databases/content-database.json such that it contains at least the following:
{
  "database-name" : "%%mlAppName%%-content",
  "stemmed-searches": "basic"
}
You would need to run the following command for this to take effect:
gradle mlUpdateIndexes mlReindexContentDatabase
Since we have a small number of documents, it won’t take long for MarkLogic to re-index everything. At a much larger scale, you’d want to be careful about what indexes you enable and when you enable them. That’s why such changes require database administrator access.
Also note that removing or disabling an index is instantaneous, while adding or enabling them will require some time to build.
Run BioConstraint.java to see how stemming includes results that contain “strategies”.
Search using an element word constraint
You’re going to modify the existing src/main/ml-modules/options/tutorial.json file. Add the following entry to your constraints property:
{
  "name": "stagedir",
  "word": {
    "element": {
      "name": "STAGEDIR",
      "ns": ""
    }
  }
}
You would need to run `gradle mlLoadModules` if you are not using `gradle mlWatch`.
Now we can find all the Shakespeare plays where, for example, swords are involved on stage as shown in StageDirConstraint.java.
Scoping search using a container constraint
You’re going to modify the existing src/main/ml-modules/options/tutorial.json file. Add the following entry to your constraints property:
{
  "name": "spoken",
  "container": {
    "element": {
      "ns": "",
      "name": "SPEECH"
    }
  }
}
You would need to run `gradle mlLoadModules` if you are not using `gradle mlWatch`.
A container constraint is similar to a word constraint, except that it will match words in the element and any of its descendants. For example, it will match text in <LINE> element children of <SPEECH>. This is useful for searching documents that contain “mixed content” (i.e. text mixed with markup, such as <em> and <strong>).
You can use `json-property` instead of `element` for JSON documents. More information about container constraints are available in the Appendix: Query Options Reference of the Search Developers Guide.
Using this constraint will restrict the search to the spoken lines of text (excluding, for example, stage directions). This will search for mentions of “sword” in the script itself as shown in SpokenConstraint.java.
Search using a properties constraint
Document and directory properties are not included in searches by default. The properties constraint enables us to search a document’s properties metadata. In our case, our images have their metadata extracted during ingest and stored as document properties, for example.
You’re going to modify the existing src/main/ml-modules/options/tutorial.json file. Add the following entry to your constraints property:
{
  "name": "image",
  "properties": null
}
If we specified an entry for `properties` then our word search will only apply to that document property. Supplying null allows us to search through all of them.
You would need to run `gradle mlLoadModules` if you are not using `gradle mlWatch`.
Running PropertiesConstraint.java we get records that match the following document property:
<xmp_dc_title xmlns="http://marklogic.com/filter">Parrot Fish</xmp_dc_title>
Search using a structured query
Recall that the Java API supports two kinds of queries that can be passed to search():
- string queries
- structured queries
We briefly touched on a structured query in PropertiesSearch.java. Now we’ll take a look at a richer use of it, utilizing the constraints we’ve defined so far. Open up StructuredQuerySearch.java. We’ll start by creating a StructuredQueryBuilder, associating it with our “tutorial” options:
// create a query builder using the "tutorial" options
StructuredQueryBuilder qb = new StructuredQueryBuilder("tutorial");
The query builder is analogous to the options builder in that it gives us a way of building up complex object structures using nested method calls. Only this time, rather than building up options to store on the server, we’re building up an actual query:
// build a search definition
StructuredQueryDefinition query =
    qb.or(
        // NB: constraints will only work correctly if they've been configured
        // find MarkLogic speakers whose bio mentions "product"
        qb.and(
            qb.wordConstraint("bio","product"),
            qb.valueConstraint("company","MarkLogic")),
        // find plays matching all three of these constraints
        qb.and(
            qb.containerQuery(qb.element("spoken"), qb.term("fie")),
            qb.wordConstraint("stagedir", "fall"),
            qb.valueConstraint("person", "GRUMIO")),
        // find photos of fish taken on February 27th
        qb.and(
            qb.properties(qb.term("fish")),
            qb.directory(true, "/images/2012/02/27/")),
        // find conference docs mentioning "fun"
        qb.and(
            qb.collection("mlw2012"),
            qb.term("fun")
   )
);
The builder’s or() method constructs a query that will find documents matching any of its argument queries (union). In contrast, an and() query restricts its results to those documents matching all of its child queries (intersection). Take a look at the StructuredQueryBuilder javadocs to see what methods you can use to construct queries. Many of these (particularly the ones with “Constraint” in their names) require you to have defined options for them to be of any use.
To run the query, we pass it to our query manager’s search() method, just as we do with string and key/value queries:
// run the search
queryMgr.search(query, resultsHandle);
Run the program to see the results. Note that the search will only give you the expected results if you’ve previously defined the “bio”, “company”, “spoken”, “stagedir”, and “person” constraints (see previous examples in this section).
For more details on the kinds of constraints you can define, see “Constraint Options” in the Search Developer’s Guide.
Analytics
“Analytics” is used to describe a class of functionality in MarkLogic that relates to retrieving values and frequencies of values across a large number of documents. With search/query, we’re interested in finding documents themselves. With analytics, we’re interested in extracting all the unique values that appear within a particular context (such as an XML element or JSON key), as well as the number of times each value occurs. An example of analytics in a MarkLogic application is the message traffic chart on MarkMail.org:
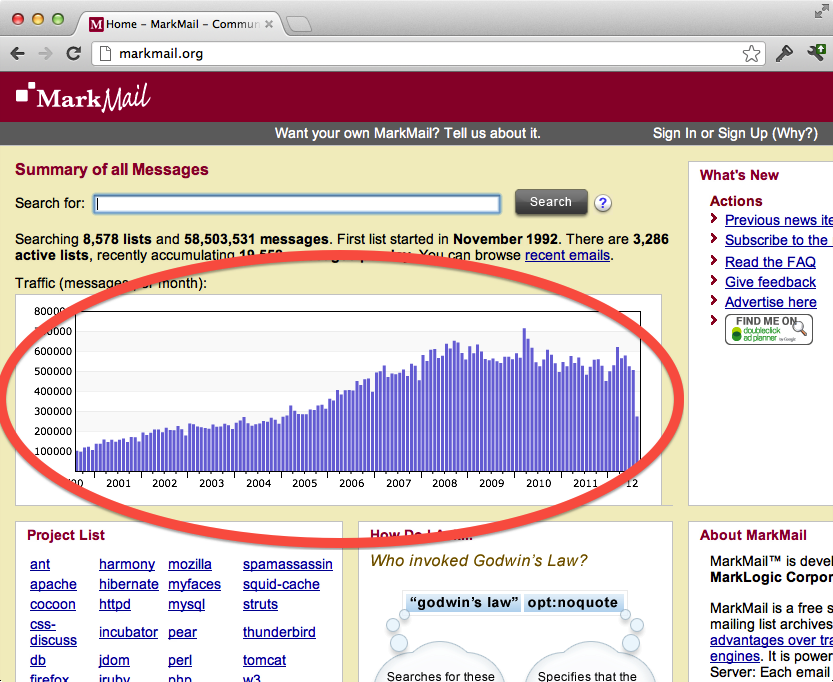
The above chart portrays ranges of email message dates bucketed by month, as well as the number of messages that appear each month. Since MarkMail hosts over 50 million messages, it of course does not go read all those messages when you load the page. Instead, whenever a new document (email message) is loaded into the database, its date is added to a sorted, in-memory list of message dates (values), each associated with a count (frequency). This is achieved through an administrator-defined index (called a range index).
A range index is one kind of lexicon. Whenever you want to perform analytics, you need to have a lexicon configured. In addition to range indexes, other lexicons include the URI lexicon and the collection lexicon. Each of these must be explicitly configured in the database.
Retrieve all collection tags
For this example, you need to have the collection lexicon enabled. Fortunately, collection lexicon is enabled by default. Open TagList.java. As when defining constraints, we need a QueryOptionsBuilder for making values available, this time with the withValues() method.
You’re going to modify the existing src/main/ml-modules/options/tutorial.json file and add a new property:
"values": {
  "name": "tag",
  "collection": {
    "prefix": ""
  }
}
Such that your document would like the following:
{
  "options": {
    "search-option": [
      "unfiltered"
    ],
    "quality-weight": 0,
    "constraint": [
      ...
    ],
    "values": [
      {
        "name": "tag",
        "collection": {
          "prefix": ""
        }
      }
    ]
  }
}
You would need to run `gradle mlLoadModules` if you are not using `gradle mlWatch`.
Whereas with a search we need to construct a QueryDefinition, with a values retrieval we need to construct a ValuesDefinition, passing it both the name we defined (“tag”) and the name of the options we just configured on the server:
// create a values definition
ValuesDefinition valuesDef = queryMgr.newValuesDefinition("tag", "tutorial");
Similarly, whereas with search we use a SearchHandle to receive results, with values we use a ValuesHandle to receive the results:
// retrieve the values
ValuesHandle valuesHandle = queryMgr.values(valuesDef, new ValuesHandle());
The above line defines the handle and fetches the results in one step. This time, instead of calling search(), we call our query manager’s values() method. Now we’ll print out the results using the handle’s getValues() accessor:
// print out the values and their frequencies
for (CountedDistinctValue value : valuesHandle.getValues()) {
    System.out.println(value.get("xs:string",String.class) + ": " + value.getCount());
}
Open and run TagList.java. The output shows all the collection tags and their frequency of usage (in other words, how many documents are in each collection). You can also view the values directly in your browser at: http://localhost:8011/v1/values/tag?options=tutorial.
Retrieve all document URIs
This example requires the URI lexicon to be enabled. Starting in MarkLogic 6, it’s enabled by default, so we’re ready to go.
You’re going to modify the existing src/main/ml-modules/options/tutorial.json file. Add the following entry to your values property:
{
  "name": "uri",
  "uri": null
}
You would need to run `gradle mlLoadModules` if you are not using `gradle mlWatch`.
Open and run URIList.java to see all the document URIs in the database, as well as how many documents they’re each associated with (the frequency). For all the JSON and XML document URIs, the answer of course is just one per document. But you might be surprised to see that each image document URI yields a count of two. That’s because each image document has an associated properties document which shares the same URI.
Set up some range indexes
You’re going to modify the existing src/main/ml-config/databases/content-database.json such that it contains at least the following:
{
  "database-name" : "%%mlAppName%%-content",
  "stemmed-searches": "basic",
  "range-element-index": [
    {
      "scalar-type": "string",
      "namespace-uri": "",
      "localname": "SPEAKER",
      "collation": "http://marklogic.com/collation/",
      "range-value-positions": false,
      "invalid-values": "reject"
    },
    {
      "scalar-type": "string",
      "namespace-uri": "",
      "localname": "affiliation",
      "collation": "http://marklogic.com/collation/",
      "range-value-positions": false,
      "invalid-values": "reject"
    },
    {
      "scalar-type": "int",
      "namespace-uri": "",
      "localname": "contentRating",
      "collation": "",
      "range-value-positions": false,
      "invalid-values": "reject"
    },
    {
      "scalar-type": "unsignedLong",
      "namespace-uri": "http://marklogic.com/filter",
      "localname": "size",
      "collation": "",
      "range-value-positions": false,
      "invalid-values": "reject"
    },
    {
      "scalar-type": "string",
      "namespace-uri": "http://marklogic.com/filter",
      "localname": "Exposure_Time",
      "collation": "http://marklogic.com/collation/",
      "range-value-positions": false,
      "invalid-values": "reject"
    }
  ]
}
You would need to run the following command for this to take effect:
gradle mlUpdateIndexes mlReindexContentDatabase
Retrieve values of a JSON key
You’re going to modify the existing src/main/ml-modules/options/tutorial.json file. Add the following entry to your values property:
{
  "name": "company",
  "range": {
    "collation": "http://marklogic.com/collation/",
    "json-property": "affiliation",
    "type": "xs:string"
  },
  "values-option": [
    "frequency-order"
  ]
}
As with collection and URI values, we start by choosing a name (“company”). This time, instead of URI or collection, we use range to indicate that a range index is the source of the values. Here, we must make sure that the arguments we pass exactly line up with the range index that’s configured in the database, especially the collation property. Otherwise, you’ll get an “index not found” error when you try to retrieve the values.
Another thing to point out above is that, rather than return the values in alphabetical (collation) order, we want to get them in “frequency order.” In other words, return the most commonly mentioned companies first. That’s what the “frequency-order” option (passed to “values-option”) lets you do.
You would need to run `gradle mlLoadModules` if you are not using `gradle mlWatch`.
Open and run CompanyList.java to see the results. Unsurprisingly, you’ll see that MarkLogic was the most common company affiliation at the MarkLogic World conference.
Retrieve values of an element
You’re going to modify the existing src/main/ml-modules/options/tutorial.json file. Add the following entry to your values property:
{
  "range": {
    "collation": "http://marklogic.com/collation/",
    "type": "xs:string",
    "element": {
      "ns": "",
      "name": "SPEAKER"
    }
  },
  "name": "speaker",
  "values-option": [
    "frequency-order"
  ]
}
You would need to run `gradle mlLoadModules` if you are not using `gradle mlWatch`.
Open and run SpeakerList.java to see all the unique speakers in the Shakespeare plays, starting with the most garrulous.
Compute aggregates on values
Not only can we retrieve values and their frequencies; we can also perform aggregate math on the server. MarkLogic provides a series of built-in aggregate functions such as avg, max, count, and covariance, as well as the ability to construct user-defined functions (UDFs) in C++ for close-to-the-database computations.
You’re going to modify the existing src/main/ml-modules/options/tutorial.json file. Add the following entry to your values property:
{
  "range": {
    "json-property": "contentRating",
    "type": "xs:int"
  },
  "name": "rating"
}
You would need to run `gradle mlLoadModules` if you are not using `gradle mlWatch`.
This time, in addition to setting up the values definition, we’ll configure it to compute both the mean and median averages:
// create a values definition
ValuesDefinition valuesDef = queryMgr.newValuesDefinition("rating", "tutorial");

// also retrieve the averages of all ratings
valuesDef.setAggregate("avg","median");

// retrieve values in descending order
valuesDef.setDirection(ValuesDefinition.Direction.DESCENDING);
Open and run ContentRatingList.java to see how many conference talks scored five stars, how many scored four stars, etc.—as well as the mean and median rating for all conference talks.
Constrain the values returned using a query
This example starts to hint at the real power of MarkLogic: combining analytics with search. Rather than retrieve all the values of a given key, we’re going to retrieve only the values from documents meeting a certain criterion. In this case, we’ll get all the ratings for conference talks given by employees of a certain organization. We already configured the values option for `rating` and the constraint option for `company` in src/main/ml-modules/options/tutorial.json:
{
  "options": {
    "search-option": [
      "unfiltered"
    ],
    "quality-weight": 0,
    "constraint": [
      ...
      {
        "name": "company",
        "value": {
          "json-property": "affiliation"
        }
      }
    ],
    "values": [
      ...
      {
        "range": {
          "json-property": "contentRating",
          "type": "xs:int"
        },
        "name": "rating"
      }
    ]
  }
}
To retrieve values, we define the values definition as usual, but this time we also associate it with a query, using the setQueryDefinition() method:
// create a values definition
ValuesDefinition valuesDef = queryMgr.newValuesDefinition("rating", "tutorial");

// create a search definition
StringQueryDefinition companyQuery = queryMgr.newStringDefinition("tutorial");
companyQuery.setCriteria("company:marklogic");

// return only those values from fragments (documents) matching this query
valuesDef.setQueryDefinition(companyQuery);
Open and run CompanyConstraintContentRatingList.java to see the ratings of all talks given by MarkLogic employees (documents matching the “company:marklogic” string query). You can also see these results in the browser using this URL:
http://localhost:8011/v1/values/rating?options=tutorial&q=company:marklogic&format=json
Retrieving tuples of values (co-occurrences)
In addition to retrieving values from a single source, you can also retrieve co-occurrences of values from two different value sources. In other words, you can perform analytics on multi-dimensional data sets. The following JSON document configures tuples (named “size-exposure”) backed by two different range indexes. In particular, it will enable you to get all the unique pairings of photo size and exposure time in image metadata.
You’re going to modify the existing src/main/ml-modules/options/tutorial.json file. Such that it would look like the following:
{
  "options": {
    "search-option": [
      "unfiltered"
    ],
    "quality-weight": 0,
    "constraint": [
      ...
    ],
    "values": [
      ...
    ],
    "tuples": [
      {
        "name": "size-exposure",
        "range": [
          {
            "type": "xs:unsignedLong",
            "element": {
              "ns": "http://marklogic.com/filter",
              "name": "size"
            }
          },
          {
            "collation": "http://marklogic.com/collation/",
            "type": "xs:string",
            "element": {
              "ns": "http://marklogic.com/filter",
              "name": "Exposure_Time"
            }
          }
        ]
      }
    ]
  }
}
You would need to run `gradle mlLoadModules` if you are not using `gradle mlWatch`.
We call tuples() to fetch the tuples:
// create a values definition
ValuesDefinition valuesDef = queryMgr.newValuesDefinition("size-exposure", "tutorial");

// retrieve the tuples
TuplesHandle tuplesHandle = queryMgr.tuples(valuesDef, new TuplesHandle());
Also, instead of a ValuesHandle, we use a TuplesHandle, which encapsulates the data in a POJO through which we can access each tuple using getTuples():
// print out each size/exposure co-occurrence
for (Tuple tuple : tuplesHandle.getTuples()) {
    System.out.println("Size: "     + tuple.getValues()[0].get(Long.class)
            + "\nExposure: " + tuple.getValues()[1].get(String.class));
    System.out.println();
}
Searching with facets
As mentioned earlier, MarkLogic’s real power lies in the combination of search and analytics. A couple of examples ago, we saw how a query could be used to constrain a values retrieval. What we haven’t seen yet is how the query manager’s search() method can also return lists of values (called “facet values”) along with its search results. These facets can then be used to interactively explore your data. In this case, we’re not calling values() at all, just search. But before we can run a faceted search, we need to adjust some of our existing contraints.
You’re going to modify the existing src/main/ml-modules/options/tutorial.json file. Such that it would look like the following:
{
  "options": {
    "search-option": [
      "unfiltered"
    ],
    "quality-weight": 0,
    "constraint": [
      ...
      {
        "name": "company",
        "range": {
          "type": "xs:string",
          "collation": "http://marklogic.com/collation/",
          "json-property": "affiliation",
          "facet-option": "frequency-order"
        }
      },
      {
        "name": "rating",
        "range": {
          "type": "xs:int",
          "json-property": "contentRating",
          "facet-option": "descending"
        },
      }
    ],
    "values": [
      ...
    ],
    "tuples": [
      ...
    ]
  }
}
Note that we are adding the rating constraint while modifying the existing company constraint.
The above configuration makes the “rating” and “company” constraints available for users to type in their query search string. You may be thinking “Isn’t that only going to be useful for power users? Most users aren’t going to bother learning a search grammar.” That’s true, but with a UI that supports faceted navigation, they won’t need to. All they’ll have to do is click a link to get the results constrained by a particular value. For example, the screenshot below from MarkMail shows four facets: month, list, sender, and attachment type:
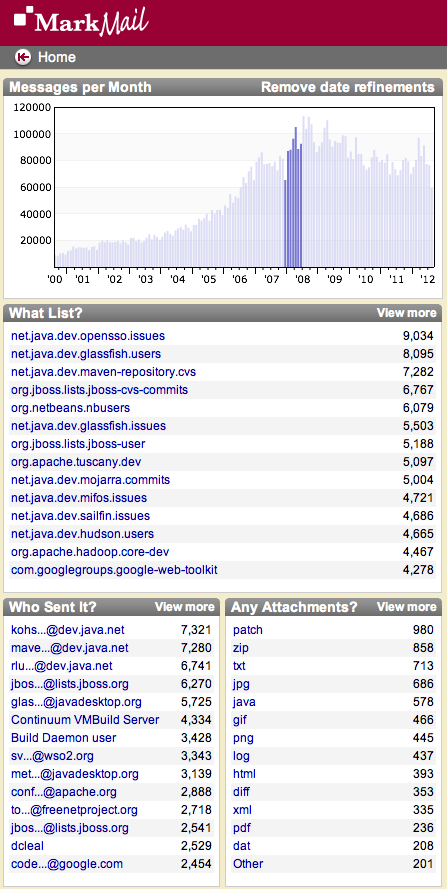
Each of these is a facet, whose values are retrieved from a range index. Moreover, users can drill down and pick various combinations of facets simply by clicking a link, or in the case of the histogram, swiping their mouse pointer.
MarkLogic’s Java API gives you everything you need to construct a model for faceted navigation. Our sample program doesn’t include a UI, but it will run a series of searches that a user might have chosen:
String[] searches = {"", // empty search; return all results
                     "company:MarkLogic",
                     "company:MarkLogic rating:5",
                     "java rating GE 4"};
For each of the above search strings, we run the search and print out all the facets and their values:
// Run each search
for (String search : Arrays.asList(searches)) {

    System.out.println("SEARCH RESULTS for \""+search+"\":");

    // Return all results
    query.setCriteria(search);

    // run the search
    queryMgr.search(query, resultsHandle);

    // Show the resulting facets & their values
    for (FacetResult facet : resultsHandle.getFacetResults()) {
        System.out.println(facet.getName() + ":");
        for (FacetValue value : facet.getFacetValues()) {
            System.out.println("  " + value.getCount() + " occurrences of " + value.getName());
        }
    }
}
Open and run FacetedSearch.java to see the results.
Just as the API provides a model for a list of search results (an array of MatchedDocumentSummary instances), it also provides a model for facet results (an array of FacetResult instances). The above code gets the facets using the search handle’s getFacetResults() method, iterates through each facet, and for each of its values, prints the value and its count (frequency).
We saw earlier how the API models the search results on this site. Now we can see how it models the facet results. One facet (“Category”) is represented by a FacetResult object:
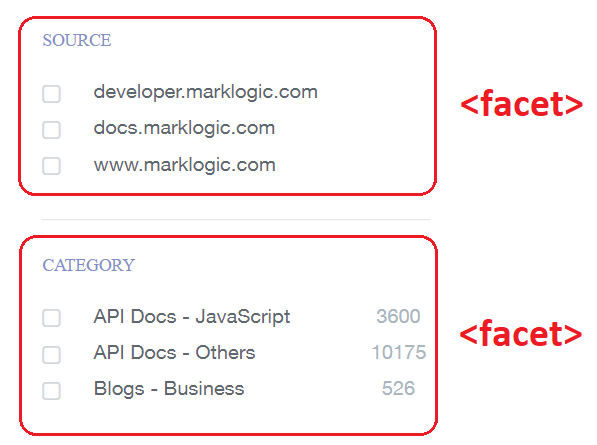
And its values are modeled by FacetValue objects:
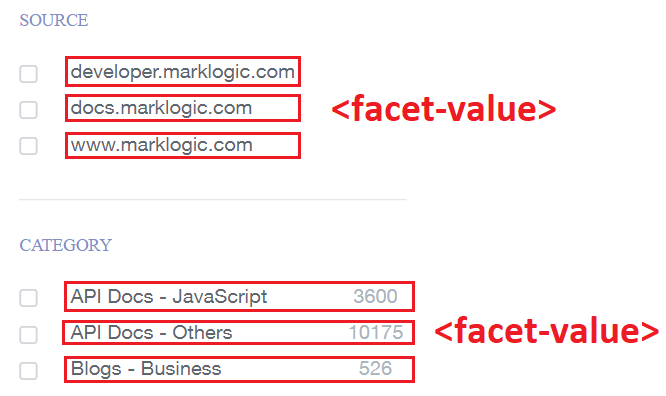
When a user clicks on one of these values, it takes them to a new automatically constrained search results page. For example, if they click “Blogs – Business” it will re-run their search with the additional constraint ‘category:”Blogs – Business”‘.
If you want to reference the updates we made during this tutorial in one place, download the tutorial end project: java-api-tutorial-end.zip.
There is more to the REST API that we have not covered. Make sure to check out other features like snippeting, stemming, type ahead, ranged facets, and more. Don’t miss out on MarkLogic Grove and how it makes it easy to generate your first web-based search application that showcases everything we discussed above. The MarkLogic developer community has already prepared a SpringBoot component for your middle-tier.