This tutorial is a part of a series pertaining to the MarkLogic Connector for Mulesoft. This tutorial is the “Ingest Flow” of the series, where we discuss the top flow or Ingest Flow, of our quickstart application. The quickstart hosts a REST endpoint, and when called, triggers fetching, transforming, logging, and ingesting CSV as JSON into MarkLogic.
If you haven’t installed the quickstart, we suggest you check out Getting Started with the MarkLogic Connector for Mulesoft and walk through installing the quickstart, configuring credentials and properties, and running the quickstart. This tutorial assumes you have the quickstart installed and running.
If you already have data in MarkLogic and are interested in accessing the data, go to Access Data in MarkLogic using the Connector for MuleSoft to walk through the bottom flow, or the Egress Flow, that hosts a second REST endpoint, which triggers querying and retrieving JSON documents back out of MarkLogic. The content is sent back as a JSON-based HTTP response to your web client.
HTTP Listener
The ingest flow starts with the HTTP listener built-in to MuleSoft, listening on port 8081 (if your port 8081 is being used by another application, go ahead and change the listener to another port). To keep things simple, we’ll keep the interface open to all traffic without authentication or any SSL. Rest assured, like MarkLogic, MuleSoft has government-grade, robust security to help protect application endpoints from harmful misuse.
The endpoint of interest for our ingest flow is http://{host}:8081/nyc-inspections. MuleSoft listeners are configured to support both GET and POST by default. We will be using GET for our HTTP calls.
In the operation depiction, notice the arrow returning back to the listener to the gray icon at bottom. This represents routing the HTTP response back from the final operation in our ingest workflow, which we’ll see in action once we fire our ingest GET request.
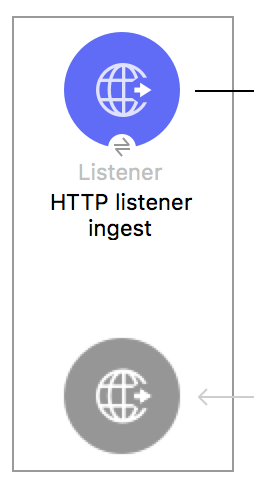
Figure 1: HTTP listener ingest
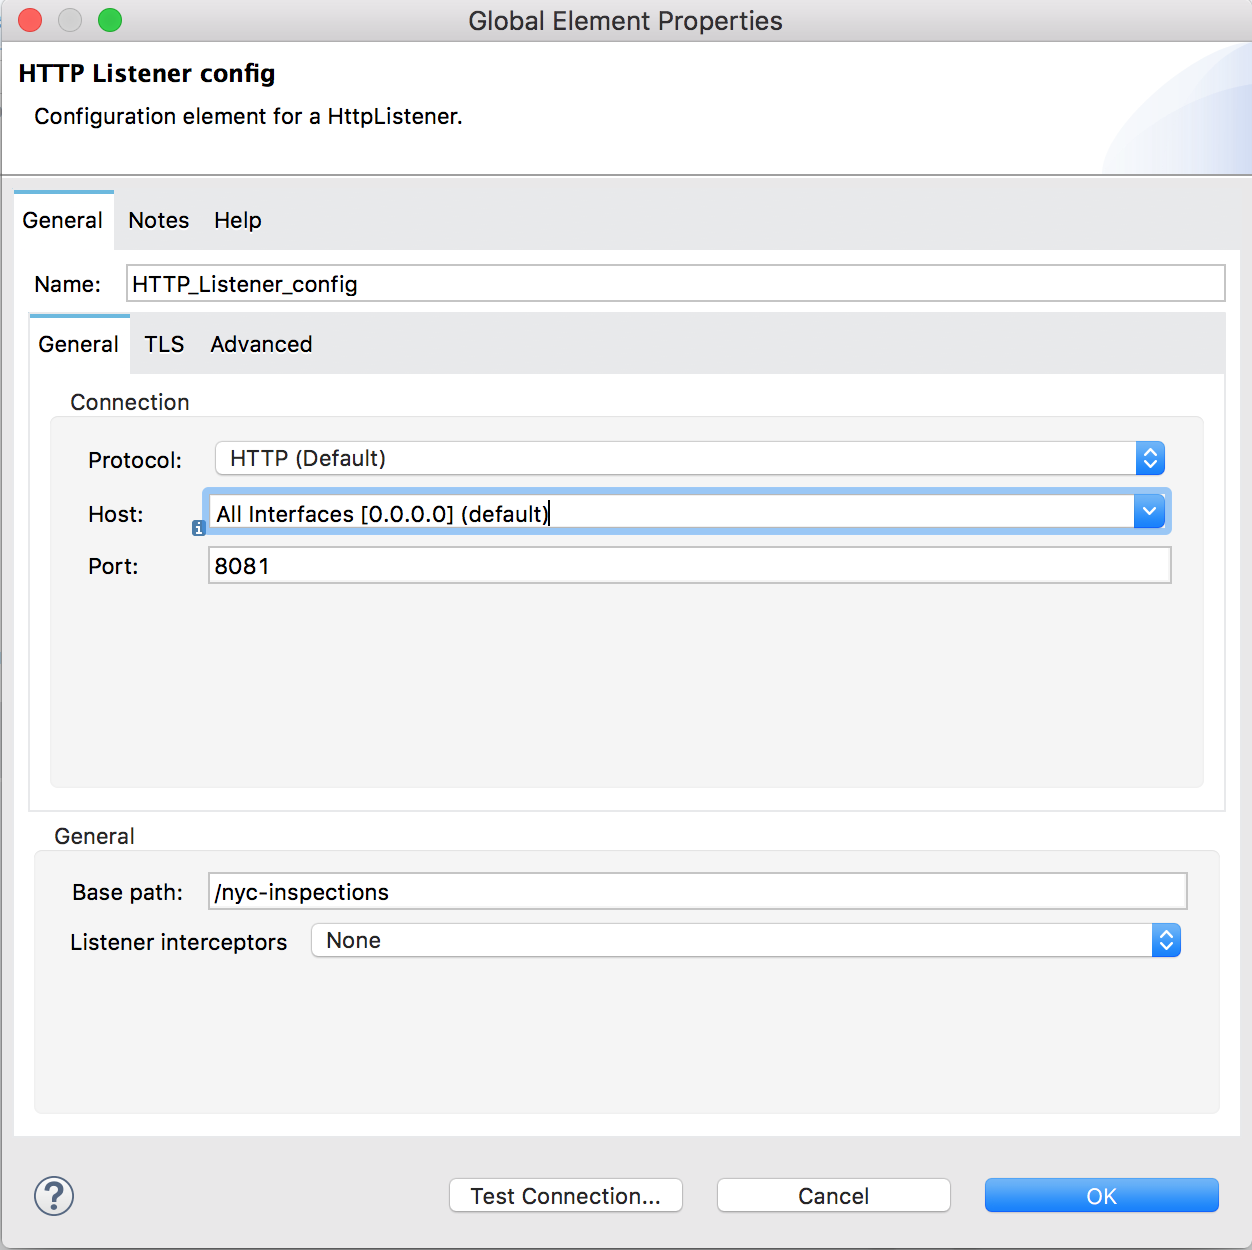
Figure 2: HTTP listener configuration
HTTP Request to Fetch CSV Data
With our flow triggered, the next operation we will complete will send an HTTPS request (built-in to MuleSoft) to the City of New York Data site to get our CSV. We also set the “MIME type” tab to “text/csv”. Notice what this does to the message output view within Anypoint Studio: our CSV column names become visible.
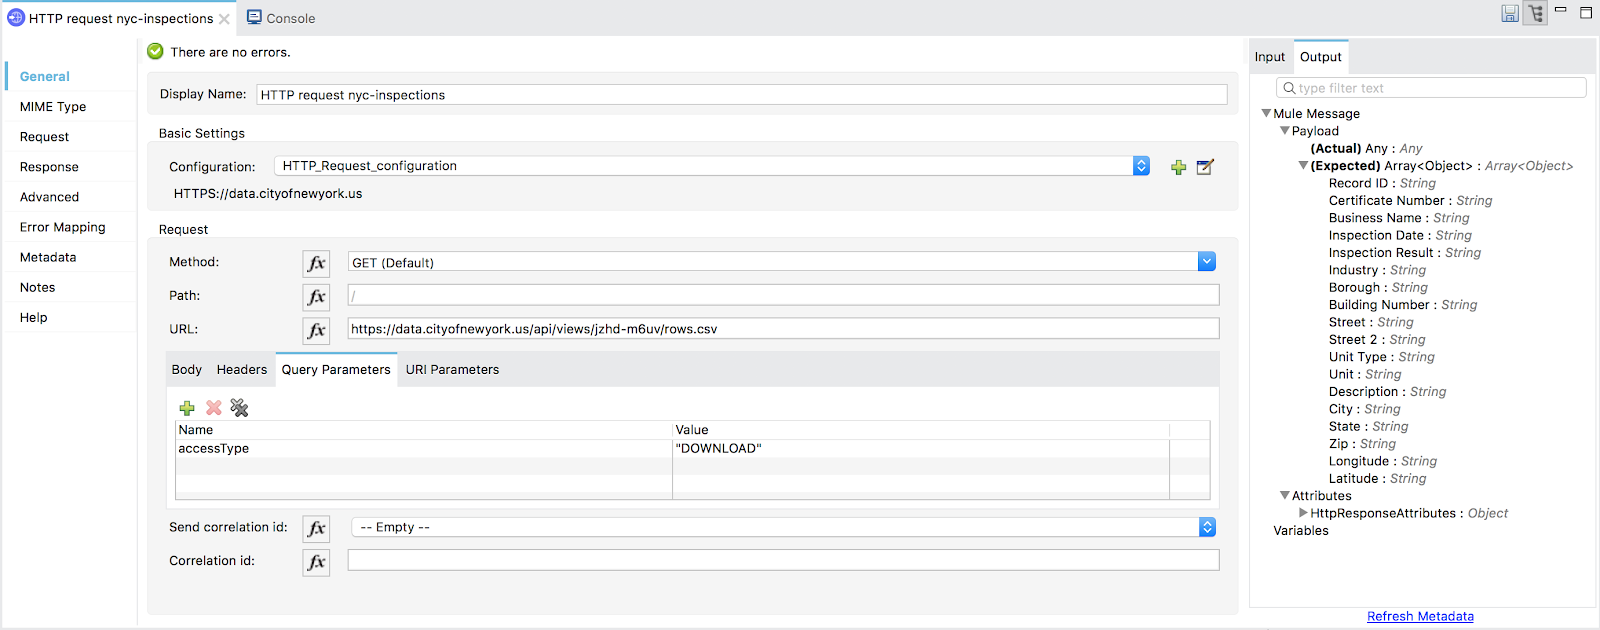
Figure 3: Message output view with CSV column names
Our next set of operations are run together in batch mode using MuleSoft’s built-in batch operations. The batch job is set to use the same number of threads and batch sizing as we’ll use in MarkLogic’s importDocs operation, which is backed by the MarkLogic DMSDK.
We recommend this practice to ensure optimal ingest performance. A batch job in MuleSoft consists of each of the following: one or more batch steps run in the Process Records phase, an optional On Complete phase, and the ability to generate reports on the outcome of the batch job. We will begin our batch steps below.
Transform CSV to JSON
Our first batch step will use the built-in Transform operation to transform each row of our CSV into a JSON format. Transformations in MuleSoft use an extremely powerful domain-specific language called Dataweave 2.0. Additionally, in Anypoint Studio, there’s a powerful graphical mapper that allows one to visually construct the transformation, using sample source data inputs and target data outputs.
Notice how the Transformation operation interface differs from other operations. There are four panes: an input/source data visualizer, a mapping visualizer, an output/target data visualizer, and the resulting Dataweave code we generated. Pay particular attention to the MIME type set in the Dataweave code section. We’ll want that value to be “output application/json”.
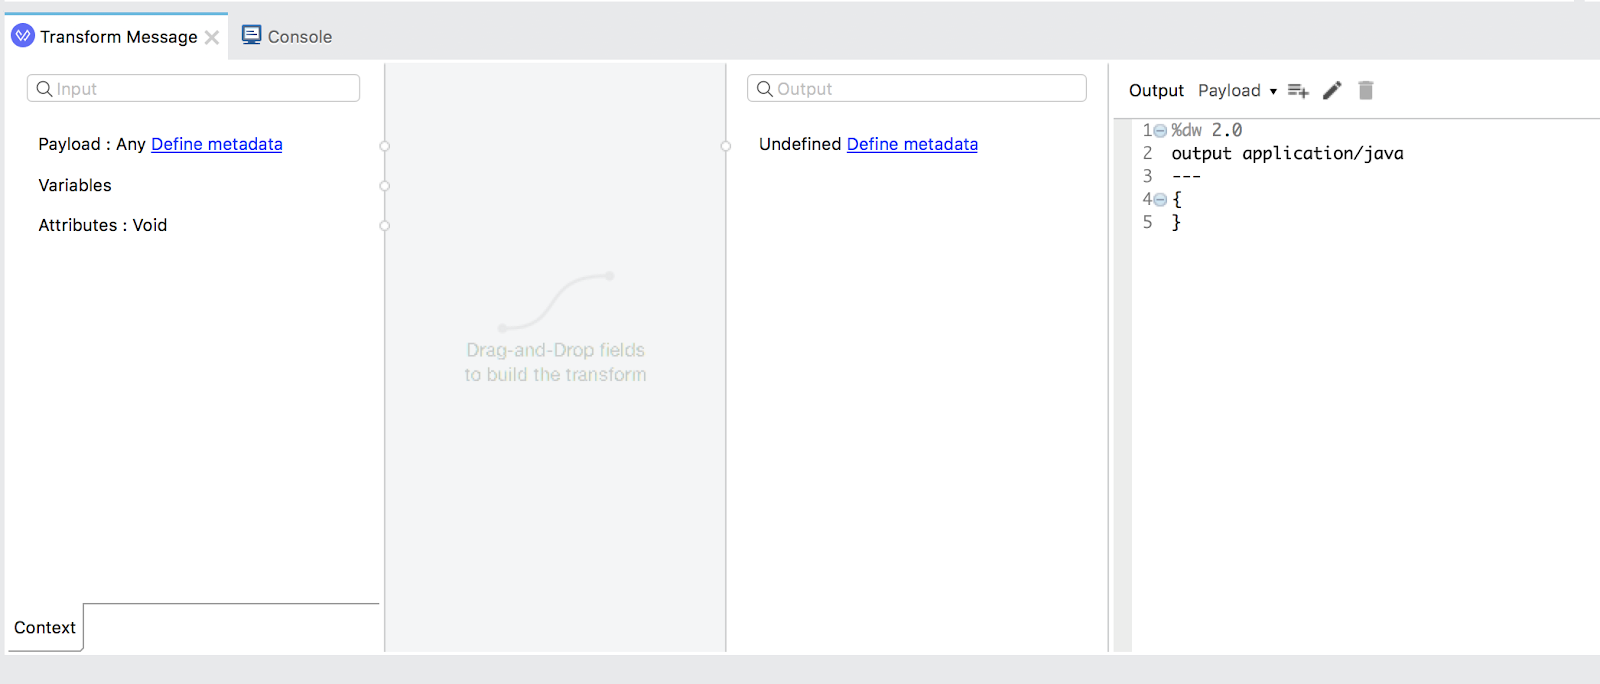
Figure 4: Transform input CSV
To set our source data inputs, in the input/source pane, click “Define metadata.” Follow along with the sequence of screenshots in Appendix A to use the inspections.csv file directly from the downloaded data to define our data mappings. To set our output/target data, we’re going to do the same as we did with the CSV inputs, except now we will provide a JSON Schema to define our target JSON model. There’s also a sample JSON instance document that is conformant to the Schema. Reference Appendix B to show the JSON Schema definition steps.
Once the data sources and targets are defined, we can begin mapping between the two. To do so, click a property in the source and drag it over to its intended property on the target data, to establish the relationship. Doing this generates our Dataweave transformation code. Also note that the JSON structure you wish to serve as the output from the transformation is fully editable directly in the Dataweave view, so you can type JSON here to further tailor the transformation code.
Usually, when using tools like MuleSoft and MarkLogic together, we want to ingest the data as-is. MarkLogic’s approach to data integration typically prefers an Extract, Load, Transform (ELT) approach, as opposed to Extract, Transform, and Load (ETL) approach. However, since we’re demonstrating MuleSoft’s capabilities, we’ll do a bit of data munging prior to MarkLogic.
In following figure, the visual relationship mapper primarily results in the addition of the properties to the transformation output. However, if we wish to tailor or manipulate the actual contents of the source data, such as capitalizing content, we must work beyond the mappings and use Dataweave constructs like variables, functions, module imports, etc., to alter the output. This depiction shows the following customizations:
- Specified that the output should be application/json. (Fun extra credit project: see what happens when you output application/xml instead, despite using JSON syntax in the Dataweave code!)
- Added some useful header metadata in the JSON, to assign the current ISO 8601 dateTime stamp with the now() function, and to assign a unique id with the uuid() function.
- Imported the built-in Dataweave Strings module for its capitalize() function, which removes all-caps from the source data.
- Used the sizeOf() function to determine when to replace empty strings from the source data with JSON nulls.
- Tokenized and converted the source data inspection dates from MM/DD/YYYY format to a MarkLogic-friendly, ISO 8601-compliant YYYY-MM-DD format, using Dataweave Date casting.
- Cast our latitude and longitude string data from the source as JSON Number data.
Dataweave can be used beyond transformations. It can be used in any operation. You’ll see mention of keywords like “payload,” “vars,” and “attributes,” throughout this tutorial. These are Dataweave references used to access data values and variables throughout the flows.“Payload” is the reserved reference to the message being passed in and out of operations.
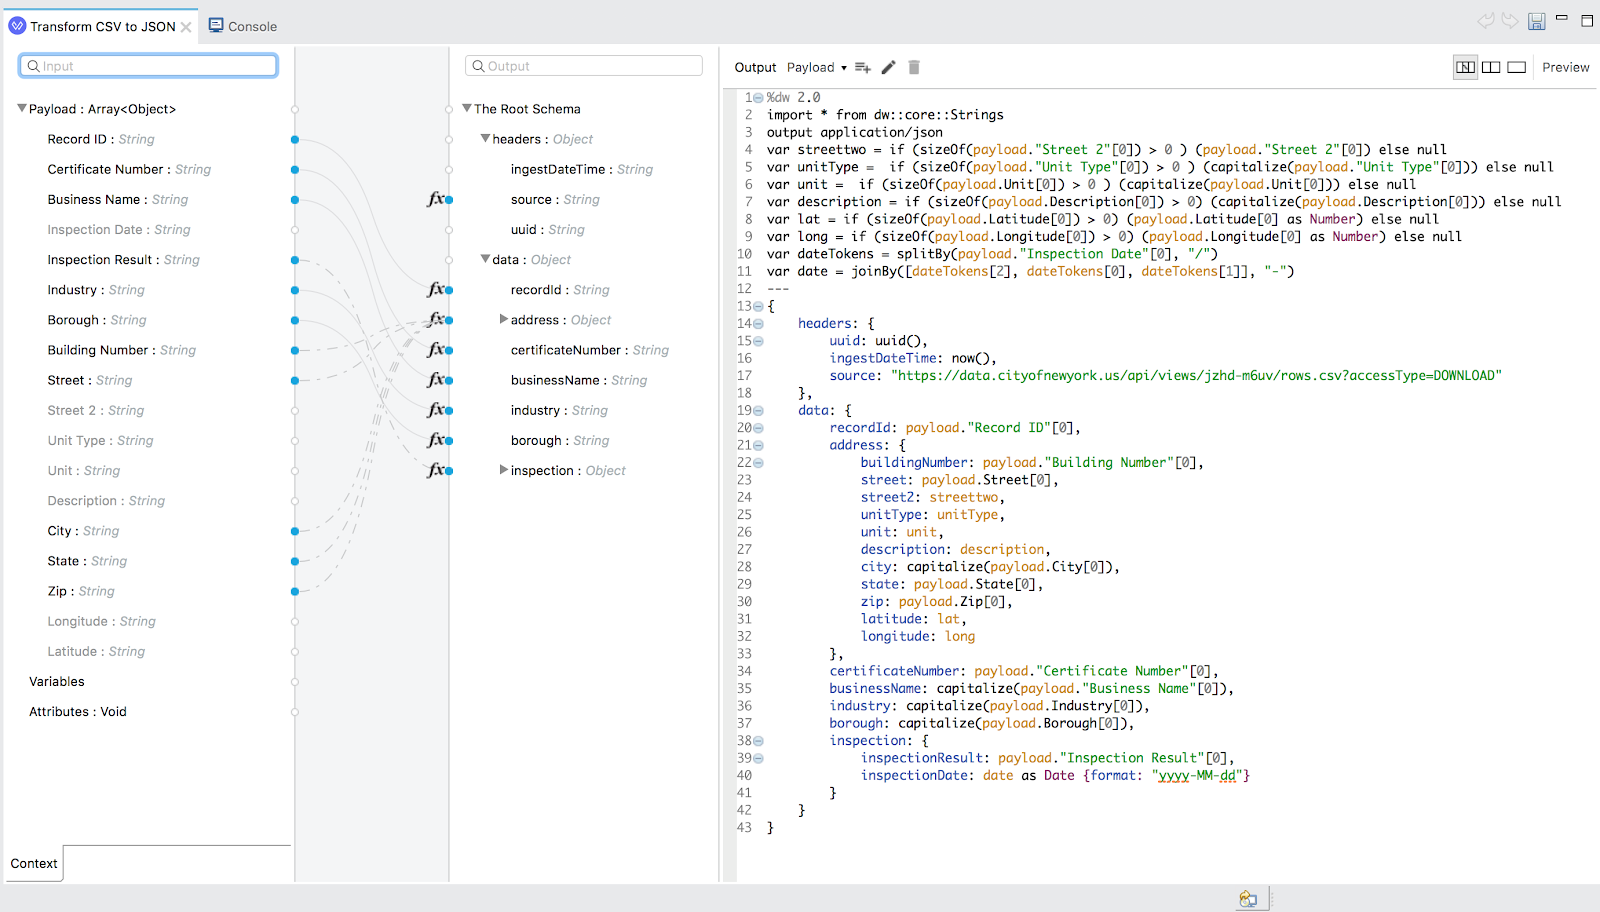
Figure 5: Final transformation
Write JSON to Filesystem
This batch step uses MuleSoft’s built-in File connector and the Write operation to write contents to our filesystem. The step is optional, and could be omitted in our final production application. It’s used here to simply verify that the transformation is working and that we’re outputting the correct number of records. The file writes can be removed altogether by deleting this specific batch step from the flow.
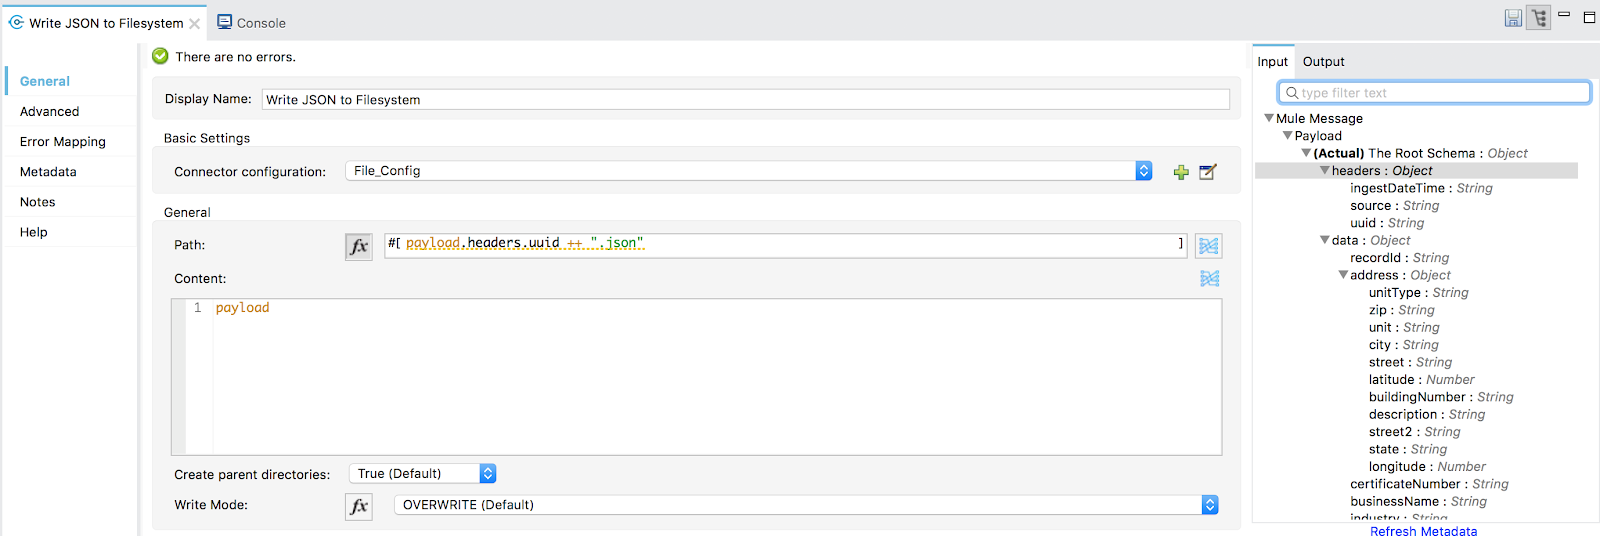
Figure 6: Write JSON to Filesystem
The output location of the JSON records depends on the directory you specified in the “automation-credentials.properties” file. The base name for each file is derived from the UUID that is generated for each record payload. The output requires about 750 MB of free disk space.
To monitor output, open a command line shell, and change directory to the location specified in “config.fileOuputPath”. Here, you can open “batchReport.json” to see the same output we received on our HTTP response to trigger the job. You can also open individual ${UUID}.json files to see the JSON contents.

Figure 7: FS count
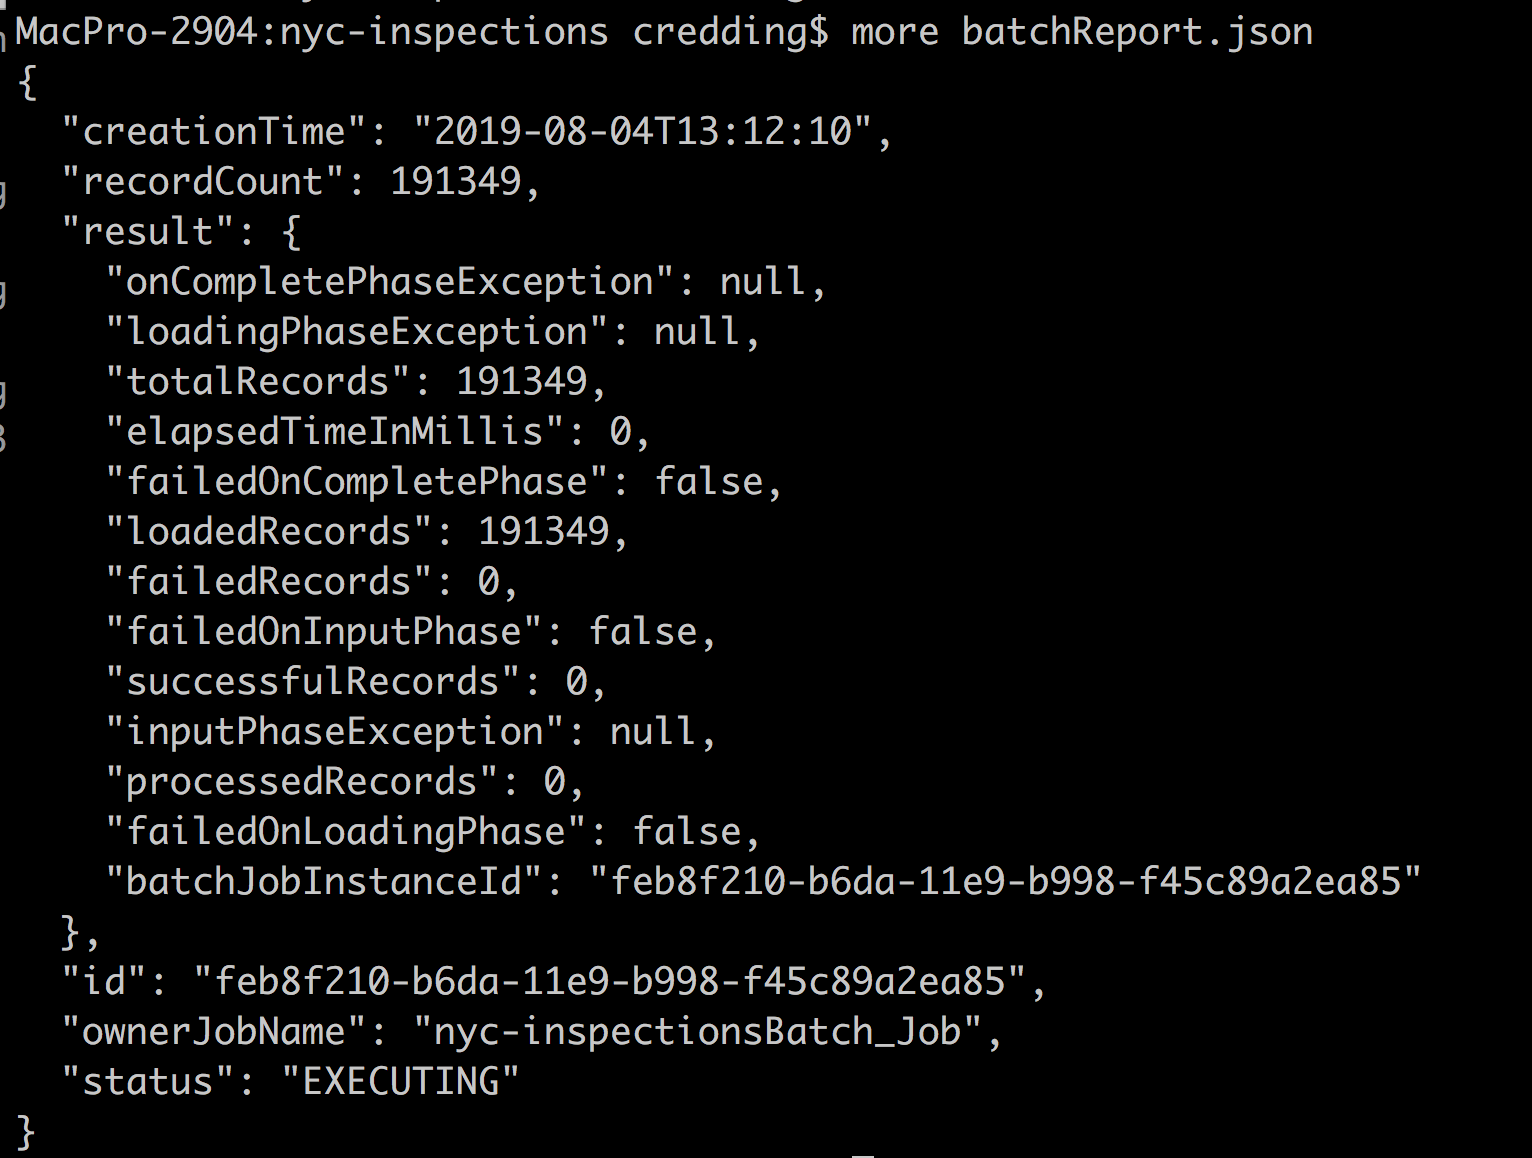
Figure 8: Batch report
Import JSON to MarkLogic
Now it’s time to ingest our inspections JSON documents into MarkLogic. To do this, we’ll use the MarkLogic Connector and the importDocs operation. If you’ve ever used MarkLogic Content Pump, then you’ll find the following configuration options familiar: output collections, output permissions, output quality, a way of composing our output URIs, specifying temporal collections, transformations, etc.The importDocs operation does work on the assumption that the incoming document type is a document, whether JSON, XML, text, or binary.
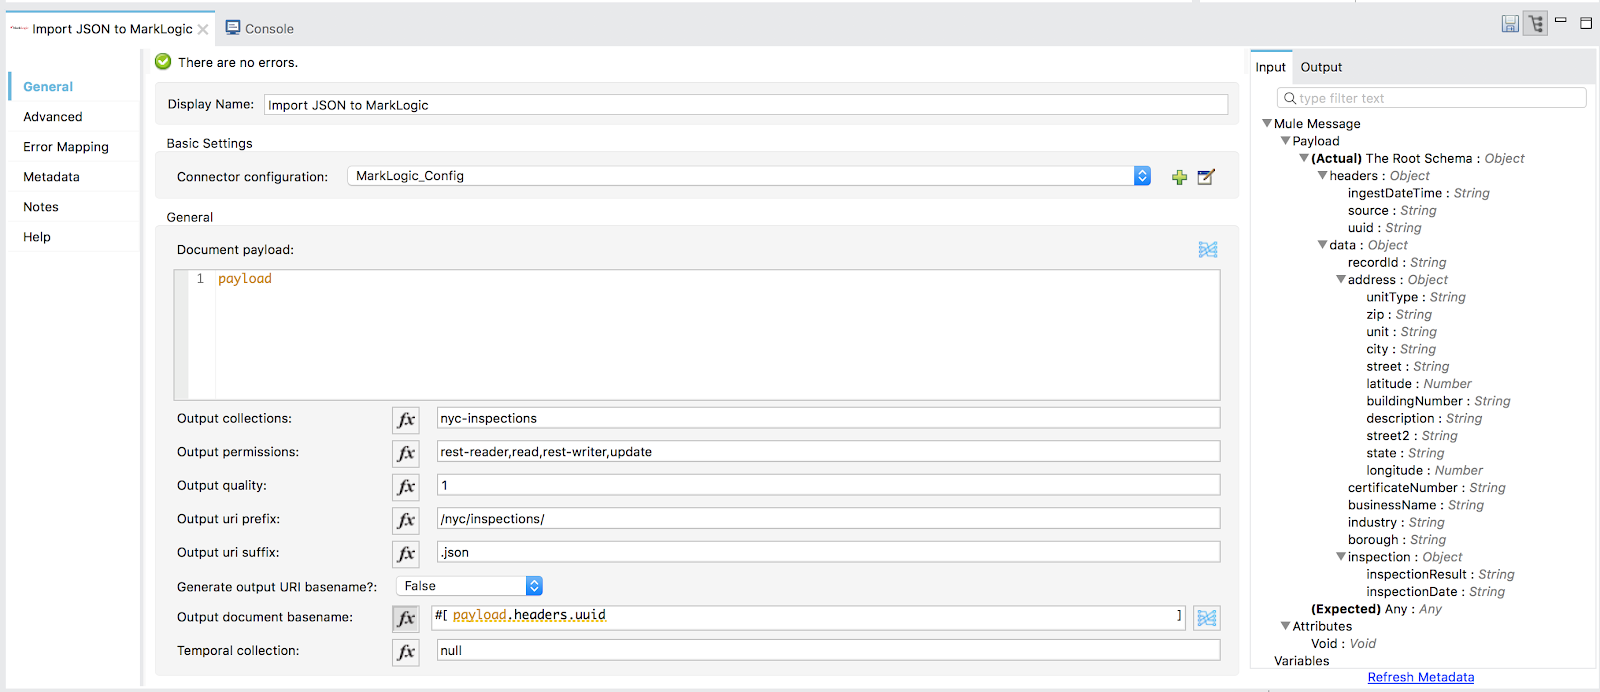
Figure 9: Import JSON to MarkLogic
Based on our configuration, the documents will go into MarkLogic belonging to a “nyc-inspections” collection. The rest-reader role will have read capabilities, and the rest-writer role will have read and update capabilities, since rest-writer inherits the rest-reader role by default in MarkLogic. Finally, our output document URIs will start with “/nyc/inspections/”. The base name of the document will be a UUID, set to each record’s “payload.headers.uuid” value, with a “.json” extension.
Let’s have a look at the Connector configuration as well. It takes the usual connection parameters: a username and password, the port to use, the authentication scheme to use (usually digest), and even a database to use. The database parameter is only necessary if you use port 8002, or the Manage app server (the app server can be used to read from and write into any specified database where the user has sufficient privileges). Additionally, we can specify the number of threads and the batch job size to use for DMSDK operations (as well as job names), and a server-side transformation to invoke.
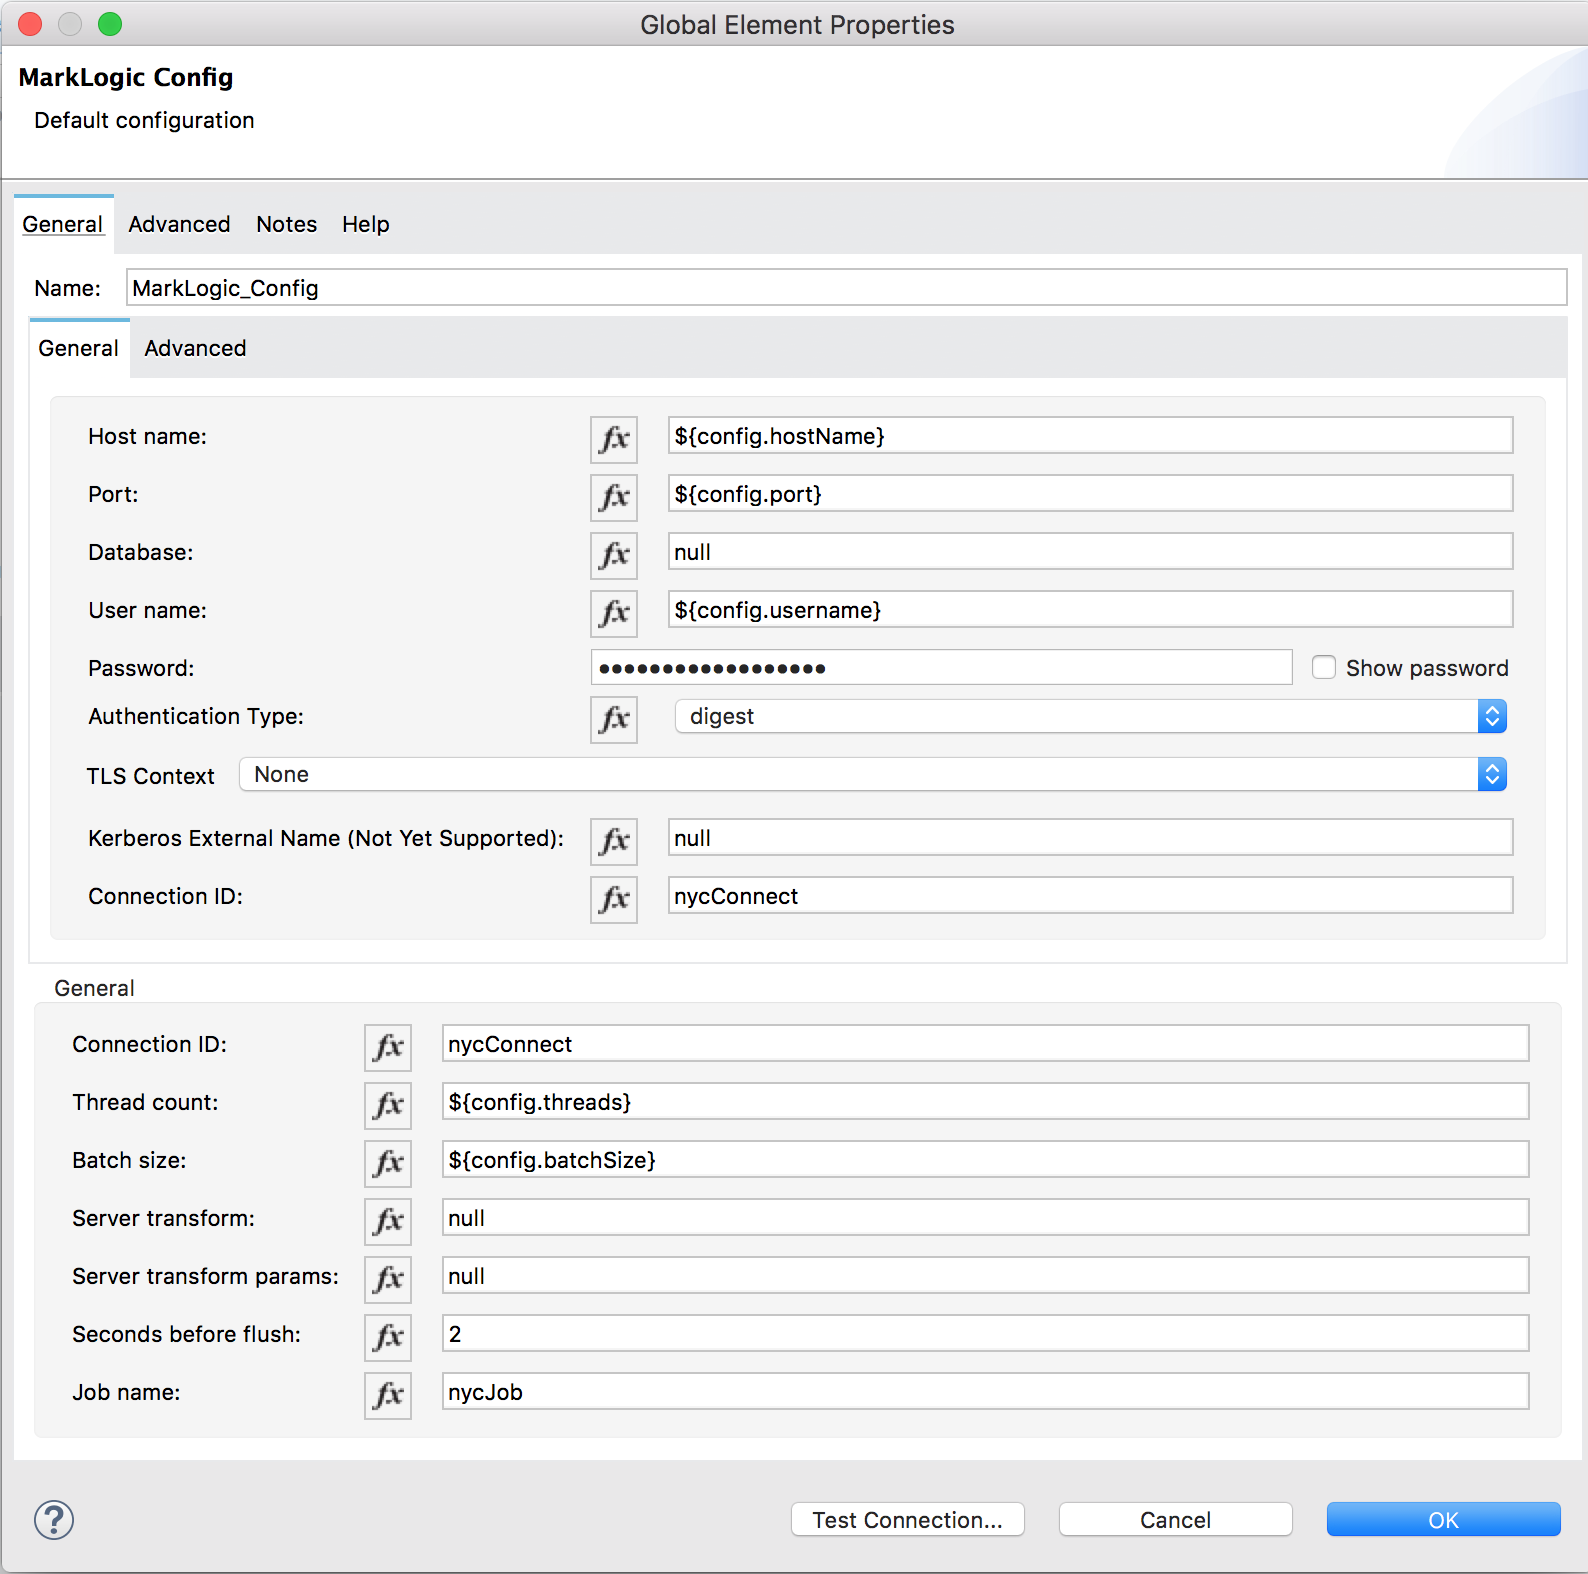
Figure 10: MarkLogic import configuration
Track progress of the MarkLogic document ingest in the running application Console, or in MarkLogic’s built-in Query Console on port 8000:
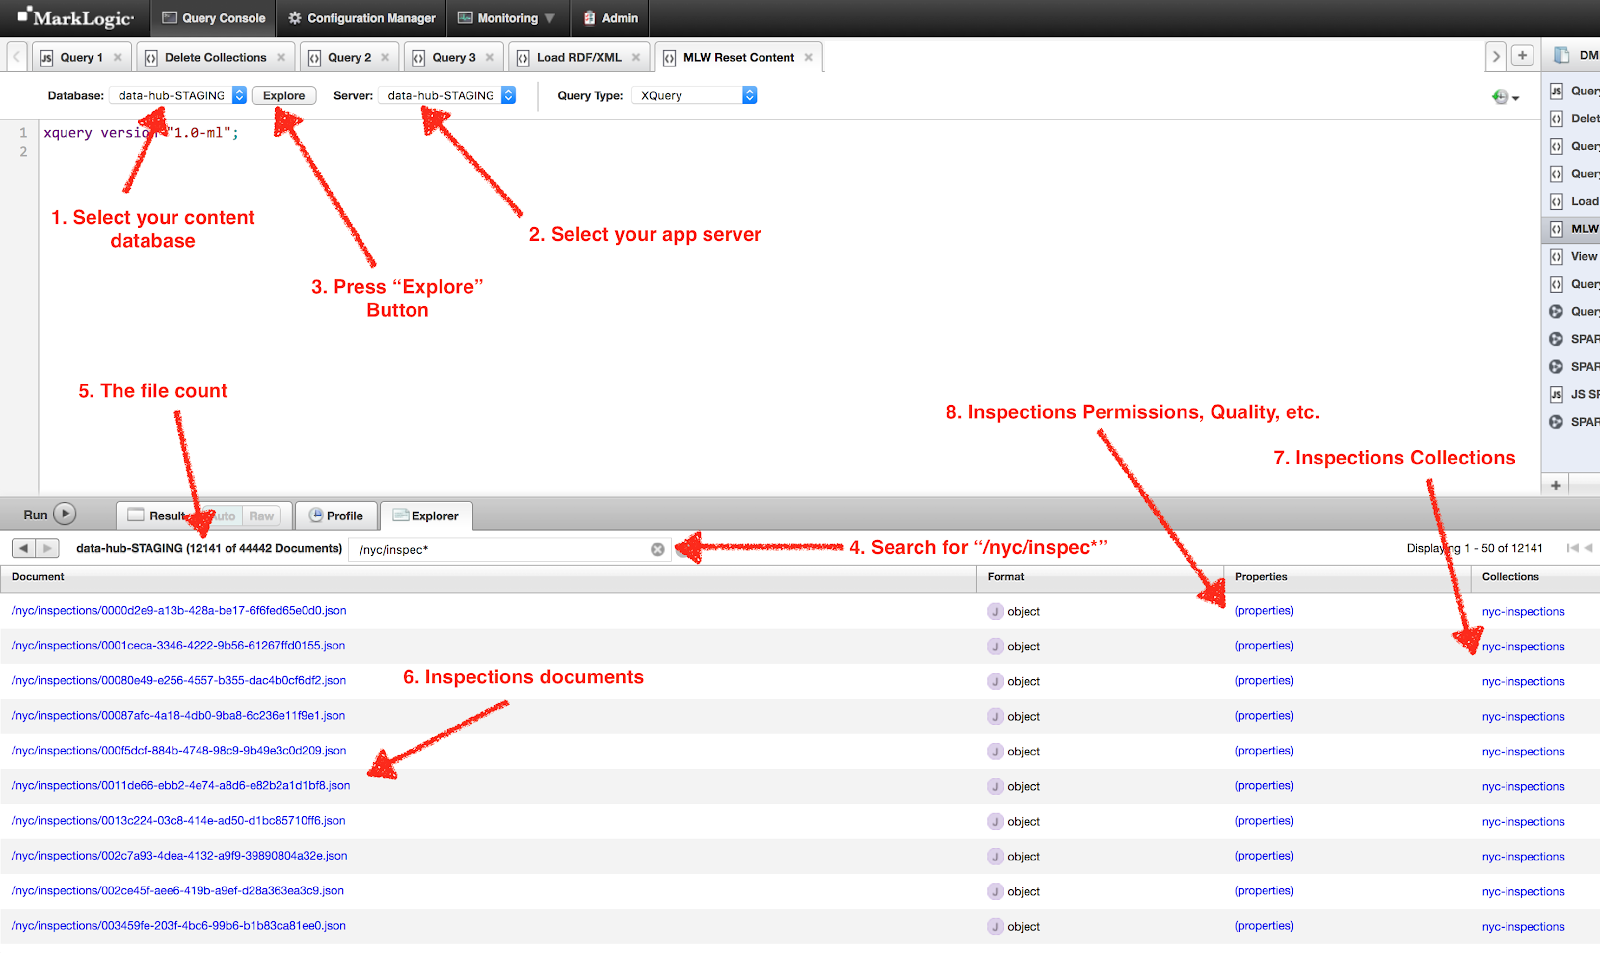
Figure 11: Query Console count
Transform Batch Report to JSON and Return HTTP Response
We’ll finish the batch job and the rest of our flow by writing out a batch report– a MuleSoft best practice. A batch job automatically produces a “BatchJobReport” output, which is a binary representation of the job outcomes. We can do a one-line transformation to output the batch report payload as JSON. Then, it can be written out to the filesystem, logged (with the Logger module), and even responding back to the HTTP call that triggers the workflow.
That’s what we’re doing here; the batch report JSON is used for our HTTP response body back to the requesting user. Notice the arrow underneath the Set Payload operation. It returns all the way back to the HTTP Listener to set the response. Note that this is the same batch report that was written out to the filesystem as “batchReport.json.”
There are potentially other useful implementations for this, such as storing records of job outputs back to MarkLogic. In essence, this operation is similar to the getJobReport() operation within the MarkLogic Connector module. The difference is that getJobReport() is a representation of the batch outcomes from the DMSDK perspective. However, either, or both, could be used in the equivalent of the Data Hub Framework data-hub-JOBS database for reporting job status.
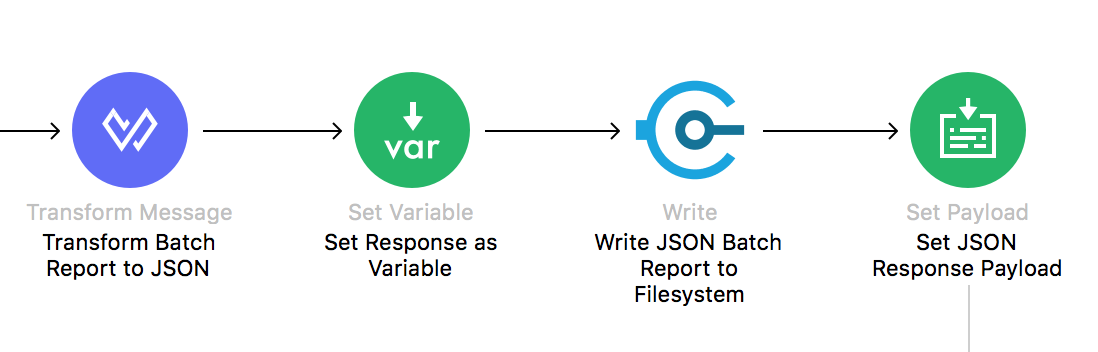
Figure 12: Response
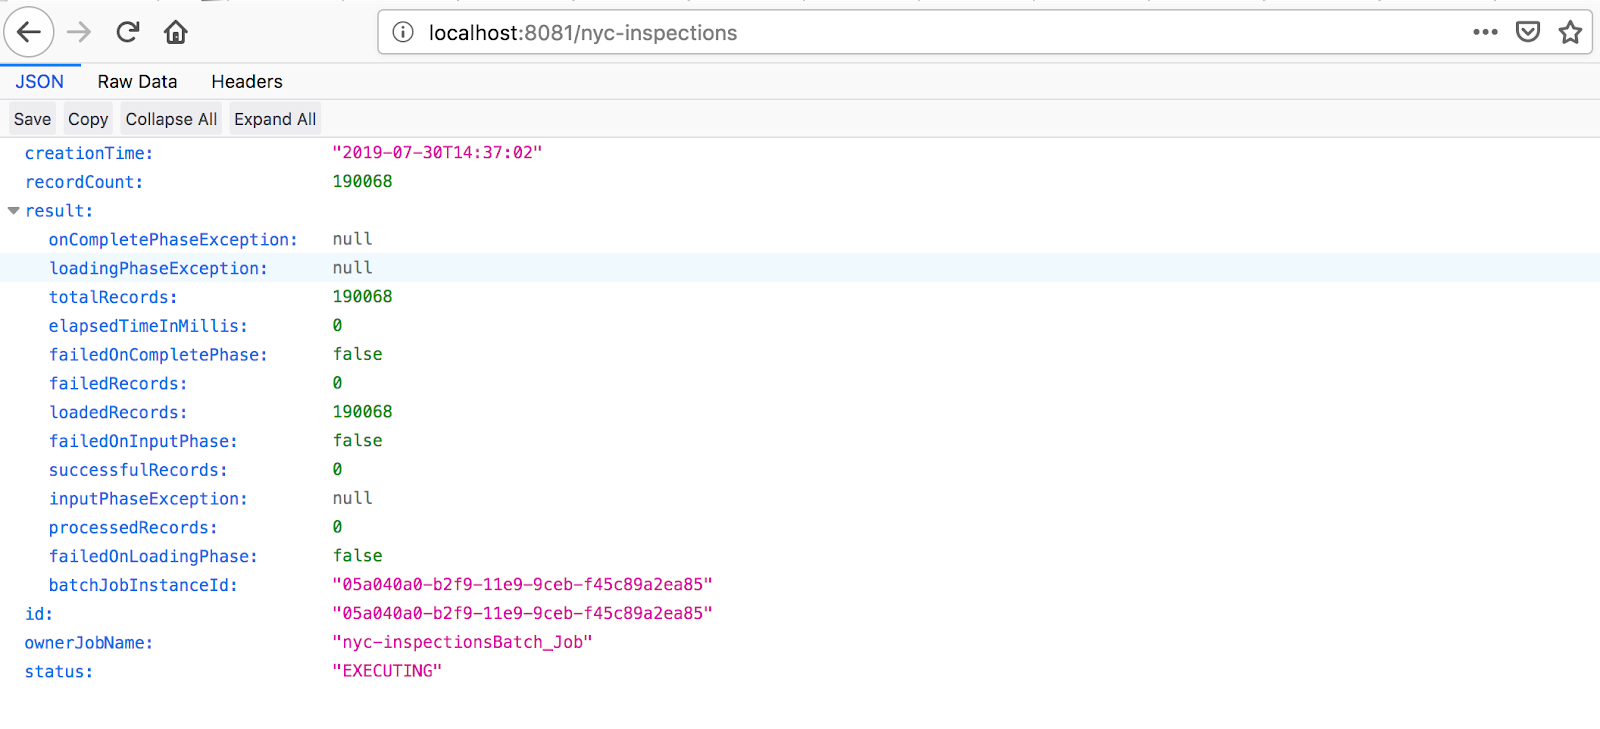
Figure 13: nyc-inspections response
Here, we’ve discussed the top flow, the Ingest Flow, of our application, which hosts a REST endpoint, and when called, triggers fetching, transforming, logging, and ingesting the inspections CSV content as JSON into MarkLogic. If you’re ready for the next step of the series, or the Egress flow, go to Access Data in MarkLogic using the Connector for MuleSoft.