In a previous blog, Matt Allen introduced the MarkLogic Connector for MuleSoft, which came about due to the recent partnership between the two companies. The connector was presented to the public for the first time at MarkLogic World 2019, and now is available on MuleSoft Anypoint Exchange.
The connector offers functionality to ingest content into MarkLogic, as well as functionality for query-driven data egress and deletion of document content in MarkLogic, support for enhanced security with two-way SSL and certificate authentication, and support for temporal collections. The connector allows you to orchestrate the entire lifecycle of MarkLogic document content from within the MuleSoft ecosystem.
Whether a seasoned MarkLogic user or a seasoned Mulesoft user, using both technologies together has a bit of a learning curve. This tutorial aims to help get you acquainted using both technologies together via the connector quickstart.
The MuleSoft Ecosystem: Anypoint Studio vs Design Center
MuleSoft applications, such as the one demonstrated in this tutorial, can typically be run in two different environments: MuleSoft Anypoint Studio and Anypoint Design Center. Anypoint Studio is Java-based and built atop the popular Eclipse IDE tool. It is designed to be installed and run on physical hardware, and is primarily geared toward application flow development.
Anypoint Design Center, on the other hand, is all cloud-based. It sports a web-based user interface that allows for application flow development; it also supports design and publication of standards-based RAML REST API design, as well as an entire cloud infrastructure provisioning service for hosting running applications for your organization.
To keep things simple, we designed our quickstart to run with Anypoint Studio.
Requirements
Below you’ll find downloads that are needed to follow along with the tutorial:
- MuleSoft Anypoint Studio, version 7.3.3 or newer. Create an account with MuleSoft to download; this sign-in will be required to install the MarkLogic Connector from Anypoint Exchange. Since Java is required, we recommend using the built-in version of Java that ships with Anypoint Studio, as opposed to leveraging an existing copy in your environment. Installing Anypoint Studio with the default settings is recommended for the purposes of this tutorial. The host where Anypoint Studio resides should be network addressable so that a web client can reach the MuleSoft HTTP listeners.
- A running MarkLogic instance or cluster based on MarkLogic Server 9 or 10 (minimum of 9.0-6 is required). The host should be network addressable so that the MuleSoft runtime environment in Anypoint Studio can reach MarkLogic over HTTP. You will need a MarkLogic user capable of executing common built-in MarkLogic REST endpoints. The user should have read capabilities for the rest-reader role and update capabilities for the rest-writer role, at minimum. You also need a database with forests available for reading and writing, with a REST-aware application server using digest authentication servicing the database.
- A graphical or command-line web client, used to send HTTP GET requests to MuleSoft’s HTTP listeners. Examples include common web browsers like Chrome, Firefox, cURL, etc.
- The quickstart files. This includes an Anypoint Studio .jar file that will serve the executable installation file for this tutorial.
Here are a few optional downloads that may also help you get started:
- MarkLogic Data Hub Framework, version 4 or 5. While the MarkLogic Connector for MuleSoft was designed for use with the Data Hub Framework and Data Hub Service, for the purposes of this tutorial, the framework is not required.
- A CSV-aware spreadsheet tool or text editor, for viewing our source CSV content.
- An XML- and JSON-aware text editor, for viewing JSON, JSON Schema, and the MuleSoft Flow XML content.
Install the Quickstart
Within Anypoint Studio, go to File → Import on the menu bar, and select “Import”:
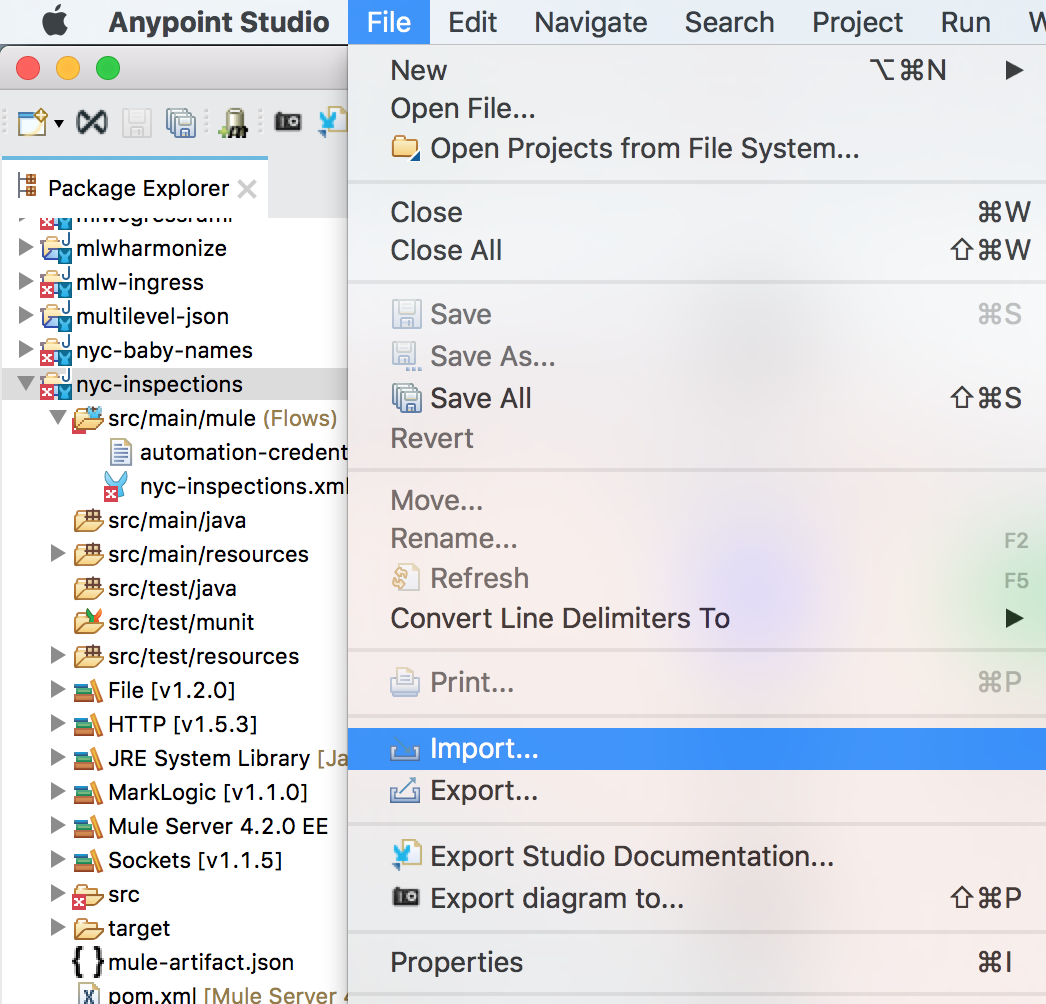
Figure 1: Importing mule application into Anypoint Studio
Select “Packaged mule application (.jar)” from under “Anypoint Studio”:
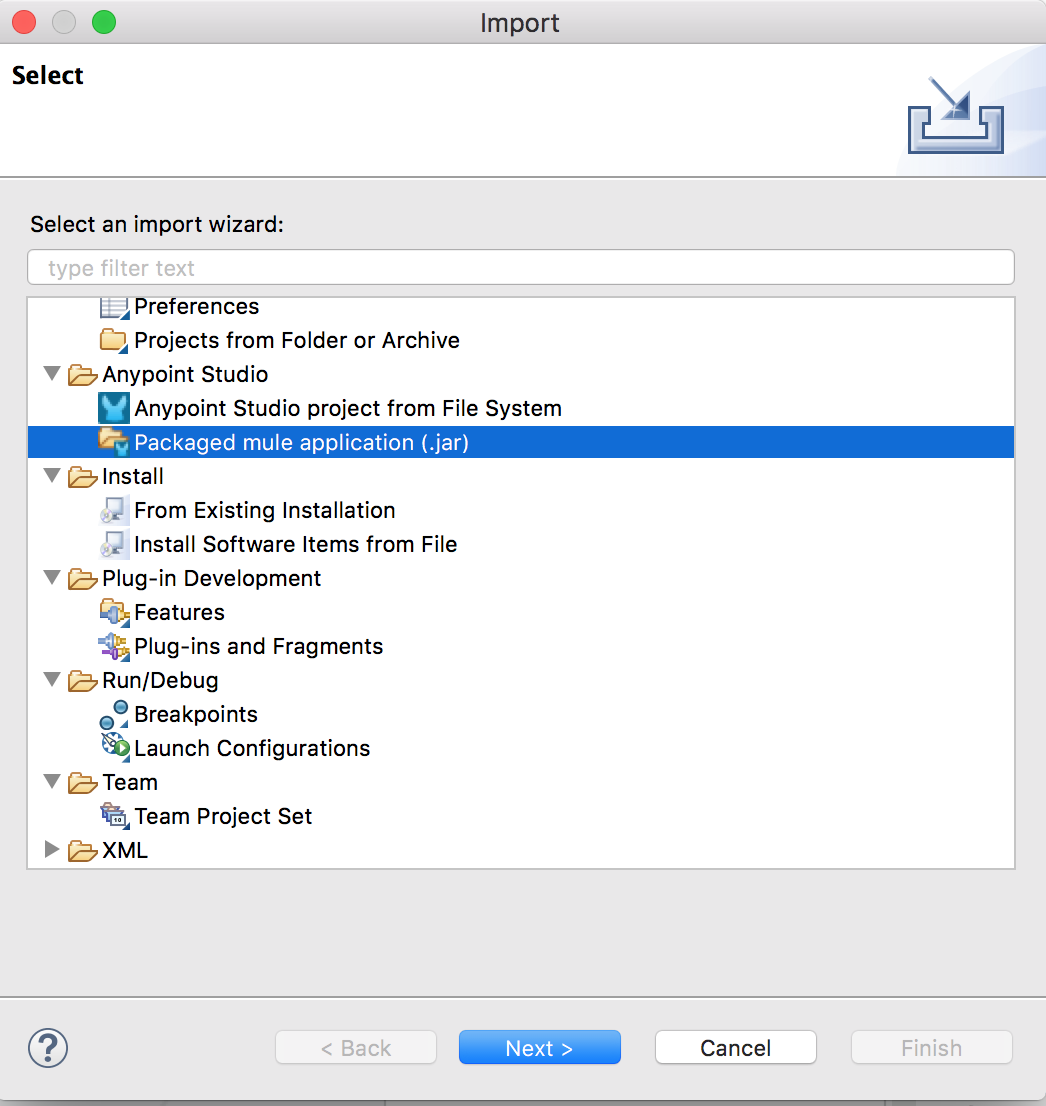
Figure 2: Select packaged mule application
On the “Import Mule Project” window, select the project .jar file by clicking on the button at right (with three dots), and find the nyc-inspections.jar file from the downloaded quickstart files. Assign a project name (the default “nyc-inspections” should suffice).
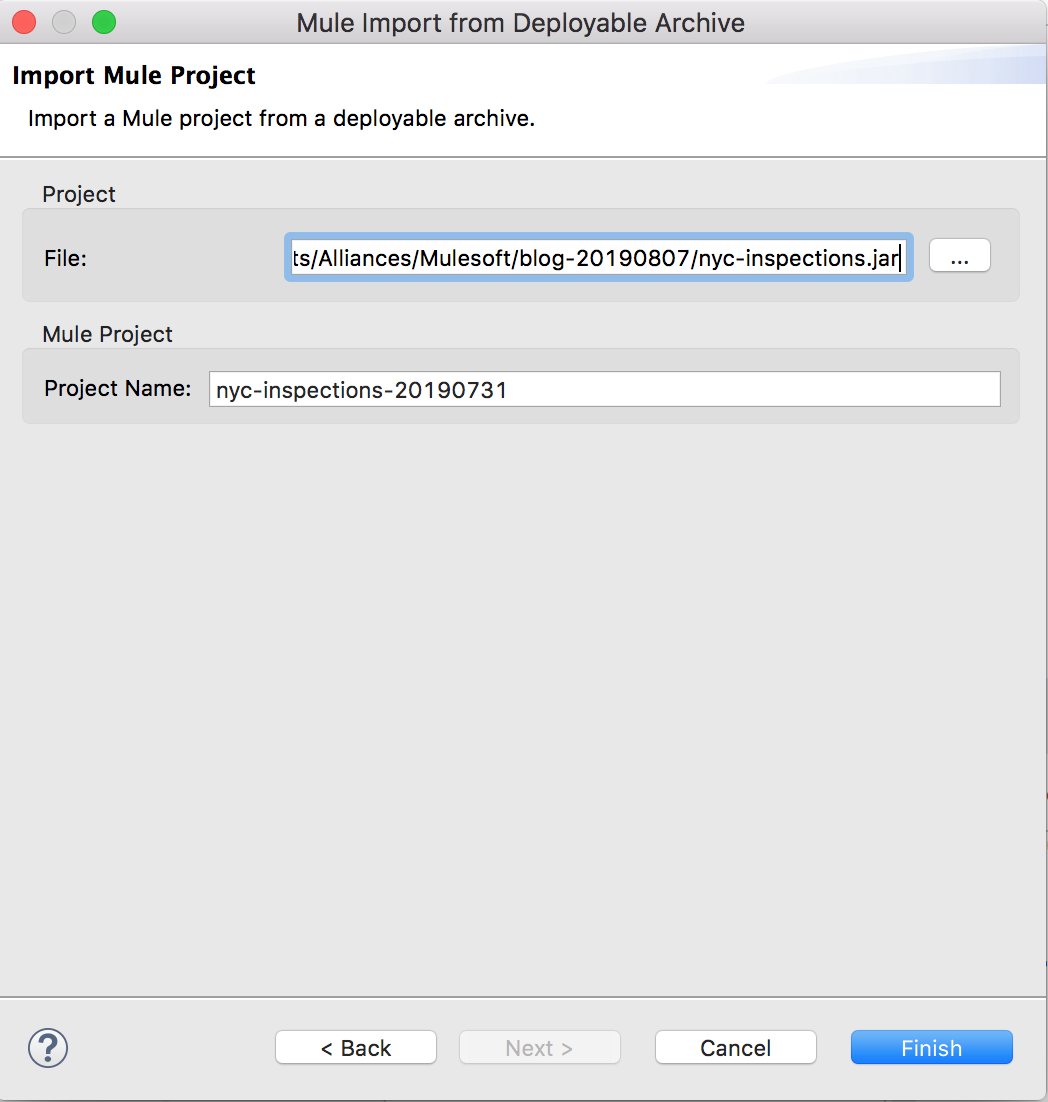
Figure 3: Assign project name
Optional: Install Additional Modules through Anypoint Exchange
Below is a screenshot of the Mule Palette, found at the far right side of Anypoint Studio:

Figure 4: Mule Palette
The Palette is where you can see which modules are loaded within your application, and which operations are available. Typically, the widgets depicted in the flows are put there when you drag and drop operations from the Mule Palette into the canvas. The imported .jar application includes everything you need for it to run successfully in terms of installed connector modules.
What we’ve imported already has the MarkLogic Connector for Mulesoft included; however, this is a great opportunity to learn how to add more modules to the Palette yourself through the use of the Anypoint Exchange from Anypoint Studio.
Firstly, at the top of the Mule Palette, click “Search in Exchange.”
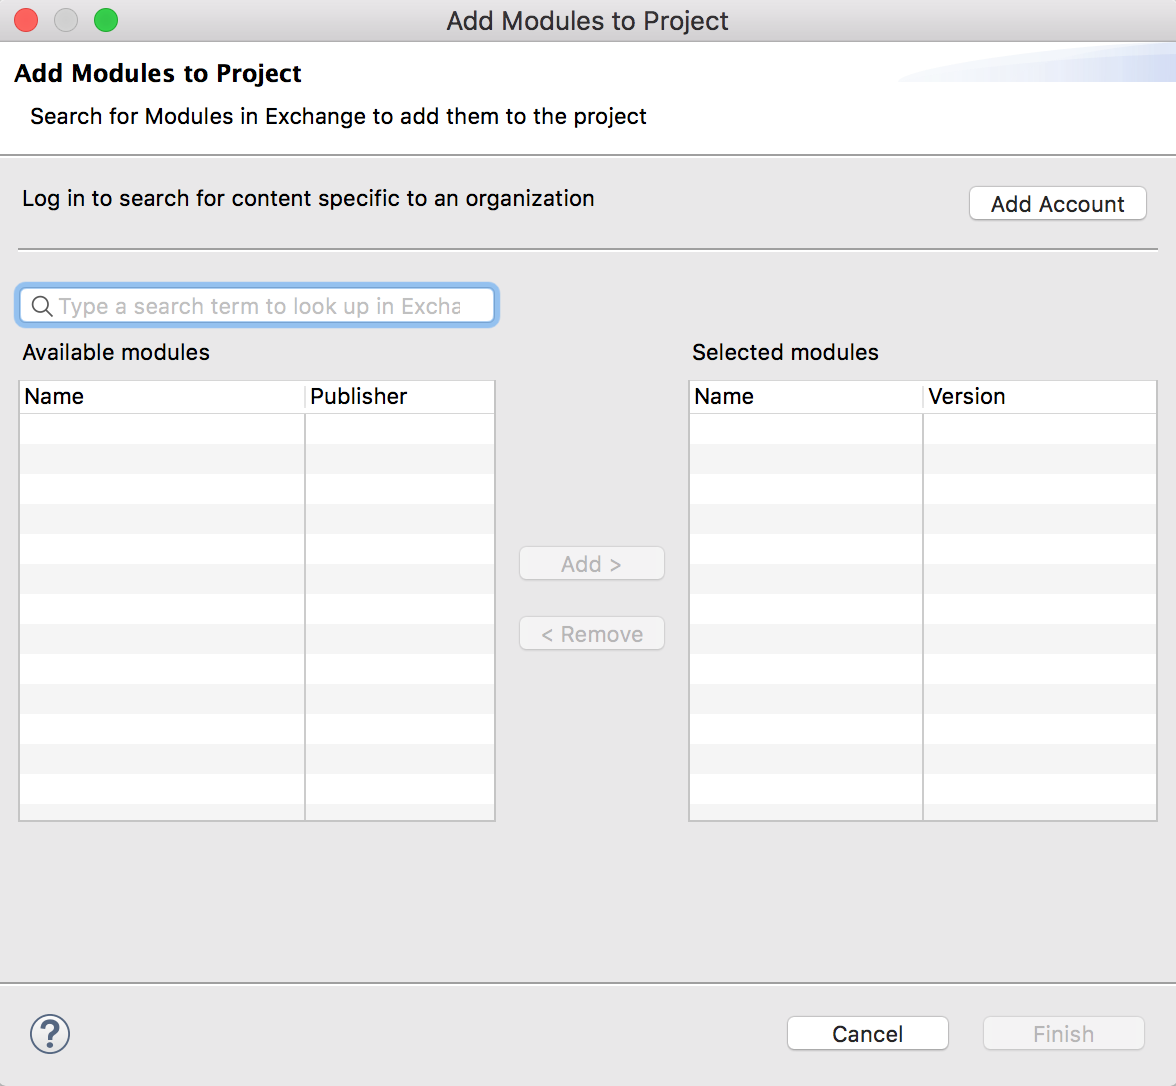
Figure 5: Add account in Add Modules to Project
Then, at the top of the resulting screen (shown in Figure 5), there’s a button called “Add Account,” used to log in for Anypoint Exchange. Click and sign in with the credentials you used when you downloaded Anypoint Studio.
Figure 6: Login for adding a module
Once authenticated and back at the “Add Modules” search screen, begin searching for the Connector of interest. For example, the MarkLogic 1.1.0 Connector is being searched and added in the screenshot below (note that official connectors are published by MuleSoft, so lean on the side of selecting those):
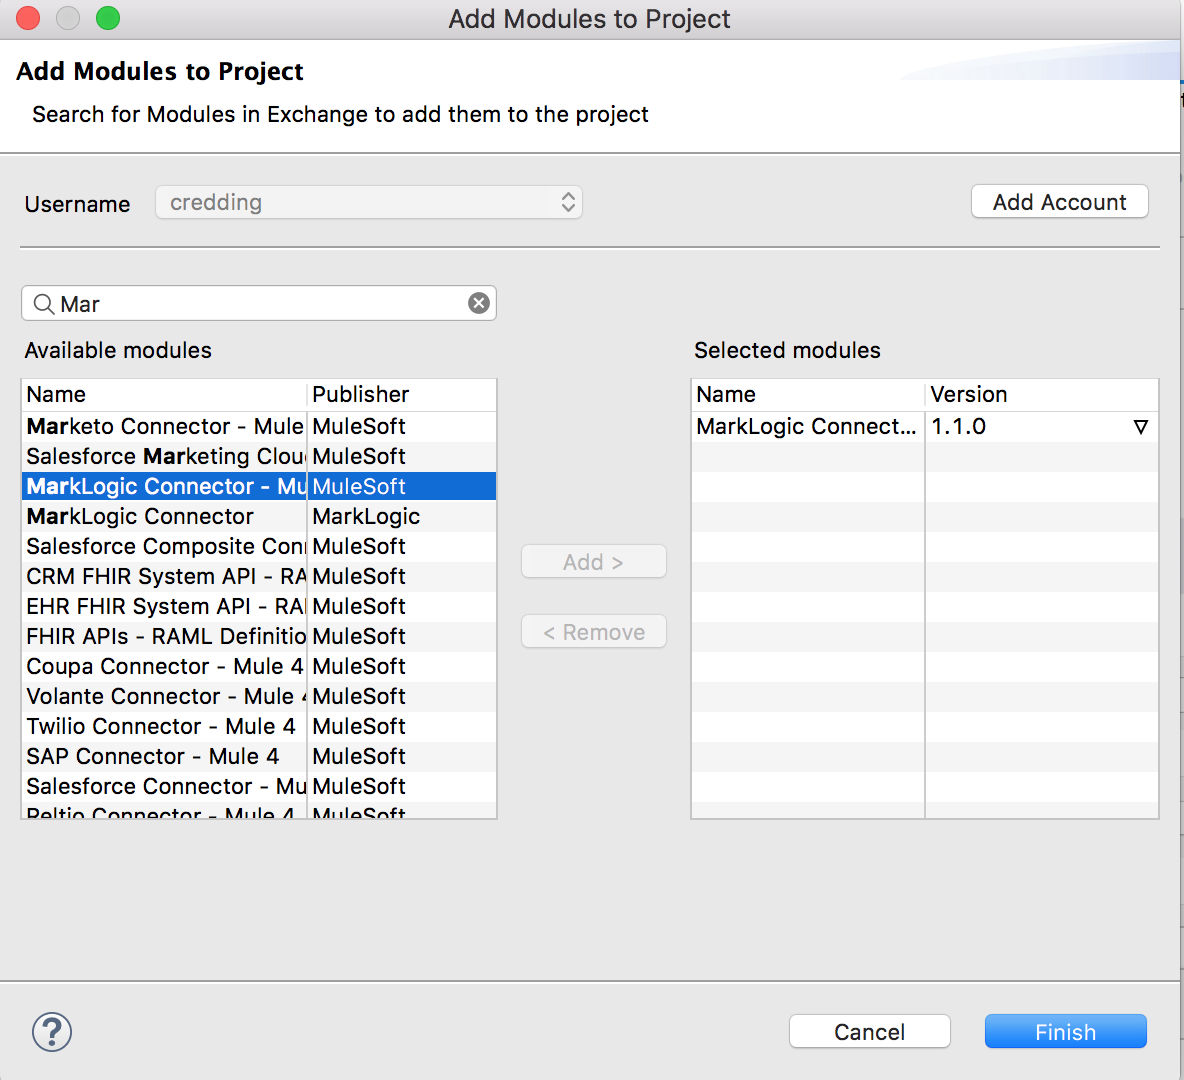
Figure 6: Searching and adding MarkLogic 1.1.0 in “Add Modules”
After clicking the “Finish” button, the Palette reflects the addition of the module of interest, plus its available operations.
Configure the Application Credentials and Properties
Before we dive into the operations and run the flows, we should assign the credentials and properties used for various operations in the application. Here, we’ll use the MarkLogic user, used underneath the covers by the MarkLogic Java API and Data Movement SDK (DMSDK), to establish a connection to MarkLogic.
Manually edit the “automation-credentials.properties” file in the Anypoint Studio Package Explorer under “nyc-inspections” →
src/main/mule (Flows)” → “automation-credentials.properties.” Double-click the file to open it in the editor.
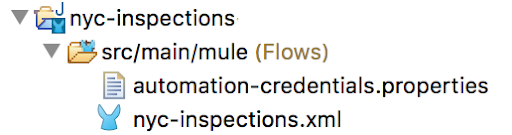
Figure 8: automation-credentials.properties file location
This properties file contains user credential and connection details, as well as other Connector properties.
| username password port hostName | Related to the MarkLogic connection. The port (8010) refers to the target MarkLogic system and is tied to the optional Data Hub Framework data-hub-STAGING database. If you don’t have Data Hub Framework installed, pick another application server installed on your system. When in doubt, default to using port 8002, which is the “Manage” app server in MarkLogic. |
| threads batchSize | Used by both the MarkLogic DMSDK, as well as the MuleSoft batch operations. Four threads with a batch size of 1000 is usually a sufficient configuration for most developer systems. |
| fileOutputPath | Location on our filesystem to write JSON data throughout the process. This can be optionally used for monitoring or logging output. In a Windows system, use “c:\”. |
Figure 9: automation-credentials.properties
Edit as needed, and click “File” → “Save.”
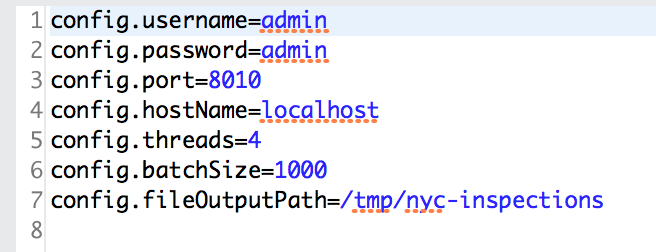
Figure 10: Configuring the application credentials and properties in editor
As a further note, there are many more configuration options on each operation. We use “automation-credentials.properties” as a way of centralizing commonly used values. We could even encrypt our credentials files if needed.
About the Quickstart
Now that you’ve installed the application and configured some reusable credentials and properties, let’s discuss the flows. We’re working with openly available data in CSV format published by the City of New York Department of Consumer Affairs that pertains to inspections performed on New York City businesses. Inspected businesses receive certification as to the status and outcome of the inspection, such as whether they passed, failed, etc.
In our flow, we’re going to connect to the CSV data live on the NYC Data site, over HTTP. However, the CSV (as well as its accompanying data dictionary) is also provided in the application download folder. If you open the downloaded CSV, you will notice that it contains over 190,000 rows of data, each of which will become a JSON document once ingested into MarkLogic. The dataset has 18 columns. Those columns will become property names in the JSON documents ingested into MarkLogic. The data is dirty; many of the values are null or make use of mixed capitalization, etc. We address these in our flows.
Extra credit opportunity: Instead of ingesting the CSV over live HTTP, you can also use the CSV included in the download. Identify the correct MuleSoft Connector module and operation to successfully load in the inpsections.csv data from your filesystem, and update the ingest flow accordingly.
Figure 11 is a screenshot of the application as shown in Anypoint Studio, which consists of two flows:
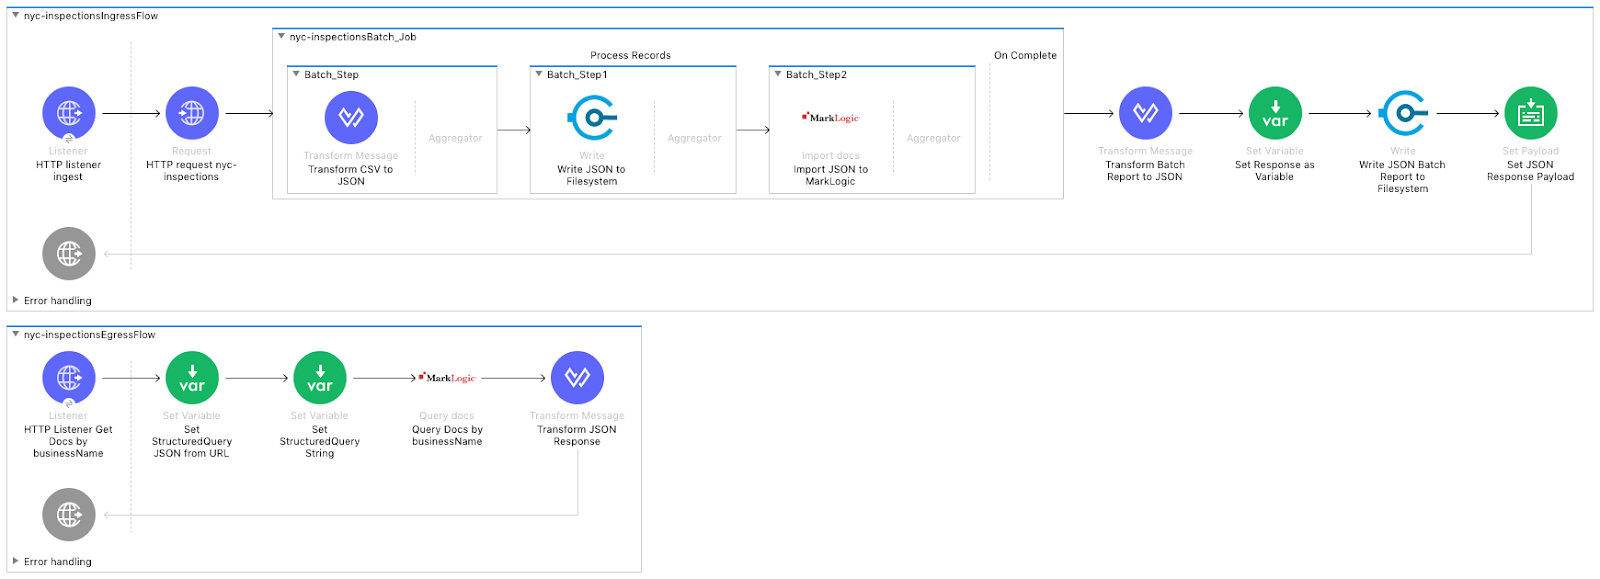
Figure 11: NYC inspections
The top flow, or the Ingest Flow, hosts a REST endpoint, which when called, triggers fetching, transforming, logging, and ingesting the inspections CSV content as JSON into MarkLogic. The bottom flow, or the Egress Flow, hosts a second REST endpoint, which triggers querying and retrieving inspection JSON documents back out of MarkLogic. The content is sent back as a JSON-based HTTP response to your web client.
Once the Mule application is running, both flows are REST-aware. They each offer a listening HTTP application server with their own endpoints. When triggered via HTTP GET calls, they kick off the pipeline of operations specified in the flow, and ultimately return a response back to the user.
As we begin looking at the application and the configuration of each operation, it’s important to keep in mind that at its core, MuleSoft is an enterprise service bus. As such, the concept is centered around the idea of “message in, message out.” Operations within a flow have message inputs and outputs, and MuleSoft understandably likes to know as much about formats, MIME types, character encodings, etc., as messages progress through the flow. While MuleSoft 4 does an impressive job of handling much of the data casting for us, our configurations can only benefit from proactive specification of known formats when possible. They help inform how messages are transmitted in and out of operations.
The following two screenshots show commonly-used areas within an operation configuration:
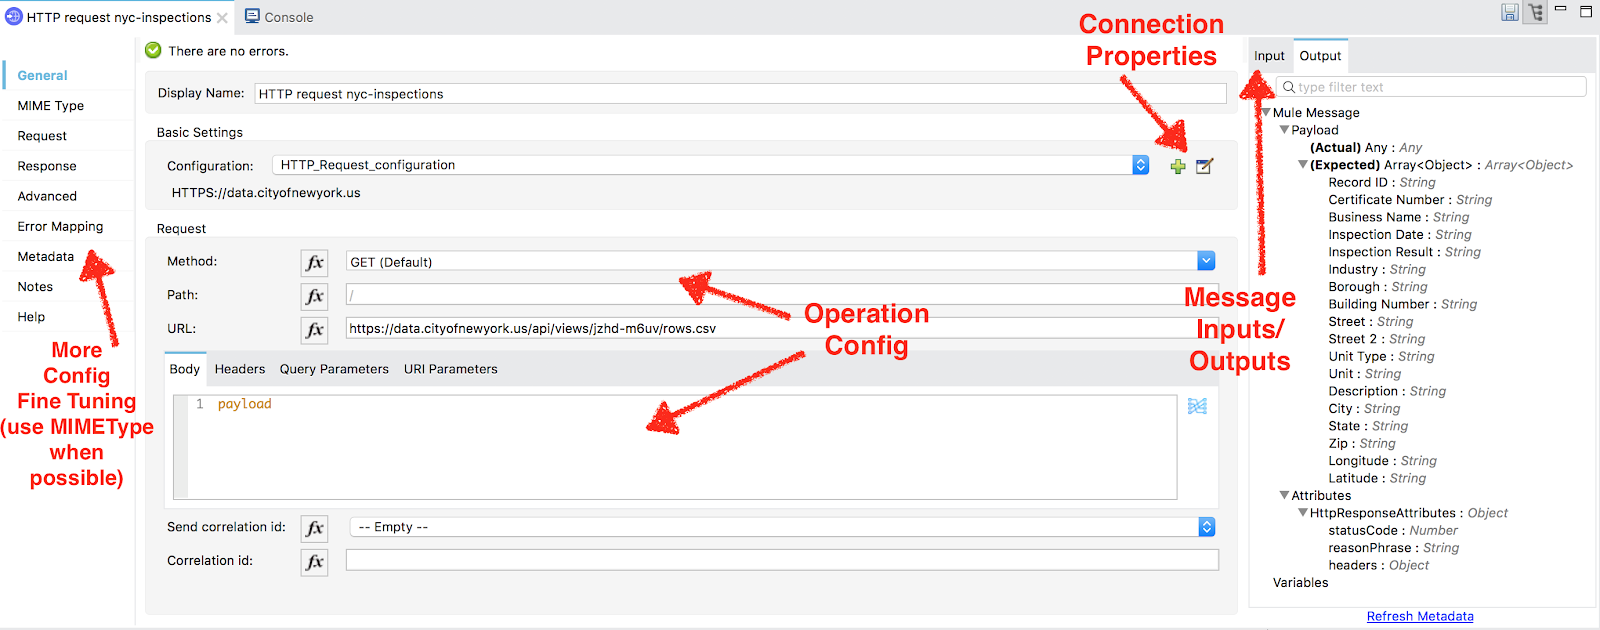
Figure 12: Commonly used areas within an operation configuration
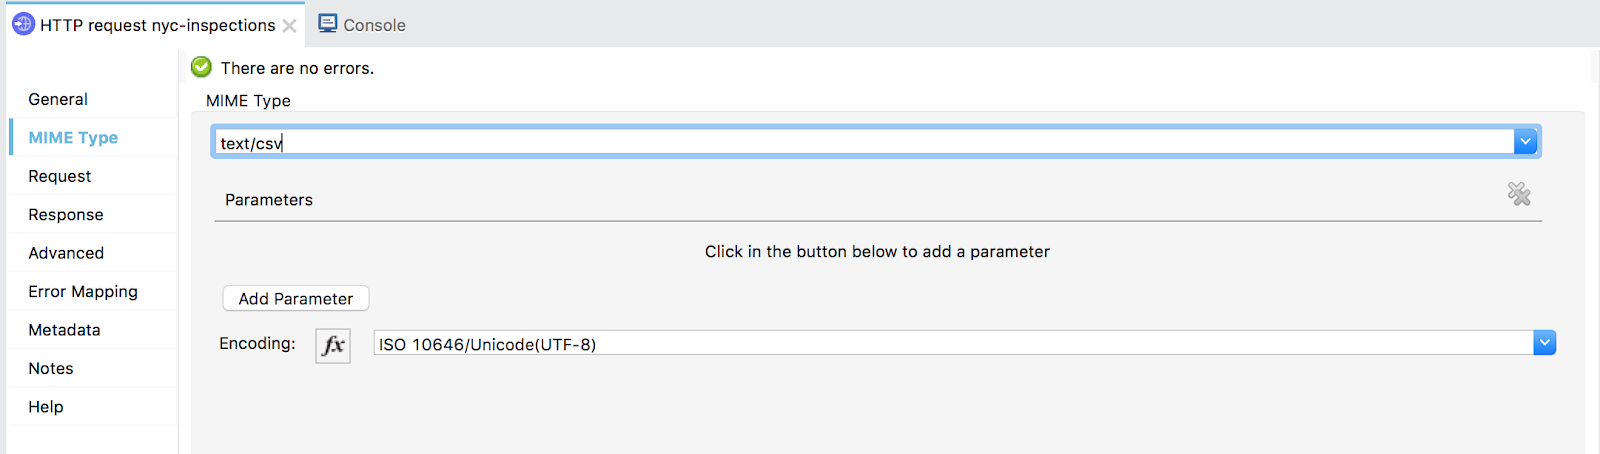
Figure 13: Specifying MIME type
You can view the underlying MuleSoft Flow XML as the operations and configurations change, by double-clicking and opening the file “nyc-inspections.xml” in the text editor (under “nyc-inspections” → “src/main/mule (Flows)”).
Run the Quickstart
Now that everything is configured, let’s run our application while we walk through the steps of each flow. Before the MarkLogic ingest, we’ll write JSON content to the filesystem, which could take a while depending on the speed of your disk. Start this process and let it run, and we’ll focus on learning the flows. To learn more, see the section Batch Step: Write JSON to Filesystem.
To run the application, right click the application name in the Package Explorer on the left-hand side of Anypoint Studio. Then select “Run As” → “Mule Application.”
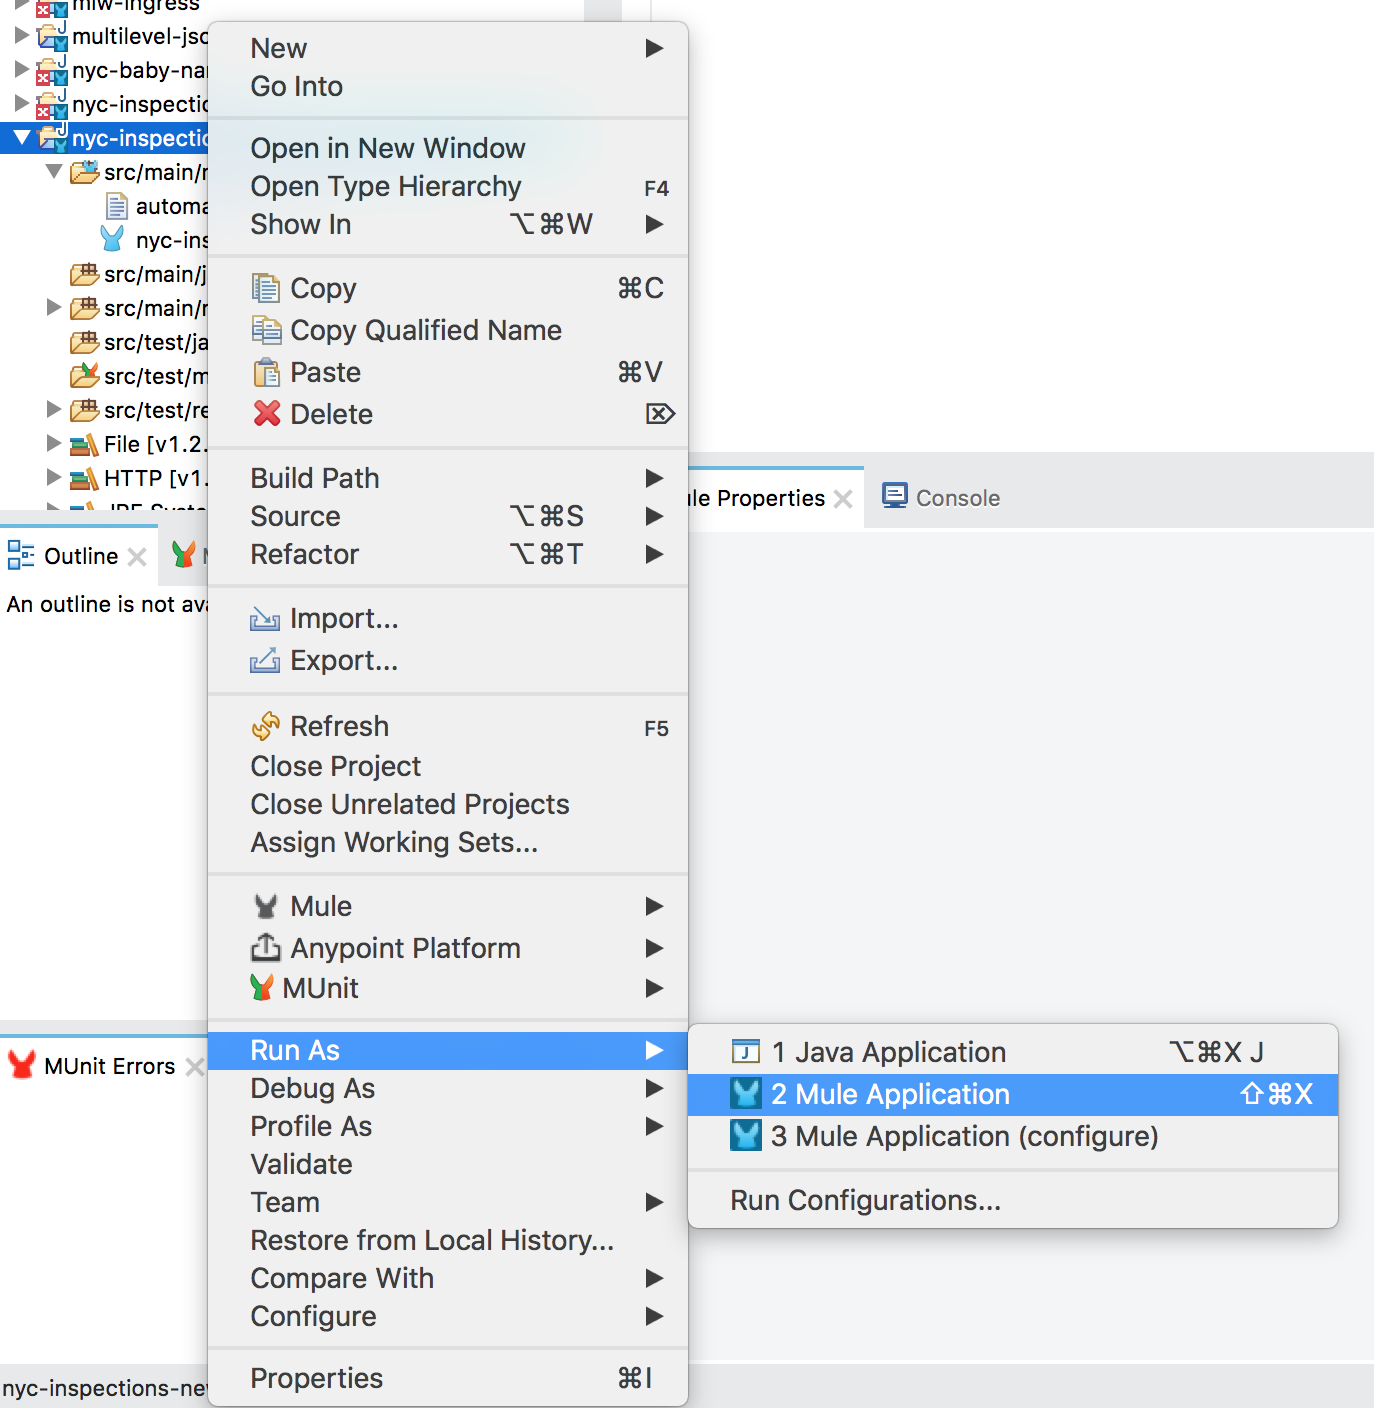
Figure 13: Run the application
When the application begins to build and run, the “Console” tab will appear in Anypoint Studio at the center bottom, adjacent to where operations are configured. The Console will report on the success of the build and when the application is deployed and operational.
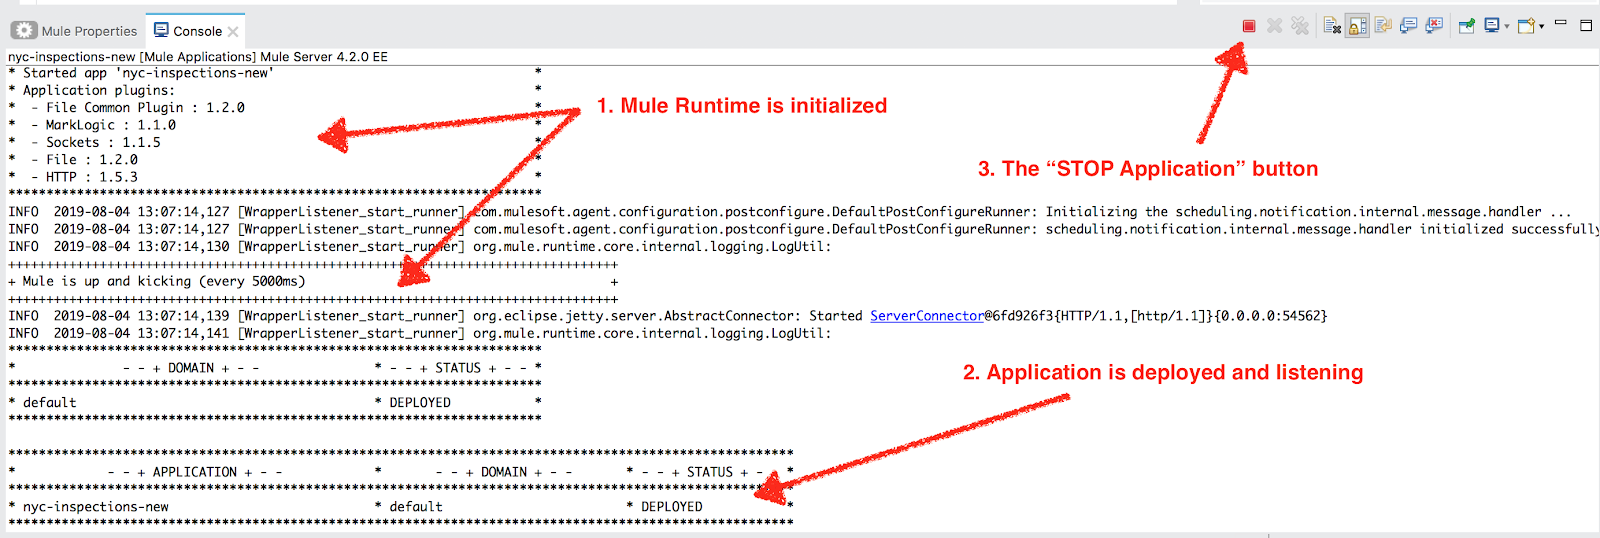
Figure 14: Import console log
As shown above, it’s important to note the location of the “Stop” button, should you ever need to stop the application due to downtime, exceptions, etc.
Now that the application is operational, we’ll begin the ingest workflow. Using a web browser, cURL, or another REST-enabled tool, send an HTTP GET request to our endpoint (no authentication necessary): http://${host}:8081/nyc-inspections. As soon as you send the request and toggle your screen back to Anypoint Studio, you’ll notice the console logging output that shows the status. It primarily reports on batch processing, as well as the MarkLogic progress.
Keep in mind that if the application is set up to write JSON output to the filesystem, the MarkLogic processing may not occur for several minutes. Refer to the file “console-ingest-log.txt” from the quickstart files for a sample of the output.
In this tutorial, we walked through installing the quickstart application, configuring credentials and properties, and running the quickstart, all while discussing what each flow means in the MuleSoft ecosystem. If you’re ready for next steps, go to the next parts in the series:
- Ingest Data into MarkLogic using the Connector for MuleSoft — Discussion of the top flow, or the Ingest Flow, of our application, which hosts a REST endpoint. When called, the flow triggers fetching, transforming, logging, and ingesting the inspections data (as CSV) as JSON into MarkLogic.
- Access Data in MarkLogic using the Connector for MuleSoft — Walk through the bottom flow, or the Egress Flow portion of the series, that hosts a second REST endpoint. The flow triggers querying and retrieving inspection documents (as JSON) back out of MarkLogic. The content is sent back as a JSON-based HTTP response to your web client.