Introduction
In this guided tour of MarkLogic Data Hub Service on AWS (or alternatively, running MarkLogic server and Data Hub Central on your local machine), you’ll complete an example project step-by-step using a sample data set we provide. You’ll learn how to use Data Hub Central (the user interface for the service) to build and deploy a data hub for integrating, curating, and exploring data. At the end of the example project, you’ll come away with a new understanding of how to integrate and manage disparate datasets the agile, MarkLogic way.
Access Data Hub Central
To use Data Hub Central, you have two options. The first option is to create an instance of MarkLogic Data Hub Service on AWS. The second option is to run Hub Central on your local machine. To do this you will need to install MarkLogic and then setup Hub Central.
No matter which approach you choose, you will need to login to Hub Central: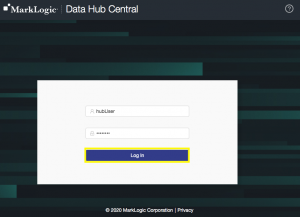
Once you login, you will be presented with the Data Hub Central interface, and the guided tour to help you create your first project will begin!
The Customer
In completing this guided tour we’ll select a business problem that, when solved, will be of high value to our customer. Let’s start by framing that into a user story to describe what we need to build.
Our customer is a fictitious company called Sunrise Insurance. Our business users at Sunrise have struggled to get a complete view of a customer because their customer data is trapped in data silos spread across their enterprise.
Let’s consider a really simple example where a Sunrise customer has both a homeowners policy and an automobile policy. That policy data is stored in different systems, with different schemas. And the data in those different systems may vary. For example, in one system the customer name might be “Joe Smith,” but in another system, that customer may be known as “Joseph Smith”. And in one system, the customer data may have been updated recently; while in another system, the customer data is outdated.
When a Business Analyst tries to perform analytics on customer data, they are forced to try and wrangle and stitch together data in order to create a complete customer profile. This results in a lot of wasted time, introduces data quality issues, and results in key business decisions being driven by incomplete data.
This problem only gets more difficult when you consider the many different types of insurance policies Sunrise offers.
To combat these complexities, Sunrise needs to integrate these data silos in order to get a complete view of their customers and empower their Business Analysts.
The Team
A valuable component of using MarkLogic Data Hub Central is that the technology enables people. Entire teams from across different areas of the business come together to collaborate in the data integration process. In a typical project that might mean a Security Administrator provides team members with appropriate access to Data Hub Central to build the project, a Systems Analyst architects new requirements for the system, a Data Architect defines and refines the data model, a Data Engineer configures the data movement and translation, a MarkLogic Developer creates Data Services to power applications, and a Business Analyst connects to the hub using BI (Business Intelligence) tools.
To keep things simple, we’ll use a single user that has rights to use all of Data Hub Central.
The User Stories
Let’s imagine that we’ve met with Sunrise Insurance to discuss their challenges, and we’ve determined that it would be of significant business value to deliver them an application that a Business Analyst can use to get a 360 degree view of a customer. Based on these conversations, let’s begin by writing up some user stories.
For the purposes of this tutorial, we can describe the following user stories:
- As a Business Analyst, I need to be able to view a combined customer profile so that I can analyze data to make operational decisions.
- As a Business Analyst, I need to be able to analyze customer data by demographics such as age so that I can understand product trends.
- As a Business Analyst, I need to be able to view customer data without seeing sensitive data, so that my organization can adhere to data privacy and compliance regulations.
The Goal
Our objective is to deliver a user experience that provides the Business Analyst access to an application to search and locate a combined customer profile across all policy types. To achieve this goal we will use Data Hub Central to model, ingest, and curate the data so that we can provide the customer the ability to explore that data through a user experience like we see here: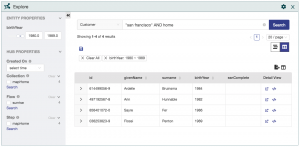
Load
Once logged in, the first step with using MarkLogic is not to model all of your data — you just load your data as is. That’s the agile way.
Let’s start by loading some sample home and auto insurance data.
Once downloaded and unzipped, select the load icon on the right side of the Data Hub Central interface:![]()
Click the Add New button to create a new loading step:
A step is a configuration that processes batches of transactions in order to do something meaningful in your Data Hub, such as loading, mapping, or mastering data. When configuring a step that loads data you get to control certain aspects of the data load. For example, you can choose whether you want the resulting data to be modeled as a JSON or XML document. And you can control how the document is identified in the data hub. That’s what is known as a URI, which is just a string identifier for a document. When loading data from a delimited text format, like a CSV file, each row in the CSV will result in a document in the data hub. The JSON property names (or XML element names) in the document will be equal to the column headers, and the resulting document will be identified with a URI concatenated from the prefix configured in the step and and the information in found in the first column.
Configure the loading step as shown and then click save: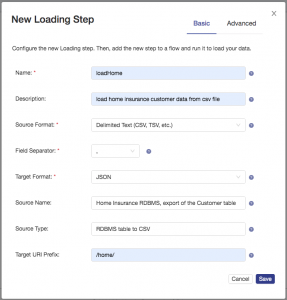
Next, we’ll add this load step to a flow. A flow is a sequence of steps that you group together order to perform the actions configured in the steps. Hover your mouse over the new step and choose add step to a new flow: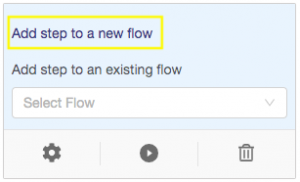
Configure the new flow as shown and click the save button: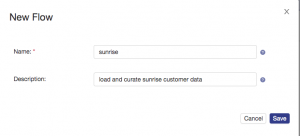
When you save the flow, you will automatically be taken to the Run interface in Data Hub Central where you can view the flow and step(s) and run those steps if desired. Click the play button to run the loadHome step in your sunrise flow: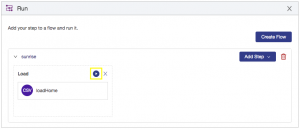
You will be prompted to select the data on your file system you wish to load. Select the /data/home/home.csv file from the free trial sample data that you have downloaded to your local machine. After selecting the file the step will automatically run and when complete you will receive a confirmation message: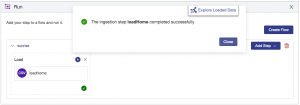
Next, load the auto insurance data. Select the load icon on the right side of the Data Hub Central interface:![]()
Click the Add New button to create a new loading step. Configure the loading step as shown and then click save: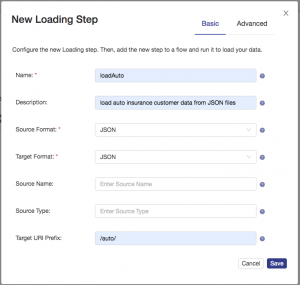
Next, add this load step to your sunrise flow. Hover your mouse over the new step and choose the sunrise flow from the add step to an existing flow dropdown menu: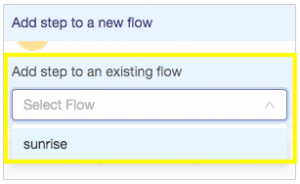
When prompted to confirm, choose yes: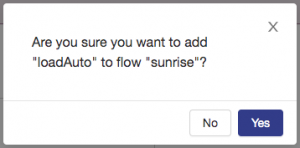
From the Run interface, click the play button to run the loadAuto step in your sunrise flow: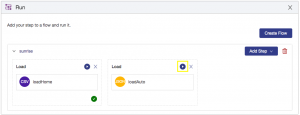
You will be prompted to select the data on your file system you wish to load. Select all of the JSON files (CTRL+A) in the /data/auto/ directory from the free trial materials that you have downloaded to your local machine. After selecting the files the step will automatically run and when complete you should receive a confirmation message as shown: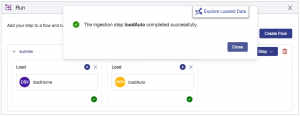
Complete! Now you have loaded your data from the original sources into the staging database. For simplicity, you loaded data from your file system but in a real world project, data can come directly from many different systems.
Now you’re ready to explore your raw data.
Explore Staging Data
The staging database in a Data Hub project is where the raw, uncurated data that you load first lands. As we add model and curate our data, we will move it to a database in our project where it is ready to be consumed by our services. This database is known as the final database.
In Data Hub Central, click the Explore icon:![]()
From the Explore interface select all data, choose the staging database, and then click the explore button: You will see the Explore interface allowing you to search and discover the data that you just loaded:
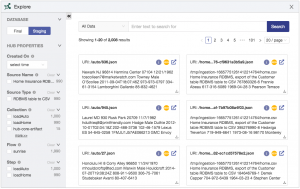
Take a moment to click on a few home and auto documents to view the types of data and the original model that came from the various source systems.
Note that both data sets are about the same general business object — a customer. However, the schema of each source is different. For example, the home and auto data have implemented a different model for data properties such as the customer name and address information.
In our next step, you will work to curate the raw data so that we can meet the requirements of our Business Analyst customer as described in the user stories.
Curate: What is it?
The process of Data Curation is done in order to model the data and get it into a shape that can power the data services you are going to deliver. You have your raw data in the hub, but you need it curated in order to get value out of it.
For this use case, you know that the downstream data service needs access to customer name, address, policy type, birth year, and the last four digits of the social security number / national ID. You will also need to match and merge customer documents in order to deliver a unified, complete view of the customer.
At a high-level, here is what you will do to curate the data:
- Create an initial data model of your customer entity.
- Create an index in order to query based on customer age.
- Restrict access to the social security numbers to meet security requirements.
- Map source data to the customer entity model and run the transforms.
- Use the Explore interface in Data Hub Central to discover and query the curated data.
Let’s get started!
Curate: Create an Entity
To keep things simple, this guide only focuses on a single entity: a customer. To start modeling that entity in Data Hub Central, select the Model icon from the navigation menu:
![]() Click the add button to create a new entity:
Click the add button to create a new entity: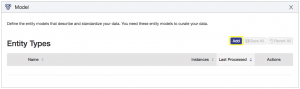
Name the entity Customer, give it a description and then click Add: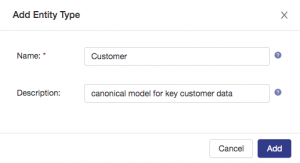
Click the Add Property button to model a property in your entity: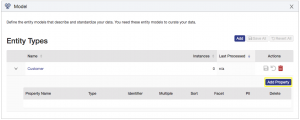
Configure a property as shown below and then click the add button. You’re modeling this property as an identifier because it was a primary key in the source system. By configuring it as an identifier in our entity model there will only be one value allowed for this property in each document, an index will be created for this property, and it will be available for users to query and filter data in the Explore interface of Data Hub Central. Check out these docs if you are interested in learning more about these property configurations and entity modeling using Hub Central.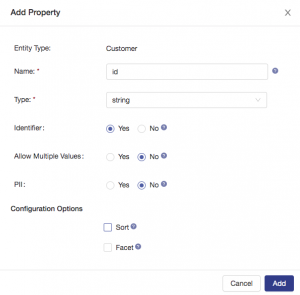
Note that entity models are persisted to the Data Hub and depending on configuration settings can result in things such as new indexes or protected paths being created for your Data Hub. The entity modeling interface will enable you to make a multitude of changes and then decide when you want to commit (save) those changes. To commit your changes, click the disk icon for your entity type as shown: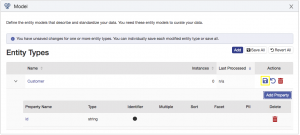
Next, add another property to the entity. Remember that what you are doing is defining the canonical representation of key properties that your data services will need to consume, and that you will eventually map each different shape of customer data to this model. Click the Add Property button and configure as shown, noting that you are choosing to enable sorting on this property, which will allow users to sort results based on this data when using the Explore interface in Data Hub Central: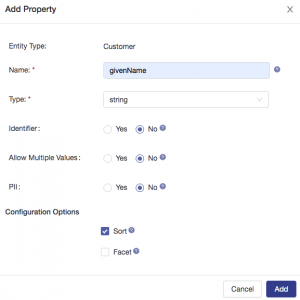
Next, add a property property to represent the surname (last name) and configure it as shown: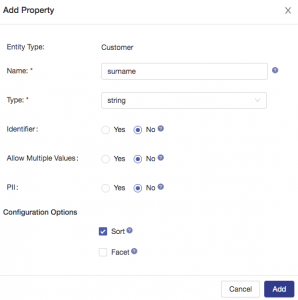
Next, add a property to represent the year that the customer was born. This will enable the Business Analysts to analyze customer data based on age. For example, they could answer complex questions like “show me all the male customers with auto insurance policies in Los Angeles who are between 20 and 25 years of age“. To enable this type of query based on age range, we will configure both a sort and a facet on this property: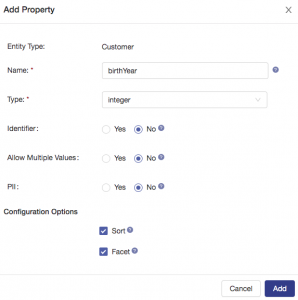
Next, add a property for the customer social security number. Very few users should have access to this personally identifiable information (PII) and MarkLogic makes it easy to protect this data. To do this, you will restrict visibility of the complete SSNs to only those users with a privileged role. Configure this property as shown: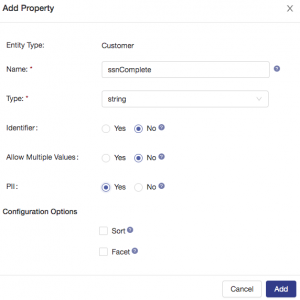
While access to a customer’s complete social security number is considered privileged, there might be a valid business reason for other users to access a portion of that data. For example, imagine a scenario where a customer calls support and the call center operator needs to validate the customer identity by confirming the last 4 digits of the customer’s SSN. To enable this, you can model a property that contains only the last 4 digits of the social security number: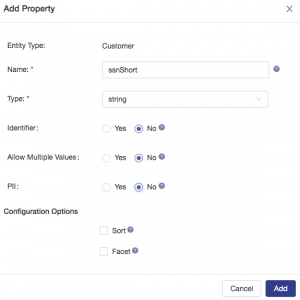
Next, model the customer address data. You’re going to take advantage of the hierarchical nature of JSON and model the address as a structured property. Add a new property and give it a name of billingAddress. For the type select Structured–>New Property Type as shown: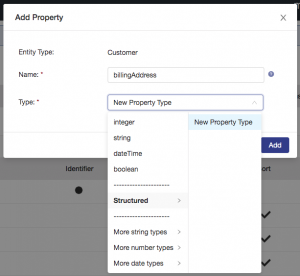
The structured type that you create could be used in multiple places within this entity. For example, you are going to model an address, and a customer could have both a billing address and that might not be the same as the insured property address. Name the new structured property type address and then click the add button as shown:
Add the last pieces of configuration to the billingAddress property and then click the add button as shown: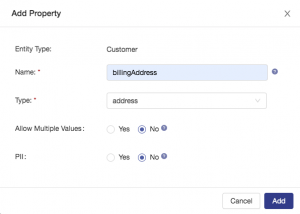
Next, configure the structured property that you created. On the Model screen, for your Customer entity, click the + icon on the row for the billingAddress property as shown: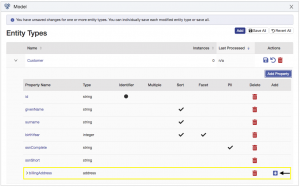
Configure a property called street as shown:
Configure a property called city as shown: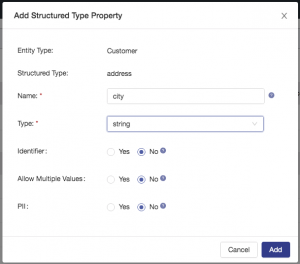
Configure a property called state as shown: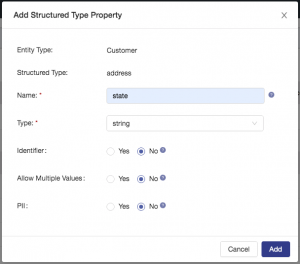
Configure a property called zip as shown: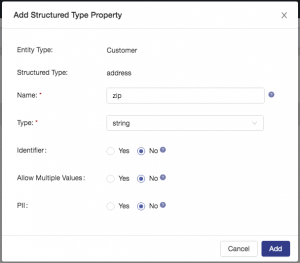
Next, configure a property to represent the various policies a customer has with Sunrise Insurance. A customer can have many different policies, so you need to account for this. And, you need to model key policy data across all these different types of policies. This data includes the policy type, policy number, and in the case of home insurance the zip code of the insured asset. Create a new property called policies and configure it as shown: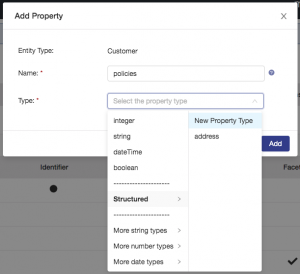
Name the new structured property type policy and then click the add button: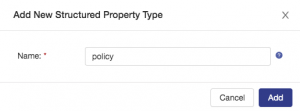
Add the last pieces of configuration to the policies property. Note that you are choosing to allow multiple values, then click the add button: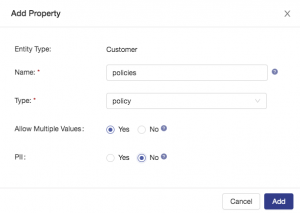
Next, configure the structured property that you just created. On the Model screen, for your Customer entity, click the + icon on the row for the policies property.
Configure a property called policyType: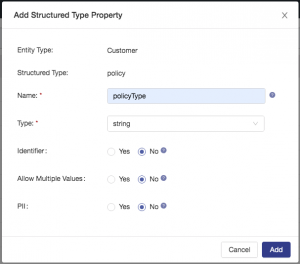
Configure a property called policyNumber: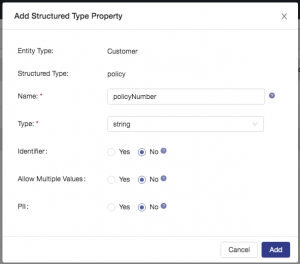
Configure a property called policyZip: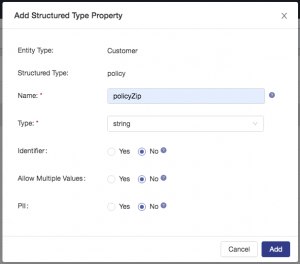
Congratulations! You have now done enough modeling to deliver on the project requirements. This model will continue to evolve over time as new requirements and data sources are introduced. But for now, your final Customer entity model should appear as shown: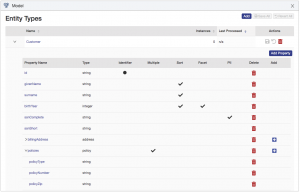
Curate: Map Home Insurance Data
Now that you’ve created and configured the Customer entity, the next step is to map each data source to the entity definition. To achieve this objective you will add mapping steps to your Sunrise flow.
In Data Hub Central, select the Curate icon from the navigation menu:![]()
First, you need to process all of the home insurance data that you previously loaded and map the key data properties to the Customer entity model. To start, you need to create and configure a mapping step. From the Curate tile, expand the Customer entity, select Map (which is the default), and then click Add New: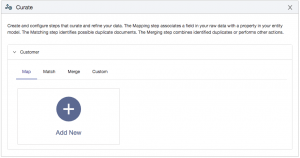
When configuring steps, there is an important concept to understand: steps are given a name, and the documents that the step processes will be placed into a collection with the same exact name. So, think back to when you loaded the home insurance data. The name of the step was loadHome. This resulted in all of the home insurance data that is currently in the staging database to be placed into a collection called loadHome.
In the mapping step here you will now process all of the home insurance documents that are currently in the staging database.
Start by defining the new mapping step as shown and then click the save button:
You’ll see that in Hub Central a sample document is automatically selected to help you configure and test your mapping. If you wish you could choose another document for configuration and testing using the question mark icon as highlighted below. This is useful if you want to test a mapping function against some specific data requirements. For now you will just use the default sample document.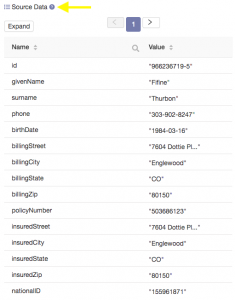
What you need to do next is map (and transform where needed) properties from the Source Data to your customer entity. Let’s start with a simple property to property mapping. In the Hub Central mapping interface, find the row that contains the id property in your entity and select the picker icon (see highlight) as shown:![]()
From the dropdown list of properties (which is populated based on the source document), choose the property from the source that you wish to map to the entity. In this first example, the property in the source and the property in the entity actually have the same name, id. Choose the id property from the dropdown list as shown: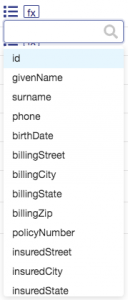
Your mapping configuration should now look like this: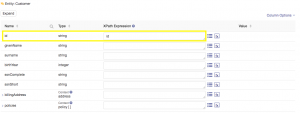
While this first example is simple, others will be more complex and apply functions to transform data as it is being mapped. And, testing is always a good idea. In this example, test to ensure the id property mapping gives the desired result. In the upper right of the mapHome step configuration interface, click the test button:![]()
You should see that the id value from the source document gets mapped to the id property defined in our Customer entity: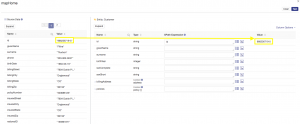
Next, configure and test a mapping that will use a function to apply a transform to the data as it is being mapped to the entity model. In the staging data there is a property called birthDate and it contains a value in the format of MM/DD/YY. Your objective is to store a four digit year value in the property defined in your entity model called birthYear. To achieve this goal you will use mapping functions. In the mapping interface, find the birthYear property and select the function icon (see highlight):![]()
Scroll through the list of functions (or begin typing the function name to filter) and select the function year-from-date as shown: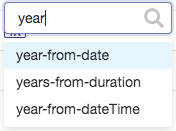
This function accepts data in an ISO standard date format, which is YYYY-MM-DD. The date information in your source is currently in this format, so this function will simply parse out the year component of that date. Pass in the birthDate source data property to the function as shown: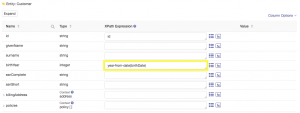
Test your mapping to validate the results. You should see the that the four digit year value is parsed out of the birthDate property and stored in the birthYear property: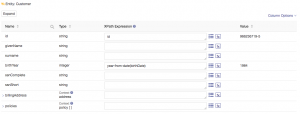
Now, do one more example using a mapping function. In this example your objective is to store just the last four digits of the customer’s social security number into the ssnShort property. To achieve this goal, use a function called substring. Configure and test your mapping, ensuring that you get the expected results: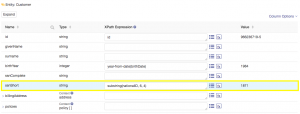
Next, configure the mapping for the billingAddress property defined in your entity model. This property is an example of a structured type. It has a hierarchy with a parent (billingAddress) and child (street, city, etc.) properties. To configure a property like this you should reference the parent data in the source data using XPath. Because our home insurance data that we have in staging is flat, meaning there is no hierarchy, we simply need to add slash (/) for the parent property. This will then enable you to access all of the data properties you need to define in the child properties. The final configuration for the billing address should be as shown (make sure to test!):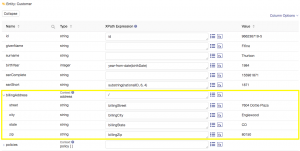
Now all that remains to be mapped for the home insurance data is the policy data (a structured type, which includes a hard coded value for the policyType property) and a few more property to property mappings. Configure and test your final mapping, and the results then appear as shown: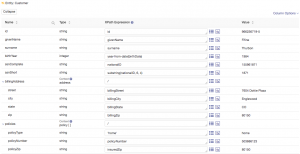
When you are satisfied with your mapHome configuration, close out of the mapping interface in Hub Central.
Now that you’ve configured the mapping step for the home insurance data, the next steps are to add the mapping step to a flow, run the step, and view the results. From the Curate tile in Hub Central, hover your mouse over the mapHome step that you have created and configured, select add step to an existing flow, and choose the sunrise flow:
When prompted to confirm, click OK.
From the Hub Central Run tile, click the play button to run the mapHome step: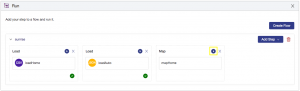
When the step has completed running you will see the following confirmation. Click on Explore Curated Data to view the results in Data Hub Explorer: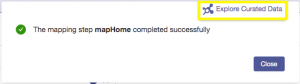
With Explorer you can search the data, constrain based on birthYear, add or remove columns from the view, and export the data as desired. Also note that the ssnComplete property is blank. This is because Data Hub Explorer is enforcing the security configuration, and the user account that you created, and which you have logged into Hub Central with, does not have privileges to read this data property. Note that you could enable a user to read this data by granting the user a role called pii-reader: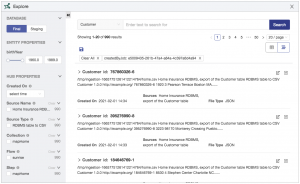
Curate: Map Auto Insurance Data
Now that you’ve mapped the home insurance data to your entity model, you need to repeat this process and apply it to the auto insurance data. In Data Hub Central, select the Curate icon from the navigation menu:![]()
From the Curate tile, expand the Customer entity, select Map (which is the default), and then click Add New: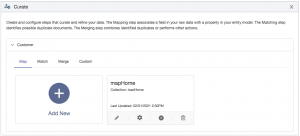
Define the new mapping step as shown and then click the save button: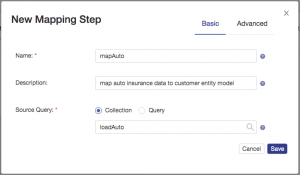
Just like in the prior mapping, the default source document will work just fine for your purposes. And like before, you will configure some simple property to property mappings as well as use some functions to transform data as it is mapped. But, there are a few differences worth noting:
- In the auto insurance source data the property containing the customer birth date information is modeled differently than in the home insurance data. In the home insurance data it was in a fixed length ISO standard format (
YYYY-MM-DD). But, in the auto insurance data it is in a format ofMM/DD/YYYY. Because the month and day could be either one or two digits depending on the date, the length can vary. Therefore we will use a new mapping function to tokenize the data and select the year token. - The social security number data is also modeled differently in the auto insurance data, containing dashes (-) as formatting characters. Therefore your use of the substring function will be slightly different to ensure you select the appropriate characters in the string.
- Finally, note that home insurance policies have a unique zip code related to the insured property. Auto insurance does not, so you will simply map the zip of the billing address for this property.
Configure and test the mapAuto step: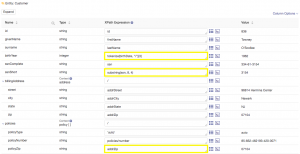
When you are satisfied with your mapAuto configuration, close out of the mapping interface in Hub Central.
Now that you’ve configured the mapping step for the auto insurance data, the next steps are to add the mapping step to a flow, run the step, and view the results. From the Curate tile in Hub Central, hover your mouse over the mapAuto step that you have created and configured, select add step to an existing flow, and choose the sunrise flow:
When prompted to confirm, click OK.
From the Hub Central navigation menu select the run icon:![]()
Run the mapAuto step: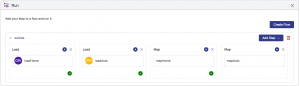
When the step has completed running you will see the following confirmation. Click on Explore Curated Data to view the results in Data Hub Explorer: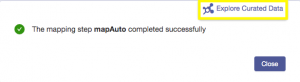
Accessing Data
MarkLogic provides many interfaces to enable developers to create and deliver the data services that consume curated data in your Data Hub in order to power applications. Examples of these interfaces include programming languages like Java, Node.js, REST, JavaScript, XQuery and SQL as well as connectors such as Mulesoft, NiFi, Tableau, Spark, and Amazon Glue.

A common (but not the required or only) technology stack that businesses use for MarkLogic projects is a data tier consisting of MarkLogic Data Services written in JavaScript. This approach enables an IT organization to have a few trained MarkLogic experts who build the hub, create the flows, and program the data services that access data from the hub. Then, anyone in the organization — regardless of their MarkLogic expertise — can get access to the data hub using whatever language they prefer.
As you progress down the MarkLogic Developer learning track, you will learn more about how to use the JavaScript APIs to program, deploy and test data services.
For the purposes of this guided tour, you don’t need to do any programming at all. This is because Data Hub Central allows you to provide users access to the Explore interface, which will enable Business Analysts to discover and analyze the curated customer data. Check out this short video to see how this enables you to deliver on all of the requirements defined in the user stories:
Review
Congratulations on completing the guided tour!
Let’s review what you accomplished:
- You learned a new, agile way to integrate data using a data hub
- You loaded data as is and explored that data
- You created a customer entity model, and mapped source data to that model
- You provided access to explore that data easily and securely
You accomplished quite a bit in a short period of time and we would love to show you a lot more!
What’s Next?
There is still a lot to learn. The good news is we’ve got more (FREE!) resources to help you go deeper with more complex projects to solve much more complex data challenges.
Start by checking out our role-based learning tracks. Or, explore the product, browse blogs, look at tools, watch or read tutorials and more by getting involved with our MarkLogic Community. And of course don’t forget to keep the general product documentation and Data Hub documentation close by as you continue to work with MarkLogic.